How to manage your Cloud Standard Backup
This guide provides information about:
- Backup creation
- Backup restore
- Template creation
Not all products includes Standard backup. If you don´t have it you can add it like a Addon. This backup it´s a snapshot of your server, this fact means that the copy it´s like a picture of your server. If you have Standard Backup every 7-10 days the system creates automatically a backup, this backup will be overwritten weekly. With Standard Backup you have the option to make manually a backup, you can convert to a template and restore it in a new server.
Backup creation
All backups that you wish to create will be issued from your private client area in gigas.com and inside of the machine options that you wish to backup. To make a new backup please follow the next steps:
- Access the client area as usual and go to the desire VPS.
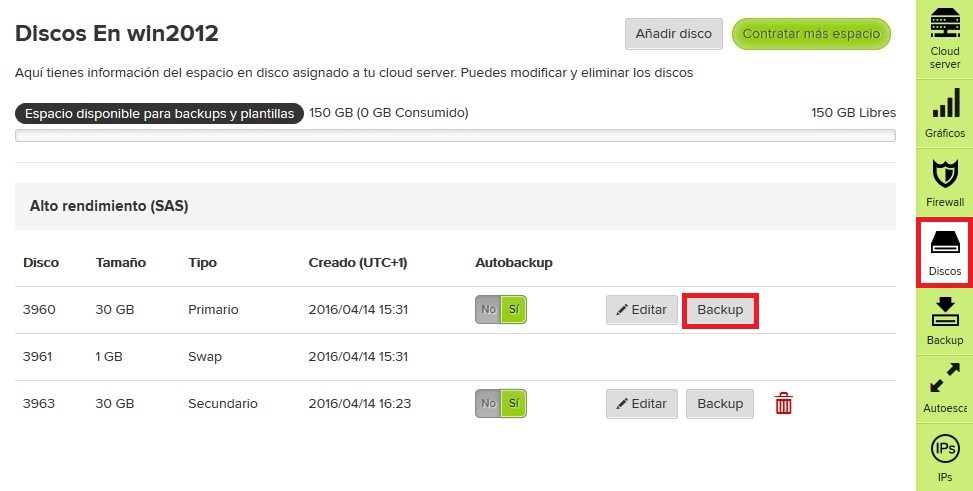
- Once there, press “Disks” tab, from there you can manage both the disk and the backups.
- To create a new backup is as simple as:
- Click on the “Backup” button.
- Click on “Accept” on the pop-up message.
The actions are executed and the backup process will begin. The process sends the order to a cloud server for these backups, these orders are queued as they go in and are executed. Once de backup it´s created you can see it on the "Backups" tab.
Restoring a backup
You can restore a backup any moment from your private client area following the next steps:
- Go to “Backups” tab.
- Click on “Restore.
- Click on “Accept” to accept the restoration.
At this point, the system will start restoring the backup. Remember that, once started, the process cannot be stopped and/or undone unless you have other backups to restore from.
Creating a template
You can create a template from any of the already finished backups. This will allow you to install this template directly in any of your VPS’s, therefore you can either restore the backup in the original machine or use the template for a new one. To create a template, follow the next steps:
- Access the Backup TAB of the desired VPS.
- Click on “Convert to template” on the desired backup.
- Give the template a name.
Installing a template
You can use your new template for any of your Cloud VPS. If the machine is a new one or you are either creating a new VPS inside your DataCenter plan you can choose your template by clicking on “Your templates” under the OS Template selection and then selecting the created template. If you prefer to apply the template to an existing VPS, select the VPS in your Services area and click on “Details”, afterwards, select the “Re-install OS” option, and finally select your template as you did in the last step (fig. 1)
Remember: you will lose all information stored originally inside your VPS; the information will be replaced with the one in the template.


