The first steps of your advanced backup
The following handbook describes, in a simple way, the first steps to take when configuring your advanced backup. Have the configuration information that was sent to you via email at hand, as it will be needed to install the new service.
If you do not have this information, please contact our support service department.
Contenido
First Steps
There are two ways to access the advanced backup control panel: 1) On Gigas' control panel (look for the "Advanced Backup" service)

On the control panel of your advanced backup there is a link from which you can connect to the web configuration
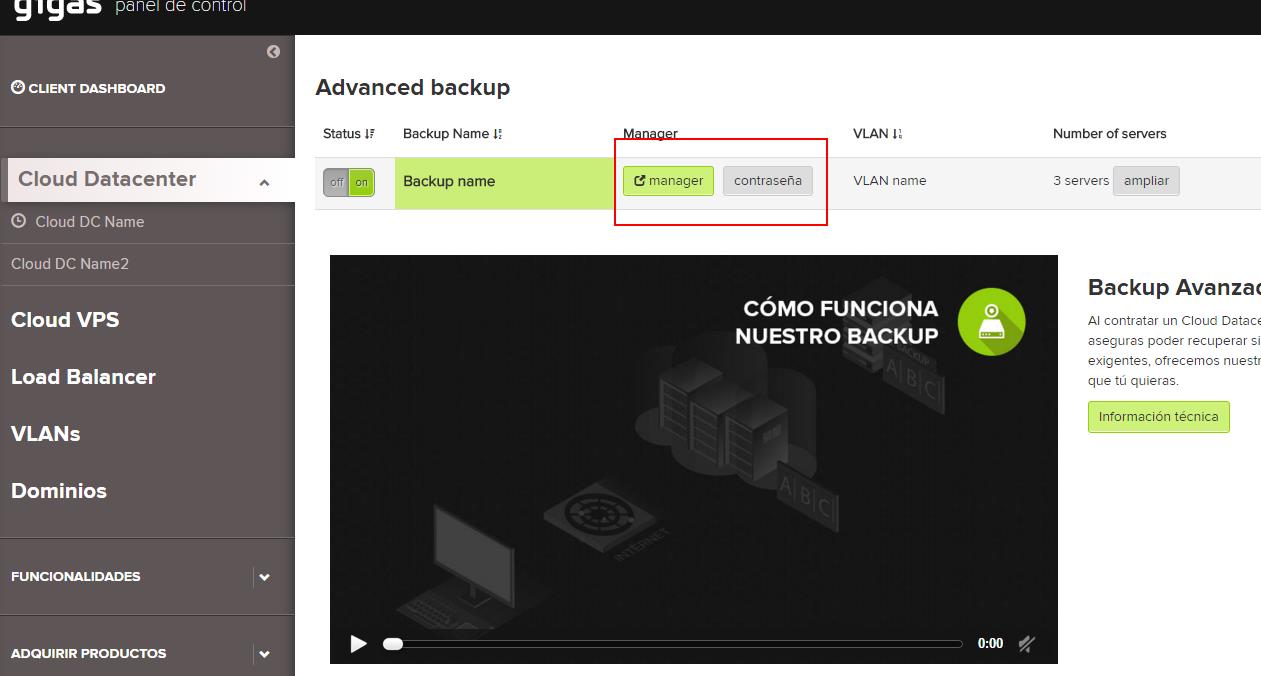
(On the new page click on the "Access the Manager" button; remember that the password for the web interface of the advanced backup can be found on the same page where the "Accessing the Manager" button is) 2) From your web browser use the following address: http://ip_proporcionado_mail:6080
As soon as you access it you´ll must login with user "admin" and password that you get in your panel Gigas, you will see a button in the central section that says "Add a cloud server"; this button was added in the latest version of the advanced backup panel and allows you to install the backup agent remotely for the servers (Windows 2008) you want to back up. If you want to install the agent on other servers with another version of the operating system, please read the following sections of this handbook.
If you need additional information about configuring your backup service, complete handbooks can be found on the following link: http://wiki.r1soft.com/display/ServerBackup/Documentation
First Configurations
Start in the "Settings" section (in the menu on the left of the panel); in this section there are many configurations, but we will only discuss the essential ones here.
SMTP Setup
Manager Options -> SMTP Setup
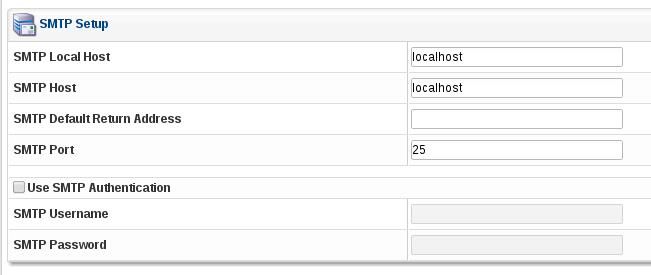
This section is for configuring the capacity of the application to send email. The configuration below is generic for each advanced backup server and clients are free to use their own.
SMTP Local Host: localhost
SMTP Host: localhost
SMTP Default Return Address: Indicates a valid return address for emails
SMTP Port: 25
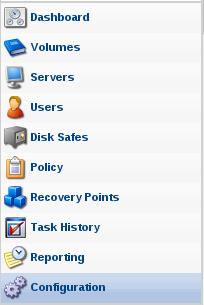
(Click on "Configuration" to access the section with all the configurations)
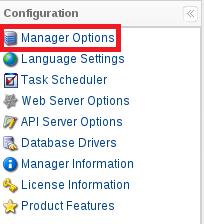
(Click on "Manager Options" to access the part where the general configuration of the backup server is found)
Look for this box and fill it out with the information outlined in the "Initial Settings" section)
License Information
In this section you can carry out two types of actions; introduce our new license or upgrade your license.
Enter your new license
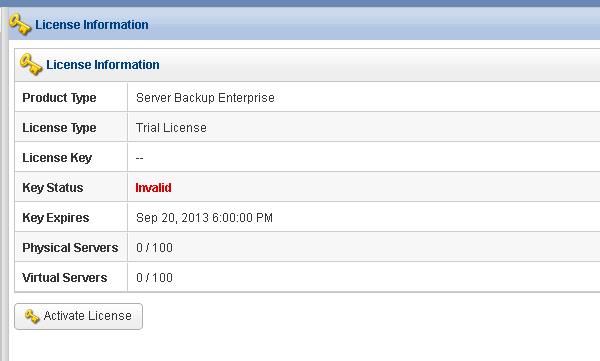
When you first access the advanced backup panel a key is required. This key allows you to add new servers to the advanced backup. When you are in the "License Information" section you will see this or something like this:
- As you can see, the panel has no associated "License Key". To find the key to your panel you must go to gigas.com -> "Help and Support" section -> log in -> enter "View tickets" from the right menu -> click on "View resolved tickets" -> in this section you will find a ticket that says "Your Advanced Backup license", in this ticket there is an alphanumeric code that you must save and use in the "License Information" section of the advanced backup panel.
Go back to the "Advanced Backup" control panel -> "Configuration" -> "License Information", click on the "Activate License" button; a wizard will guide you to enter the license; click on "Next", select "Online Activation" and click on "Next". There are two fields in the new section; in the "Product Key" field enter the ticket license, and in the second field leave the indicated default IP address and click "OK".
If everything has been done correctly in the "License Information" section, the number of servers which you can back up ("cloud servers") is shown.
Updating a license
There is an option for increasing the number of servers that can be backed up; when you have contracted the update, go to the advanced backup panel and the "Configuration" section -> "License Information"; once inside click on "Re-Activate-License", click on "Next" until the "OK" button appears and click on it, the license should update and show the new limit of servers that can be configured.
Installing the backup agent
To carry out a backup of the cloud servers a small application must be installed that will act as an intermediary between the server you want to back up and the advanced backup console itself. Below is a simple description of the basic method for installation:
LINUX
Installing agent using repository (Linux)
(NB: When carrying out the commands, omit the > symbol)
Add the R1Soft repository to your system; to do so, select the method based on your Linux distribution:
For Debian/Ubuntu/Derivatives distributions, run:
> echo deb http://repo.r1soft.com/apt stable main >> /etc/apt/sources.list
> wget http://repo.r1soft.com/r1soft.asc
> apt-key add r1soft.asc
> apt-get update
> apt-get install linux-headers-`uname -r`
> apt-get install serverbackup-enterprise-agent
For CentOS/Fedora/Derivatives distributions, run:
> yum install kernel-devel kernel-headers
> touch /etc/yum.repos.d/ r1soft.repo
Edit the “/etc/yum.repos.d/ r1soft.repo” file and type in:
[r1soft]
name=R1Soft Repository Server
baseurl=http://repo.r1soft.com/yum/stable/$basearch/
enabled=1
gpgcheck=0
After copying the above text, save the file and continue carrying out the following steps:
> yum install serverbackup-enterprise-agent
> /etc/init.d/cdp-agent stop
Before completing the installation, check that the following packages have been installed in the system and in turn if the installed version matches the kernel of your system (to see your kernel version run #uname -r):
Debian/Ubuntu/Derivatives distributions:
- Install kernel-headers:
> apt-get install linux-headers-`uname -r`
CentOS/Fedora/Derivatives distributions:
- kernel-headers: To check, run:
> rpm -qa | grep headers
- kernel-devel:
To check, run:
> rpm -qa | grep devel
If you don’t have either of the two packages installed, run:
- Install kernel-headers:
> yum install kernel-headers
- Install kernel-devel:
> yum install kernel-devel
If you need help at this stage, contact our technical support service team.
Installing an agent using a package
- Download the agent installer (select yours based on the operating system you have) to the cloud server you want to back up:
- Uncompress the file by unzipping it (we recommend unzipping it into an empty directory; if you don’t have this utility you can install it by running #yum install unzip).
> Unzip package_name - Before installing the agent you must have the headers that correspond to your kernel that is installed on the server:
For CentOS/Fedora/Derivatives distributions, run:
> yum install kernel-devel kernel-headers
For Debian/Ubuntu/Derivatives distributions, run:
> apt-get install linux-headers-`uname -r` - Now you can proceed to installing the agent in the directory where you have unzipped the files for the installation. You must differentiate between two types:
Debian/Ubuntu/Derivatives distributions: To proceed with the installation of one of these distributions you must use the files in the “deb-linux64” or “deb-linux32” directory (based on the package you have chosen); once inside the directory, run:
> dpkg -i *.deb
This will install the agent. CentOS/Fedora/Derivatives distributions: To proceed with the installation of one of these distributions you must use the files in the "rpm-linux64" or "rpm-linux32" directory (based on the package you have chosen); once inside the directory, run:
> rpm -i *.rpm
This will install the agent.
For all Linux installations Once the agent has been installed either via package or repository these last steps must be followed:
- To complete the installation proceed to configure the following:
- Go to the /usr/sbin/r1soft/conf/server.allow directory.
- Open an empty file whose name must be the IP address that the advanced backup server will use to access the agent machine.
- Edit the file and paste in the public key of the advanced backup server. (To get the public key go to the backup’s control panel and in the left menu click on "Configuration", as soon as you access it you will see a text box called "Public Key" and this is what you must copy).
- Save the changes and carry out the following in the agent server:
> R1Soft-setup --get-module
(If the command has been carried out successfully it will tell you to restart the backup agent. If not it may be that the machine does not have access to the internet or the "kernel" version does not match the "headers". If you cannot solve the matter, contact our technical support team)
- Last step:
> /etc/init.d/cdp-agent restart
WINDOWS
(NB: This process can result in a restart of the server where it was installed; if the Windows firewall was activated, open an inbound rule for the advanced backup server via port 1167)
Note that, for versions of Windows 2008, it is possible to run a self-installation via the web console of the advanced backup.This method is explained in the section on "Configuring the first backup task"
- Download the appropriate package for the architecture of the operating system you are using:
- Right-click on the downloaded file and select “Extract All…”
- When the contents of the downloaded file have been extracted, go to the folder you created. Open the folder and double click on the executable "ServerBackup-Enterprise-WinXX-X.X.X"
- When you load the installation a wizard will appear indicating where the agent will be installed, click on "Install":
A new screen will display the possible components to install, click on "Install Backup Agent".
A new installation process will begin:
The first question will be regarding the installation language, select the one you want and click on "Next".- The second step will ask you to accept the terms of use; accept and continue.
- This new step is crucial and you must verify that the two tests shown by the default installation say "Pass". If not, contact the technical support team.
Next step.
The next step shows a summary of the directory where you will install the agent; click on "Next". - For the last step before the installation, click on "Next" (remember that after the installation you will have to restart the machine).
- When you have restarted the machine begin to configure the agent. To do this enter the "c: \ Program Files \ Idera Server Backup \ conf \ server.allow \" directory.
Create a text file in this directory whose name must be the IP address of the advanced backup server (to create the text file, right-click on the inside of the folder -> New -> Text Document).
Edit the text file and copy into it the public key of the advanced backup server. Save the file. (To get the public key go to the backup’s control panel and in the left menu click on "Configuration", as soon as you access it you will see a text box called "Public Key" and this is what you must copy). - To finish, simply enable the necessary ports so that there is communication between the server and the agent. To do this, follow these steps:
- Click on “Start”, when the menu appears, go to "Control Panel".
- Click on "Windows Firewall" to open a new window with the firewall settings; to enable ports you must go to "Advanced settings".
- Once inside you will have to create a rule for outside requests (incoming). To do this, click on “Inbound Rules” and immediately click on “New Rule ...” from the menu on the right; a new wizard will guide you to create the new rule. On the first screen select “Port”, click “Next”, then select “Specific local ports” value “1167” (without quotation marks) and click on “Next”; on the next screen select “Allow the connection “, click on “Next”, and in the “Name” window write a brief description of the use that you will give the port (backup), and lastly, click on “Finish”.
Thanks to these steps the agent is now ready to be accessed from the advanced backup server.
NB: If any of the servers where you want to install the backup agent does not have access to the internet, please open the link (in the initial email) that contains the full version of the handbook.
Configuring the first backup task
Below we explain two methods for setting up the first backup task:
Method 1
- Access the advanced backup web control panel
- In the left menu, click on “Dashboard”. Click on “Add a Server” in the top left corner.
- A wizard will guide you step by step to create a backup task. On the first screen of this wizard you can self-install the backup agent, but this process is only compatible with Windows 2008 (NB: The process of self-deployment requires the user to have administrator permissions, this process can restart your server), if the system does not match the supported versions you will have to unselect the “Deploy agent software now” tick.
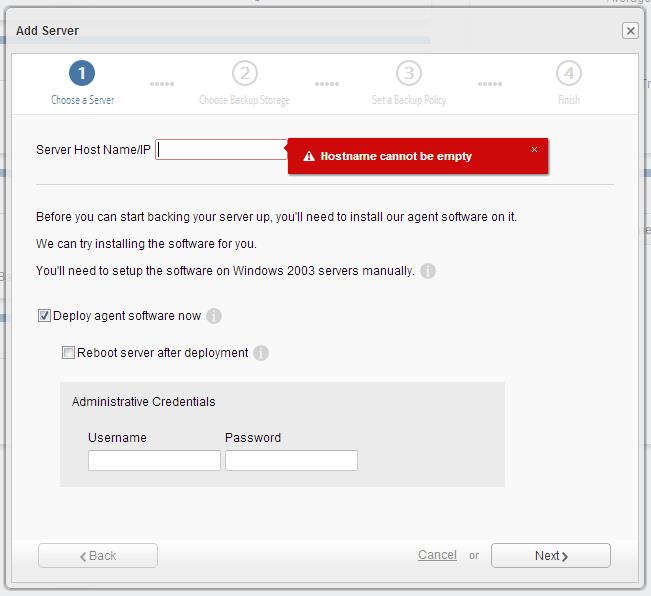
- Server Host Name/IP: Shows the server’s IP address.
- Deploy agent software now: If your system is Windows version 2008 you can use this option to self-install the backup agent.
- Reboot server after deployment: (Only possible if “Deploy agent software now” is active) Following the self-installation process of the agent the server will restart to complete the process.
- Administrative Credentials: (Only possible if “Deploy agent software now” is active). In this section the credentials of a user with “administrator” role will be requested to install the backup agent automatically.
Click on “Next” and if everything has been done correctly, you will continue to the next step of the configuration.
- This new screen allows you to choose where you want to store the backup.
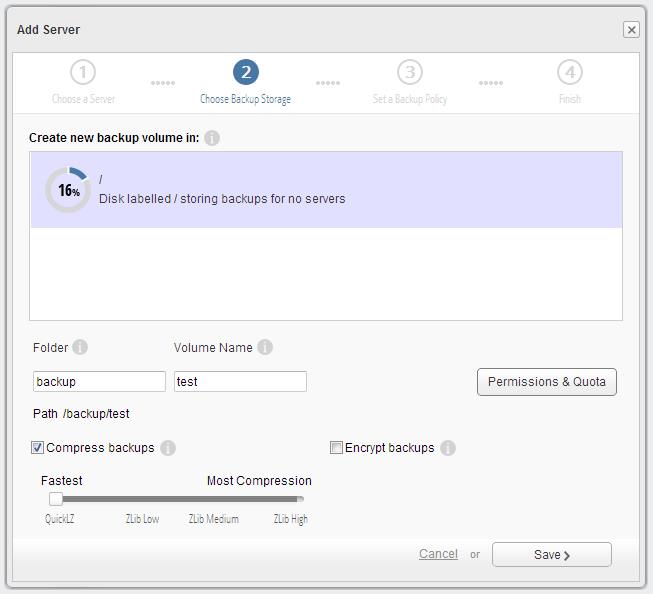
- Create new backup volume in: In this section, select the drive where you want to store the files for the backup; Gigas’ default settings means you must choose “/backup” as the backup drive. If this drive does not appear you must fill in the “Folder” field with word backup.
Folder: This field indicates the directory where backup files are stored. - Volume Name: Volume name that will manage the permissions for your new backup (users, management of maximum space for the backup being created).
- Permissions & Quota: This button opens a section where you can define the limits on the use of the volume of the new backup.
- Compress backups: If you tick this option, a menu bar will appear where you can choose the type of compression you want to apply to the backup; the higher the compression the less space it will take up, but it will take longer to complete the task.
- Encrypt backups: If you tick this option, the backup files will be encrypted with a password that you must choose.
Click on “Next” and if everything has been done correctly, you will continue to the next step of the configuration.
- Create new backup volume in: In this section, select the drive where you want to store the files for the backup; Gigas’ default settings means you must choose “/backup” as the backup drive. If this drive does not appear you must fill in the “Folder” field with word backup.
- This is the section where you must define the backup policy (when the backup is carried out)
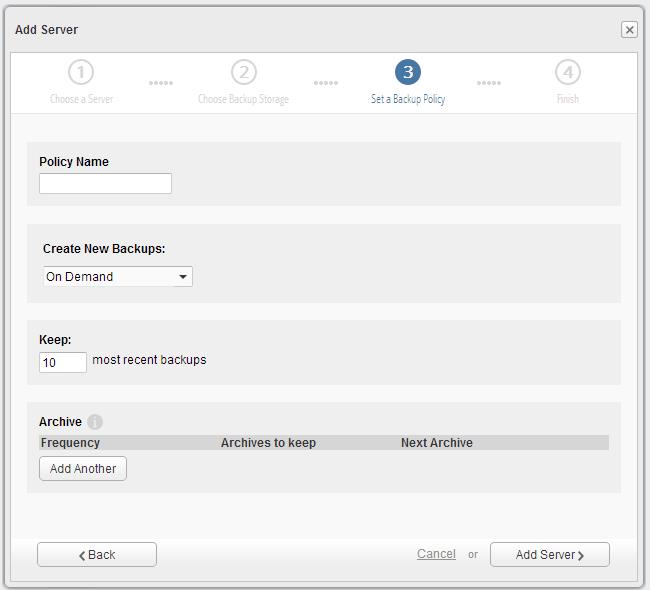
- Policy Name: Shows the name of the policy of the new backup.
- Create New Backups: this allows you to choose how often you want the backup to be run; every few minutes, hourly or on a daily basis (you can define the time and minutes of the operation) . If you need to define a more complex policy, when the wizard has finished, go to the “Policy” section in the menu and edit the policy that you created earlier.
- Keep: This defines how long you keep your backups.
- Archive: This option allows you to define a parallel policy that will be responsible for archiving backups based on what you defined and for how long.
Click on “Add Server” and if everything has been done correct the following will appear: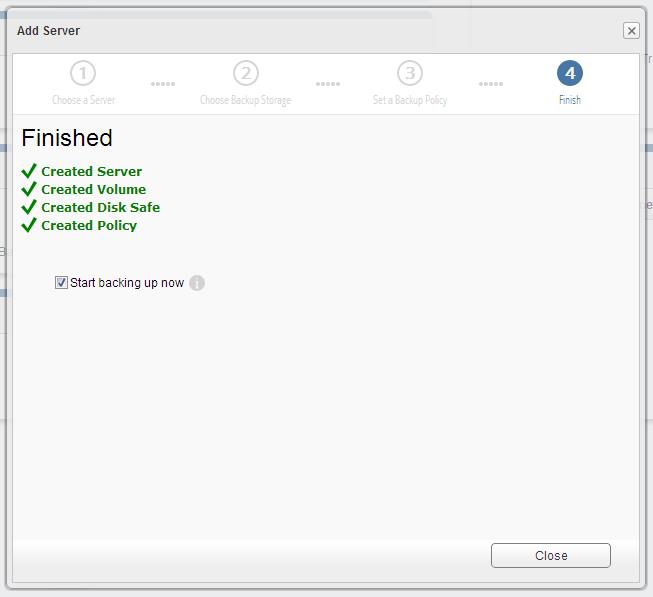
- Start backing up now: Choose this option if you want a first backup to be run as soon as the wizard finishes.
Lastly, click on “Close”.
WE RECOMMEND that you read the second method as it describes the different parts of a backup in more detail.
- Access the advanced backup web control panel.
Method 2
- Access the advanced backup web control panel.
- In the left menu, click on “Servers”
Server Name: Server Name
Host Name/IP: agent_server_ip
Port: 1167
Click on “Test Agent Connection” and if the results shown are positive, click on “Create”. If the result is negative, check the connectivity, firewall, etc. of the agent machine. - In the left menu, click on “Disk Safes”
In the new window type in the following:- Name: Name that will identify the new Disk Safe.
- Server: Select the server that you created recently from the drop-down menu.
- Disk Safe Location: This time, untick “Assign this disk safe to a volume”.
- Path: Be very careful here as this shows in which directory of the backup server the information is saved in:
THE DEFAULT DIRECTORY IS: / backup /
The table shows / backup / agent_machine_name
Leave the other default options of the tab.
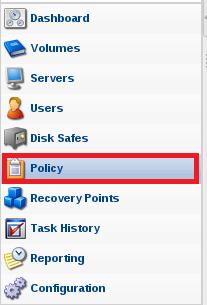
- In the left menu, click on “Policy”
Server Name:
In the new window type in the following:- Name: Name of the agent machine
- Description: To fill in as you wish
- Agent: Select the “Agent” that you created recently from the drop-down menu
- Disk Safe: Select the “Disk Safe” that you created recently from the drop-down menu
- Replication Schedule: Choose when to run the backup
- Merge Schedule: This task is responsible for deleting old backups based on the limits you set for the backups. Decide when you want it to be run. (It is not advisable to do this at the same time the backup is being carried out)
Got to the “Data Retention” tab
In this section you can set the “Number of Recovery Points to Retain” that you want to store.
Got to the “File Exclude” tab
This section shows the directory tree of the agent server; you decide which ones to exclude from the directories during the backup simply by selecting them.
For this basic kind of configuration leave the other tabs with the default options.
“Save”
- The basic points for your first backup have been covered. All you have to do now is wait for the scheduled time and the backup of your agent server will automatically start.
If you want to run a backup, go to the “Policy” section and click on the “Run Now” icon from the list (a blue arrowhead).
(Go to the “Policy” section)
(Look for the bar that matches the policy of the server from which you want to start the backup)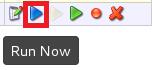
(At the end of the bar is an icon shaped like a blue arrowhead; click on it and the backup process will run or be queued)

