Diferencia entre revisiones de «USER GUIDE FOR HOT DISK RESIZES»
(Página creada con «== RESIZES DE DISCOS EN CALIENTE HACIA ARRIBA== ===2nd Part: Resize disk into the Operative System=== After the first hot resize on Gigas Panel, now it’s time to resiz...») |
|||
| Línea 45: | Línea 45: | ||
o (parted) resizepart | o (parted) resizepart | ||
| − | o (parted) 1 | + | o (parted) 1 Partition number |
| − | o (parted) 32.2GB | + | o (parted) 32.2GB Size that shows by “print”. |
| − | o (parted) print | + | o (parted) print Partition size verification. |
o (parted) quit | o (parted) quit | ||
| − | • # partprobe /dev/vdc | + | • # partprobe /dev/vdc We make the S.O. re-read the partitions. |
| − | 5. Once we have confirmed that our secondary hard disk has been resized correctly and shows the new size, we will only need to resize the internal file system it contains. | + | 5. Once we have confirmed that our secondary hard disk has been resized correctly and shows the new size, we will only need to resize the internal file system it contains. |
| − | + | As the screenshot below, we will use the command "resize2fs" to stretch the partition system to the maximum limit of the new size, then we will verify that the file system has been resized correctly using the command "Fdisk", and finally we will try to mount the disk using command "mount" and check information about it again with the command "df": | |
[[Archivo:ResizeCaliente11.png]] | [[Archivo:ResizeCaliente11.png]] | ||
| − | + | Used Commands: | |
| − | • # resize2fs /dev/vdc1 | + | • # resize2fs /dev/vdc1 |
| − | • # fdisk -l /dev/vdc1 | + | • # fdisk -l /dev/vdc1 |
| − | • # mount /dev/vdc1 /data | + | • # mount /dev/vdc1 /data |
| − | • # df -h | grep -z --color “vdc1” | + | • # df -h | grep -z --color “vdc1” |
| − | ===== | + | =====Resize at internal level (Windows):===== |
| − | + | ||
| − | 1. | + | 1. First, You must access to your server through the Console Access (VNC) on your Gigas Panel. |
| + | Once we have logged in, we are shown the Windows desktop, we will click on the "Start" button, and then on "Server Manager" as it is. Indicates in the following screenshot: | ||
[[Archivo:ResizeCaliente12.png]] | [[Archivo:ResizeCaliente12.png]] | ||
| − | 2. | + | 2. When you have opened "Server Manager", we will click on the "Tools" menu on the top. |
[[Archivo:ResizeCaliente13.png]] | [[Archivo:ResizeCaliente13.png]] | ||
| − | + | ... and when the "Tools" menu is displayed, we will click on "Computer Management": | |
[[Archivo:ResizeCaliente14.png]] | [[Archivo:ResizeCaliente14.png]] | ||
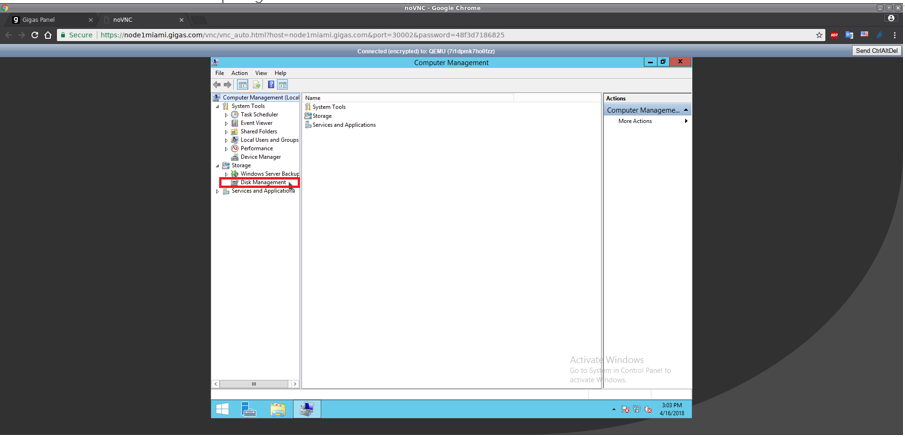
| − | 3. | + | 3. Once the "Computer Management" window has opened, we will click on "Disk Management", in the "Storage" section of the left side menu. |
[[Archivo:ResizeCaliente15.png]] | [[Archivo:ResizeCaliente15.png]] | ||
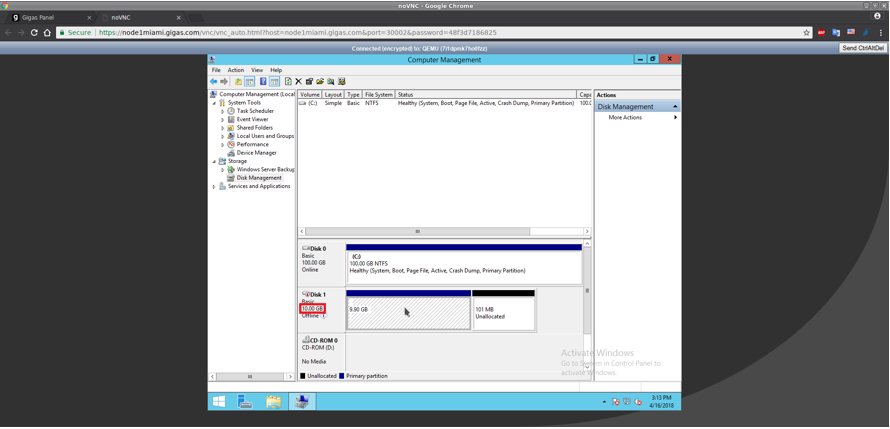
| − | 4. | + | 4. On "Disk Management" section, we will see how the internal resize of the partition or the file system of our secondary disk at Windows level has not been produced, causing an inconsistency between the size of the secondary disk of the server that shows the Gigas Panel (30GB), and the current internally usable size within Windows (10GB): |
[[Archivo:ResizeCaliente16.png]] | [[Archivo:ResizeCaliente16.png]] | ||
| − | 5. | + | 5. In addition, we see that the secondary disk appears in the "Offline" state. This is normal since we have added the disk from the Panel without having restarted the server, and although Windows detected the new disk, it does not have it activated and therefore, we must change it to "Online" state manually. |
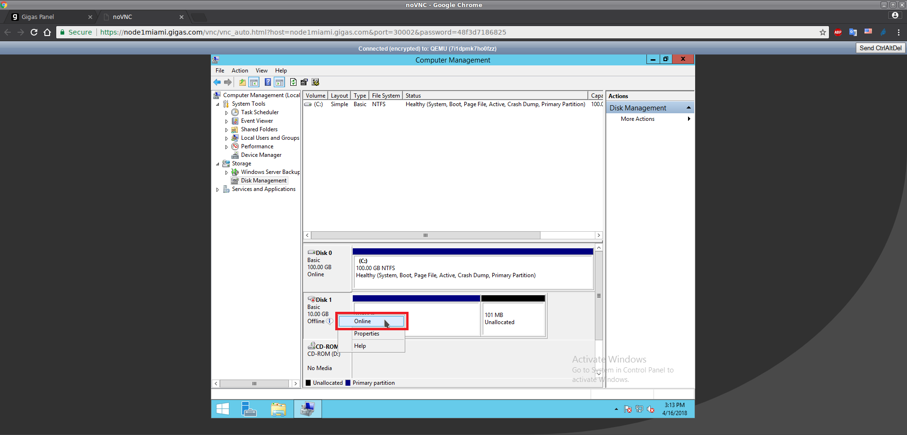
| − | + | We must select the disk, click with the right mouse button and select "Online" in the drop-down menu: | |
[[Archivo:ResizeCaliente17.png]] | [[Archivo:ResizeCaliente17.png]] | ||
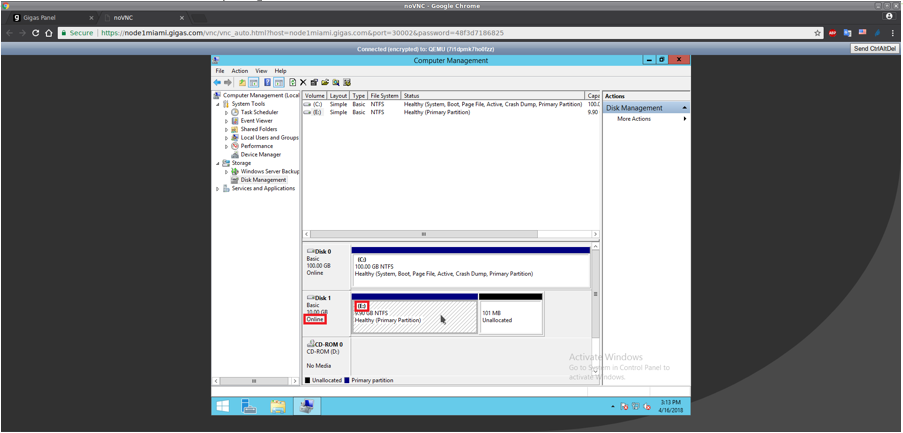
| − | 6. | + | 6. After activating our secondary disk , Windows will assign a letter to the unit (in our example it has been assigned the letter E :), although, it still has a size of 10GB, but we will take care of this in the following point: |
[[Archivo:ResizeCaliente18.png]] | [[Archivo:ResizeCaliente18.png]] | ||
| − | 7. | + | 7. Our disk is already in an "online" state and at the panel level the external hot resize was performed correctly, Windows should detect the new disk size (in our example it should show 30GB). |
| − | + | However, Windows does not always automatically detect the new total size of the disk that we assign from the Panel, and we must refresh with the F5 key or by clicking on the "Refresh" icon in the upper bar marked with the box in red. | |
| − | + | After doing it, we will see how instantly the disk size becomes the correct one (in our case 30GB): | |
[[Archivo:ResizeCaliente19.png]] | [[Archivo:ResizeCaliente19.png]] | ||
| − | 8. | + | 8. Once Windows correctly detects the size of our secondary disk, it is time to resize the partition and the file system that is included in it, and that still has an approximate size of 10GB (9.90GB in our case). We must mark the partition of our secondary disk to which Windows assigned a drive letter (in our case, the letter E :), click with the right mouse button, and select "Extend Volume ...": |
| − | + | ||
[[Archivo:ResizeCaliente20.png]] | [[Archivo:ResizeCaliente20.png]] | ||
| − | 9. | + | 9. After this, the partition resize wizard will appear on the screen, which we will solve in this way: |
[[Archivo:ResizeCaliente21.png]] | [[Archivo:ResizeCaliente21.png]] | ||
[[Archivo:ResizeCaliente22.png]] | [[Archivo:ResizeCaliente22.png]] | ||
| − | 10. | + | 10. If we followed all the steps correctly, we can check that the resize wizard has been closed and has returned the control to "Disk Management", where it shows that the partition we wanted to resize and corresponding in our example to the unit "E" : ", Now it has the same size as the disk and also on the Panel (30GB): |
[[Archivo:ResizeCaliente23.png]] | [[Archivo:ResizeCaliente23.png]] | ||
| − | 11. | + | 11. Finally, we recommend that a file system check be carried out after having finished the hot resize process, in order to avoid any problem in the inconsistency of the data. In the case of Windows, we will use the "CHKDSK" command, and like we did in Linux, our recommendation is to execute it TWICE. |
| − | + | The "CHKDSK" command is a command that has to be launched by command line, and for this we must open a console / DOS terminal / System Symbol. | |
| − | + | Then, we will press the "Send CtrlAltDel" button and then we will click on "Task Manager" as shown in the following screenshot: | |
| − | + | ||
| − | + | ||
[[Archivo:ResizeCaliente24.png]] | [[Archivo:ResizeCaliente24.png]] | ||
| − | + | Then, we will click on the top menu "File" and then "Run new task": | |
[[Archivo:ResizeCaliente25.png]] | [[Archivo:ResizeCaliente25.png]] | ||
| − | + | This will open a window titled "Run", in which we will type the "cmd" command and then press the "OK" button to open it: | |
[[Archivo:ResizeCaliente26.png]] | [[Archivo:ResizeCaliente26.png]] | ||
| − | + | We just have to enter the command "chkdsk E: / f" (in our case we type "E:" as that is the letter assigned by Windows to our secondary disk, but this must be adapted data and insert in its place the correct letter corresponding to the case of each user): | |
[[Archivo:ResizeCaliente27.png]] | [[Archivo:ResizeCaliente27.png]] | ||
| − | + | Remember that it is best to run the "chkdsk E: / f" command again to make sure that the data stored in the unit is in a consistent state. | |
| − | + | Therefore, we re-run the command again, and as soon as it finishes, we can terminate the entire hot resize process under Windows: | |
[[Archivo:ResizeCaliente28.png]] | [[Archivo:ResizeCaliente28.png]] | ||
Revisión del 12:47 21 may 2018
Contenido
RESIZES DE DISCOS EN CALIENTE HACIA ARRIBA
2nd Part: Resize disk into the Operative System
After the first hot resize on Gigas Panel, now it’s time to resize the disk on operative system level.
We can split between two different types, depending on your operative system:
- Linux OS
- Windows OS
Resize at internal level (Linux)
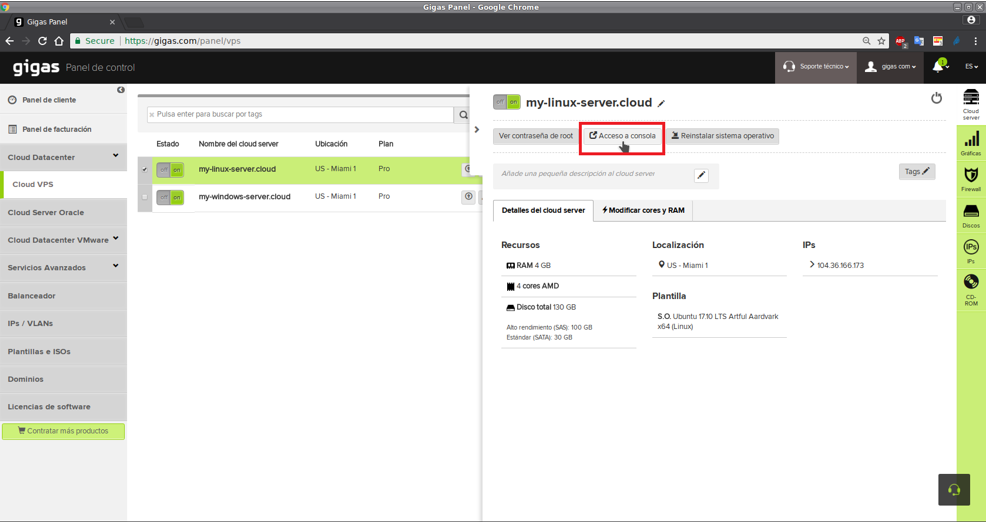
1. First, You must access to your server through the Console Access (VNC) on your Gigas Panel.
We can also do this from SSH if we prefer, although to avoid possible problems related to outages in our connection and that the process may not be done correctly, it is preferable to perform the process from the server's VNC console:
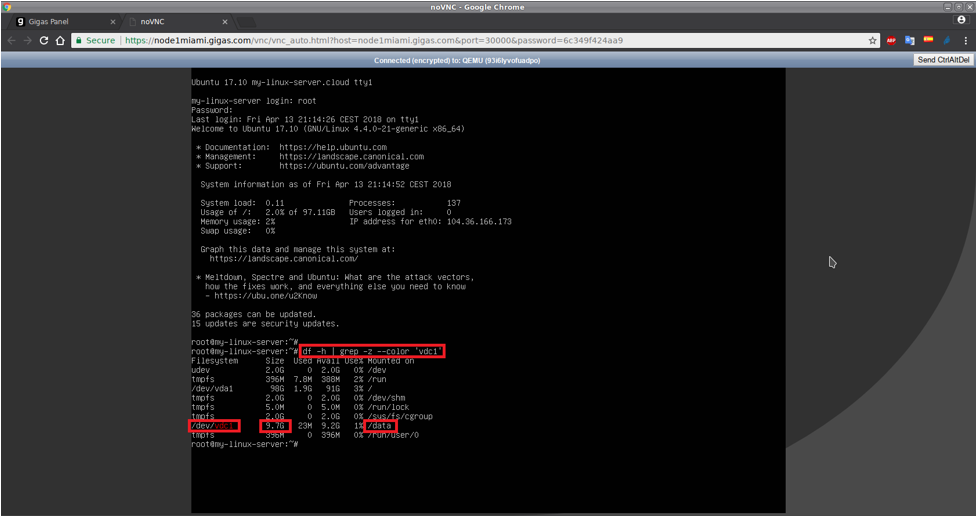
2. Before, we should collect information about the current state of the disk to check the resize made on Gigas panel.
We should check the size that the disk has (it should be the old size) and in what directory / mount point is mounted (usually "/ data", but could be another).
Our disk is called "/ dev / vdc1", it is the 3rd disk of the server and it is mounted in "/ data", and we can also see how it still has the old size (9.7GB):
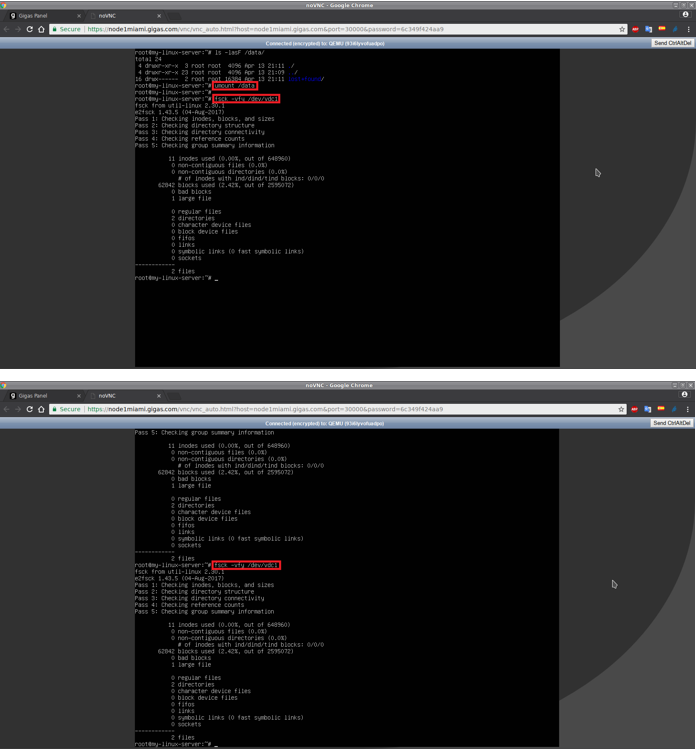
3. Now if the disk is currently mounted and on which route, we will dismount it, and as a security measure, from GIGAS we recommend that the "fsck" command be executed TWICE to avoid possible inconsistency errors of data:
4. Once we have disassembled the unit and made the checks, we will proceed to perform the resize of the partition.
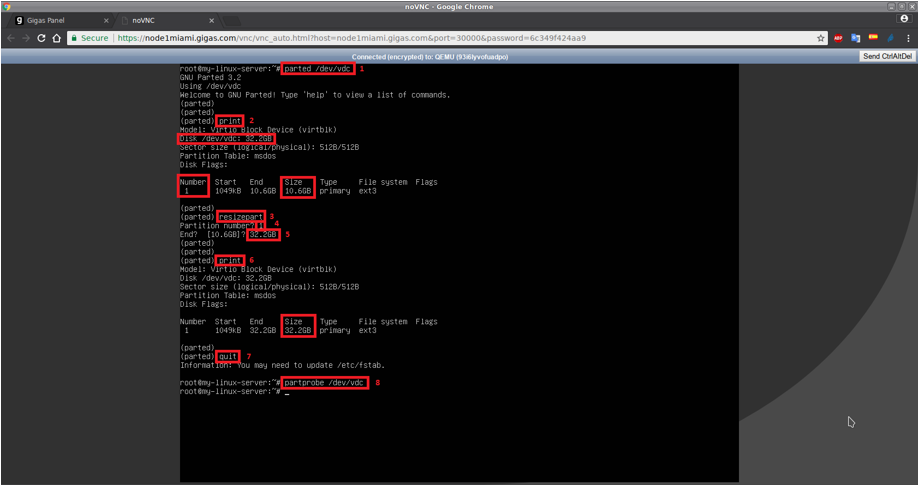
We will use the "parted" tools to internally resize the partition to the new disk size (that assigned from the Panel in the 1st part); and then we will use "partprobe" to detects hot changes without restart.
Following our example, these are the commands adapted for our case: NOTE: The commands are those boxed in red with a number next to it.
Used Commands: • # parted /dev/vdc
o (parted) print
o (parted) resizepart
o (parted) 1 Partition number
o (parted) 32.2GB Size that shows by “print”.
o (parted) print Partition size verification.
o (parted) quit
• # partprobe /dev/vdc We make the S.O. re-read the partitions.
5. Once we have confirmed that our secondary hard disk has been resized correctly and shows the new size, we will only need to resize the internal file system it contains.
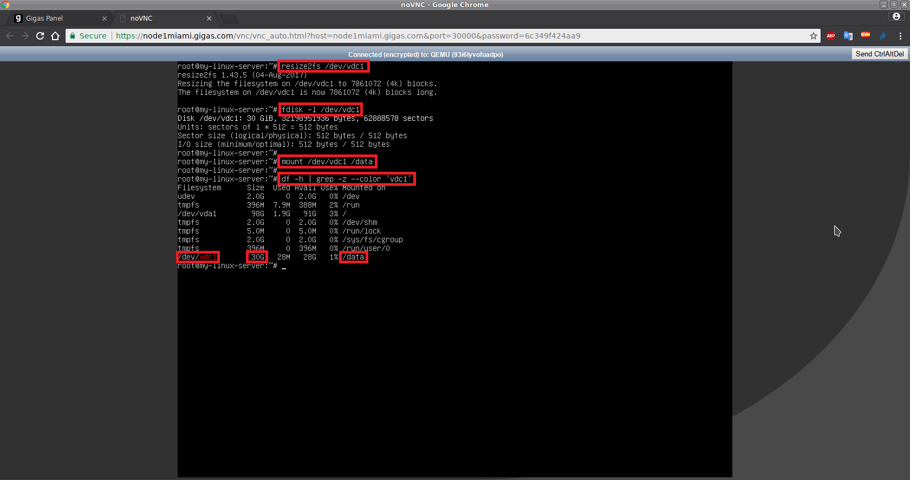
As the screenshot below, we will use the command "resize2fs" to stretch the partition system to the maximum limit of the new size, then we will verify that the file system has been resized correctly using the command "Fdisk", and finally we will try to mount the disk using command "mount" and check information about it again with the command "df":
Used Commands:
• # resize2fs /dev/vdc1
• # fdisk -l /dev/vdc1
• # mount /dev/vdc1 /data
• # df -h | grep -z --color “vdc1”
Resize at internal level (Windows):
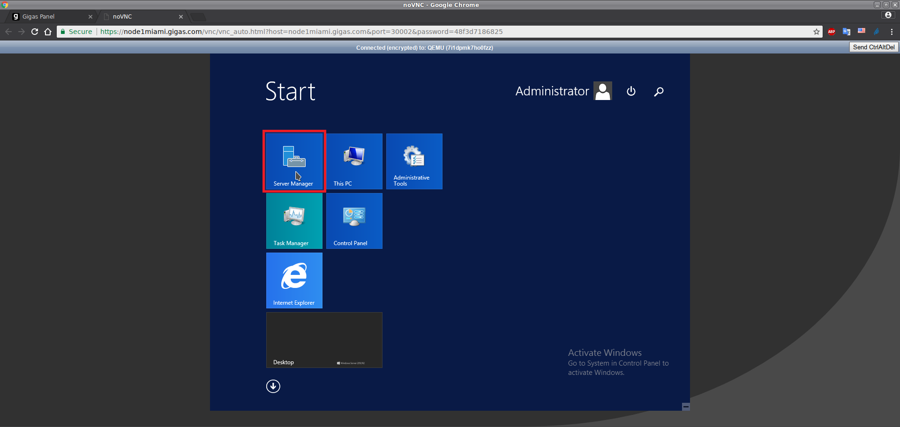
1. First, You must access to your server through the Console Access (VNC) on your Gigas Panel. Once we have logged in, we are shown the Windows desktop, we will click on the "Start" button, and then on "Server Manager" as it is. Indicates in the following screenshot:
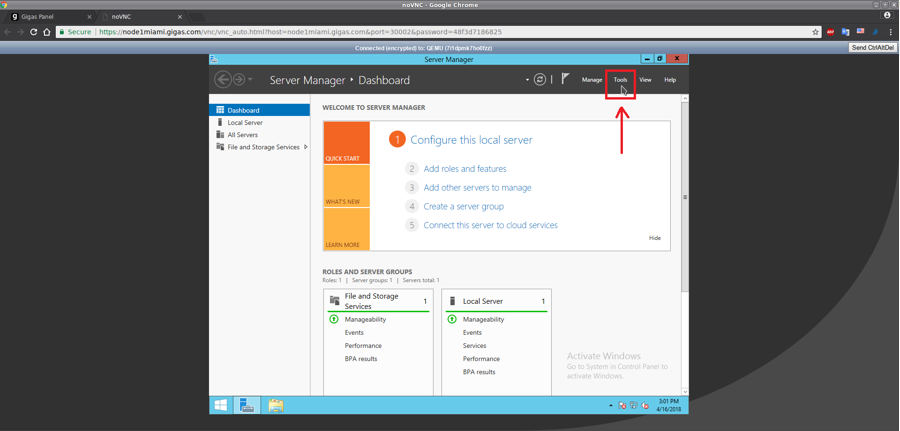
2. When you have opened "Server Manager", we will click on the "Tools" menu on the top.
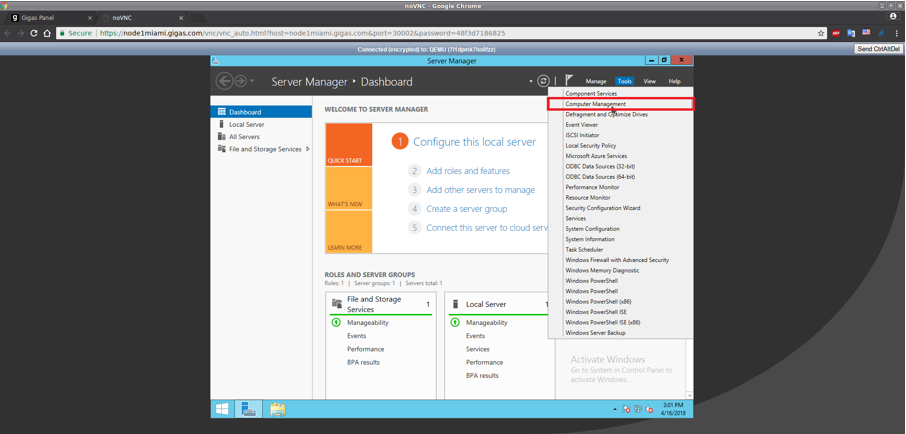
... and when the "Tools" menu is displayed, we will click on "Computer Management":
3. Once the "Computer Management" window has opened, we will click on "Disk Management", in the "Storage" section of the left side menu.
4. On "Disk Management" section, we will see how the internal resize of the partition or the file system of our secondary disk at Windows level has not been produced, causing an inconsistency between the size of the secondary disk of the server that shows the Gigas Panel (30GB), and the current internally usable size within Windows (10GB):
5. In addition, we see that the secondary disk appears in the "Offline" state. This is normal since we have added the disk from the Panel without having restarted the server, and although Windows detected the new disk, it does not have it activated and therefore, we must change it to "Online" state manually.
We must select the disk, click with the right mouse button and select "Online" in the drop-down menu:
6. After activating our secondary disk , Windows will assign a letter to the unit (in our example it has been assigned the letter E :), although, it still has a size of 10GB, but we will take care of this in the following point:
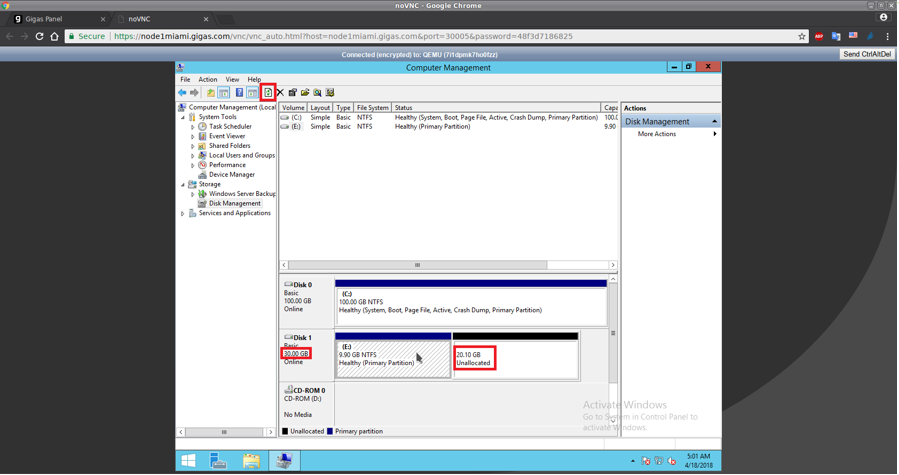
7. Our disk is already in an "online" state and at the panel level the external hot resize was performed correctly, Windows should detect the new disk size (in our example it should show 30GB).
However, Windows does not always automatically detect the new total size of the disk that we assign from the Panel, and we must refresh with the F5 key or by clicking on the "Refresh" icon in the upper bar marked with the box in red.
After doing it, we will see how instantly the disk size becomes the correct one (in our case 30GB):
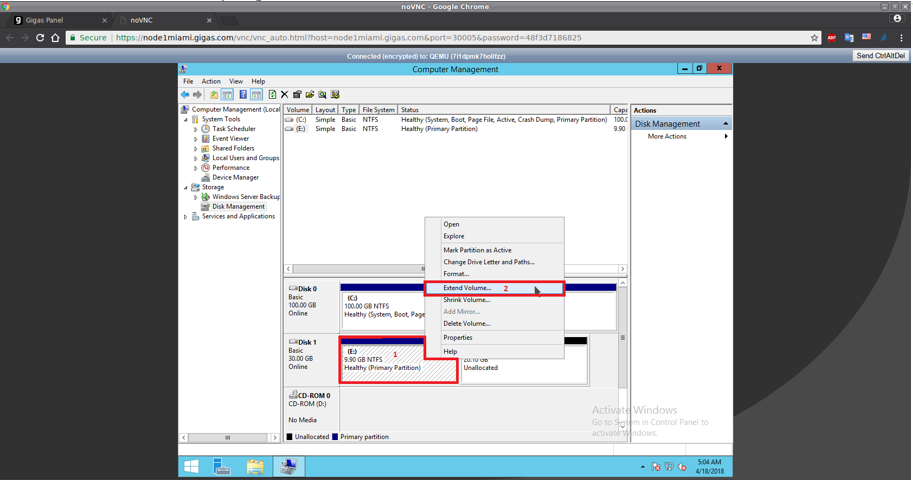
8. Once Windows correctly detects the size of our secondary disk, it is time to resize the partition and the file system that is included in it, and that still has an approximate size of 10GB (9.90GB in our case). We must mark the partition of our secondary disk to which Windows assigned a drive letter (in our case, the letter E :), click with the right mouse button, and select "Extend Volume ...":
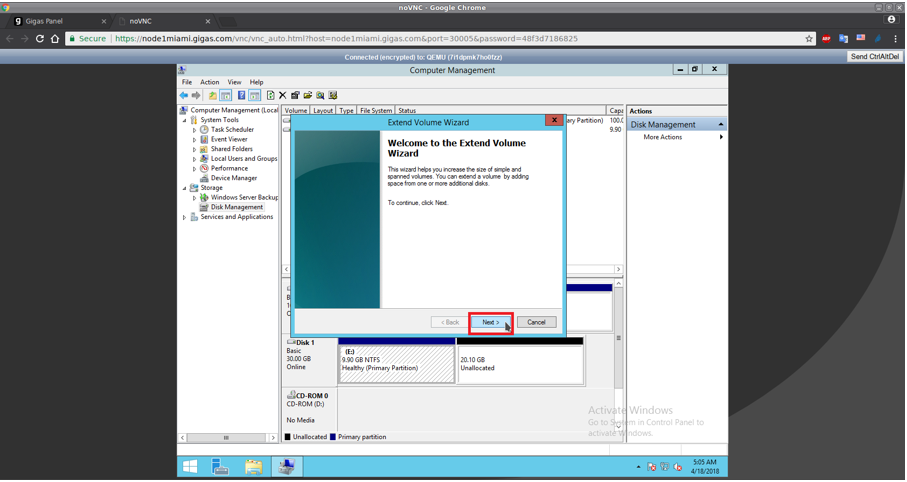
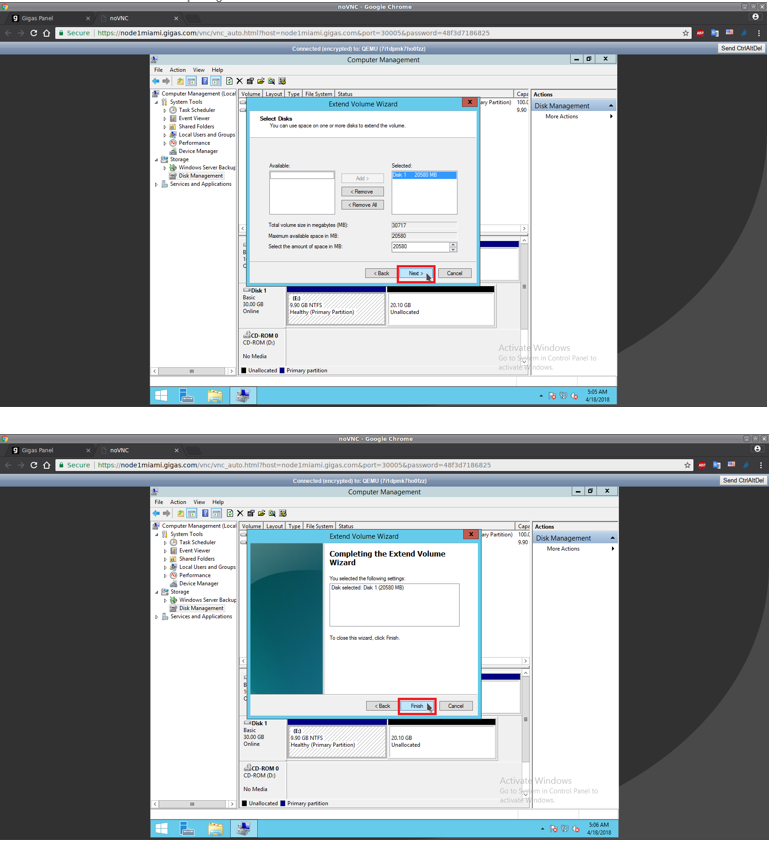
9. After this, the partition resize wizard will appear on the screen, which we will solve in this way:
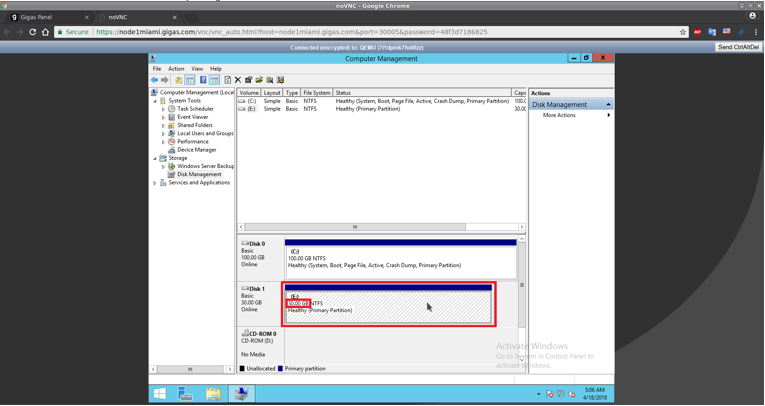
10. If we followed all the steps correctly, we can check that the resize wizard has been closed and has returned the control to "Disk Management", where it shows that the partition we wanted to resize and corresponding in our example to the unit "E" : ", Now it has the same size as the disk and also on the Panel (30GB):
11. Finally, we recommend that a file system check be carried out after having finished the hot resize process, in order to avoid any problem in the inconsistency of the data. In the case of Windows, we will use the "CHKDSK" command, and like we did in Linux, our recommendation is to execute it TWICE.
The "CHKDSK" command is a command that has to be launched by command line, and for this we must open a console / DOS terminal / System Symbol.
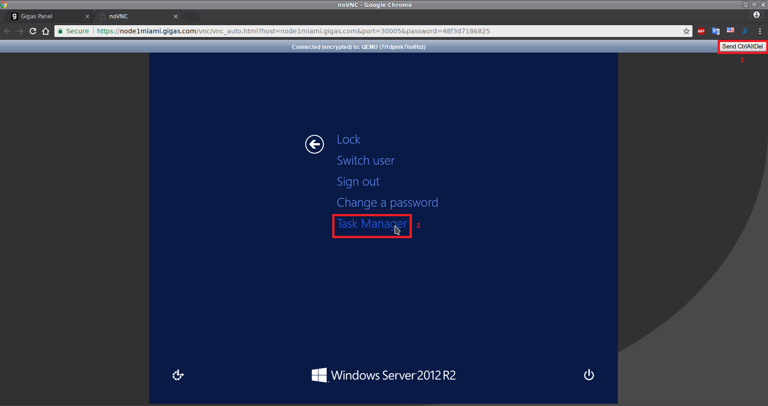
Then, we will press the "Send CtrlAltDel" button and then we will click on "Task Manager" as shown in the following screenshot:
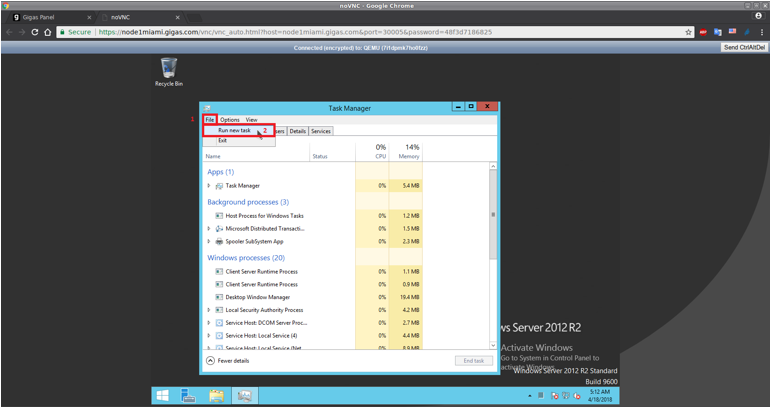
Then, we will click on the top menu "File" and then "Run new task":
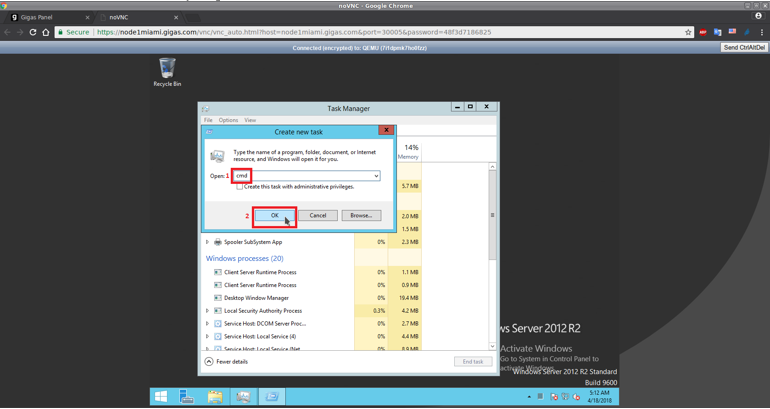
This will open a window titled "Run", in which we will type the "cmd" command and then press the "OK" button to open it:
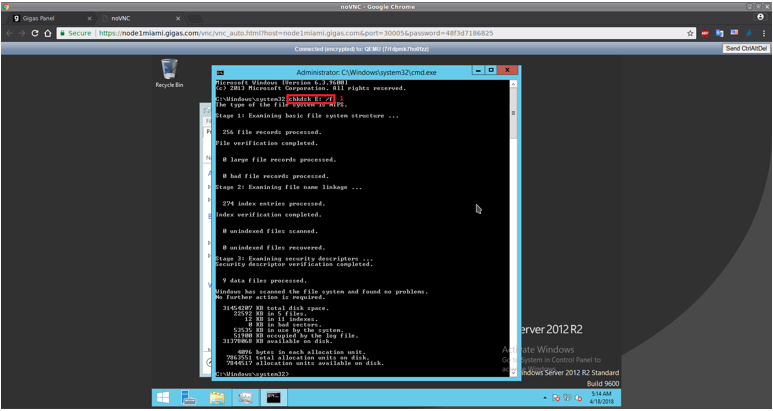
We just have to enter the command "chkdsk E: / f" (in our case we type "E:" as that is the letter assigned by Windows to our secondary disk, but this must be adapted data and insert in its place the correct letter corresponding to the case of each user):
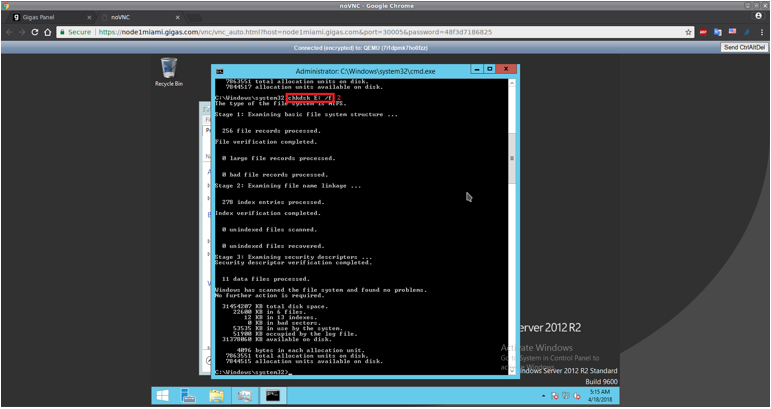
Remember that it is best to run the "chkdsk E: / f" command again to make sure that the data stored in the unit is in a consistent state.
Therefore, we re-run the command again, and as soon as it finishes, we can terminate the entire hot resize process under Windows:
