How to set up your first Cloud Datacenter
Once registered as a user and after acquiring the Cloud Datacenter that best fits your needs, you can begin to create the Cloud Servers you are going to set up within your Cloud Datacenter. Accessing your control panel, you will be able to identify the number of products you have contracted at Gigas. Select “List Services” in order to proceed with setting up your Cloud Datacenter, as shown by the following figure: Next you will access a screen where you will see your Cloud Datacenter´s summary:
- Contracted Cloud type
- Your Cloud´s resources information (disk / space / memory)
- Total Contracted
- Total Used
- Total Avaible
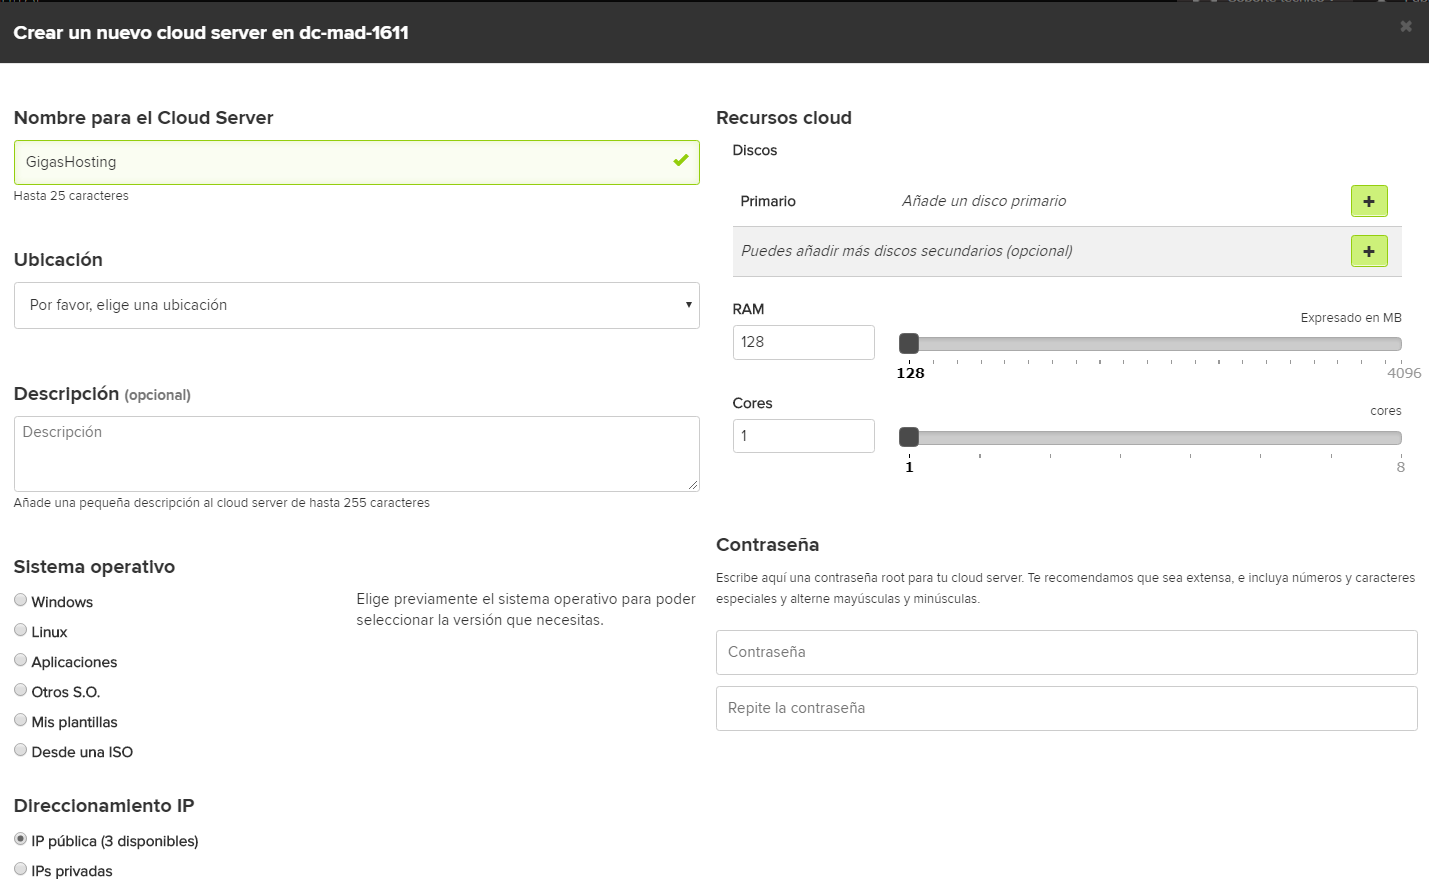
Select “Create new cloud server” in order to create a new cloud server. Remember that, in case you need to expand your resources, you will be able to do so at any time by means of a contracted service total upgrade or individually adding those resources you need to expand. [+ info] You can define your cloud server´s setup in the next step. In order to do so, the following parameters have to be defined:
- HostName: Define the server name by which you want to identify your cloud server and will be assigned to your operating system´s “Hostname” variable. Said name may contain up to 25 characters, including alphanumeric and special characters, such as “_” and “-“
- Ubication: Cloud Server's Location
- Operating System: Select one of the operating systems from the list of available images. OS list
- RAM: Choose the amount of RAM memory you wish to assign to your cloud server
- CPU: Select the number of Cores you wish to assign to your cloud server. Remember a Cloud Server has to have a minimum of one (1) Core and can have up to sixteen (16) (*1)
- NOTE: (*1) Maximum number of Cores per cloud server dependent on the number of Cores available in the contracted product
- Disk Space: Select the disk space your cloud server will occupy. A minimum size of 20 GB is recommended, which may vary depending on the Operating System
- Swap: Select the amount of Swap memory to be assigned to your cloud server. The recommended minimum amount is 2 GB. Remember that the amount assigned to Swap will be deducted from your Available Total
- Password: Assign a Root password to your cloud server, which will allow you to access it. Due to security reasons, we recommend it contain numbers, special characters and mixed upper- and lowercase letters. The length of the password depends on the selected Operating System, yet a minimum length of six (6) characters is required.
Remember that you will be able to modify the assigned the RAM, CPU and Disk resources, increasing or decreasing them depending on your needs, once the Cloud Server has been created.
Once your cloud server has been set up, you will be able to access a screen where you will be able to see the state of the Cloud Datacenter associated resources, as well as your new cloud server´s information Provisioning time for your cloud sever is within minutes, depending on the chosen Operating System. During this time you may see the provisioning state on screen, as well as updated information on your Cloud Datacenter´s and new Cloud Server´s resources. In order to see if your new cloud server is available, periodically click the “Refresh” button. The following screen will appear once the Cloud Server has been provisioned, indicating the server has booted up as well its setup.
Do you need to set up additional Cloud Servers within your Cloud Datacenter?
The process is as easy as the one for your initial cloud server. You just have to consider the available resources within your Cloud Datacenter, being able to use 100% of them for your next cloud server, or divide them amongst the cloud servers you require.
Remember that, in case you need to expand your resources, you will be able to do so at any time by means of a contracted service total upgrade or individually adding those resources you need to expand. [+ info] Once your second cloud server has been provisioned, all available information will be available on your Cloud Datacenter´s summary screen.
