Diferencia entre revisiones de «Pay Per Use»
(Página creada con «{{en español |Pago_Por_Uso}}») |
|||
| (No se muestran 3 ediciones intermedias del mismo usuario) | |||
| Línea 1: | Línea 1: | ||
{{en español |Pago_Por_Uso}} | {{en español |Pago_Por_Uso}} | ||
| + | |||
| + | |||
| + | |||
| + | == ¿What is Pay Per Use? == | ||
| + | Pay per Use is the functionality available to the client in the Gigas Control Panel, that enables the option to expand resources from Cloud servers hired in subscription mode, temporarily and managing their consumption, thus being able to control the cost of additional resources. | ||
| + | |||
| + | This functionality is designed for a punctual increase in resources without the need for time-consuming commercial procedures, providing all the possible autonomy to the client, both in the activation and deactivation of these additional resources. | ||
| + | |||
| + | The products in which this expansion can be carried out, within the Gigas product catalog, are the Cloud Datacenter, in any of its plans, and may increase the following resources: | ||
| + | |||
| + | - RAM | ||
| + | |||
| + | - CPU (Intel cores) | ||
| + | |||
| + | - Disk (SSD, SAS and SATA) --> The disk expansion generates the expansion of the Backup space automatically and without extra cost | ||
| + | |||
| + | - IPs | ||
| + | |||
| + | Resources can be added in blocks of minimum units, being able to contract as many units as we need, taking into account that the minimum unit that can be contracted is: | ||
| + | |||
| + | Minimum Unit Resource | ||
| + | |||
| + | RAM '''1 Gb''' | ||
| + | |||
| + | CPU (Intel) '''1 core''' | ||
| + | |||
| + | SSD Disk '''100 Gb''' | ||
| + | |||
| + | SAS Disk '''100 Gb''' | ||
| + | |||
| + | SATA Disk '''100 Gb''' | ||
| + | |||
| + | IP '''1 IP''' | ||
| + | |||
| + | == ¿How can I contract and activate Pay Per Use? == | ||
| + | |||
| + | The functionality of Pay Per Use must be activated every time you want to have additional resources, although by default, it is activated. | ||
| + | |||
| + | In case we have disabled it and want to activate it, you just have to: | ||
| + | |||
| + | 1- Select the Cloud Datacenter on which we need to expand resources in Pay Per Use mode | ||
| + | |||
| + | 2- Click on “Activate resources in Pay Per Use” | ||
| + | |||
| + | [[Archivo:P1.png]] | ||
| + | |||
| + | 3- A window will appear with the Terms and Conditions of use of the Pay Per Use, which must be read and accepted | ||
| + | |||
| + | [[Archivo:P2.png]] | ||
| + | |||
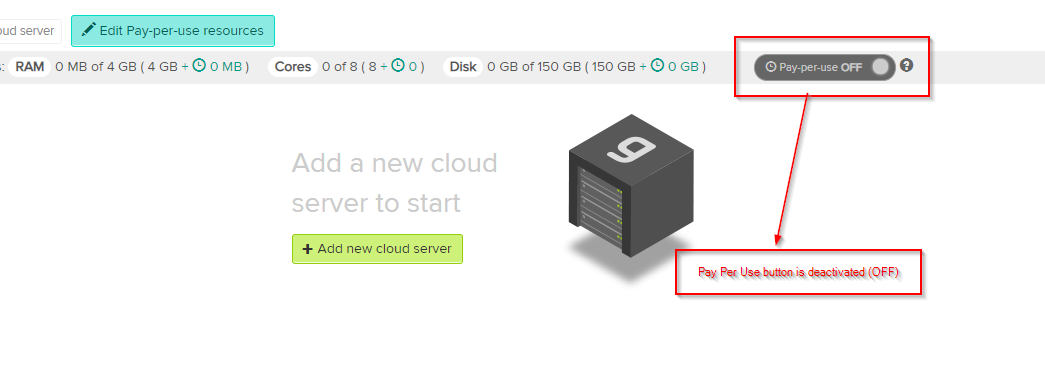
| + | 4- After that, we will already have the functionality activated, although we will not yet have any Pay Per Use resource included and therefore we will not be billing anything additional, clearly indicating it since the Pay Per Use button is deactivated (OFF) | ||
| + | |||
| + | [[Archivo:PE1.png]] | ||
| + | |||
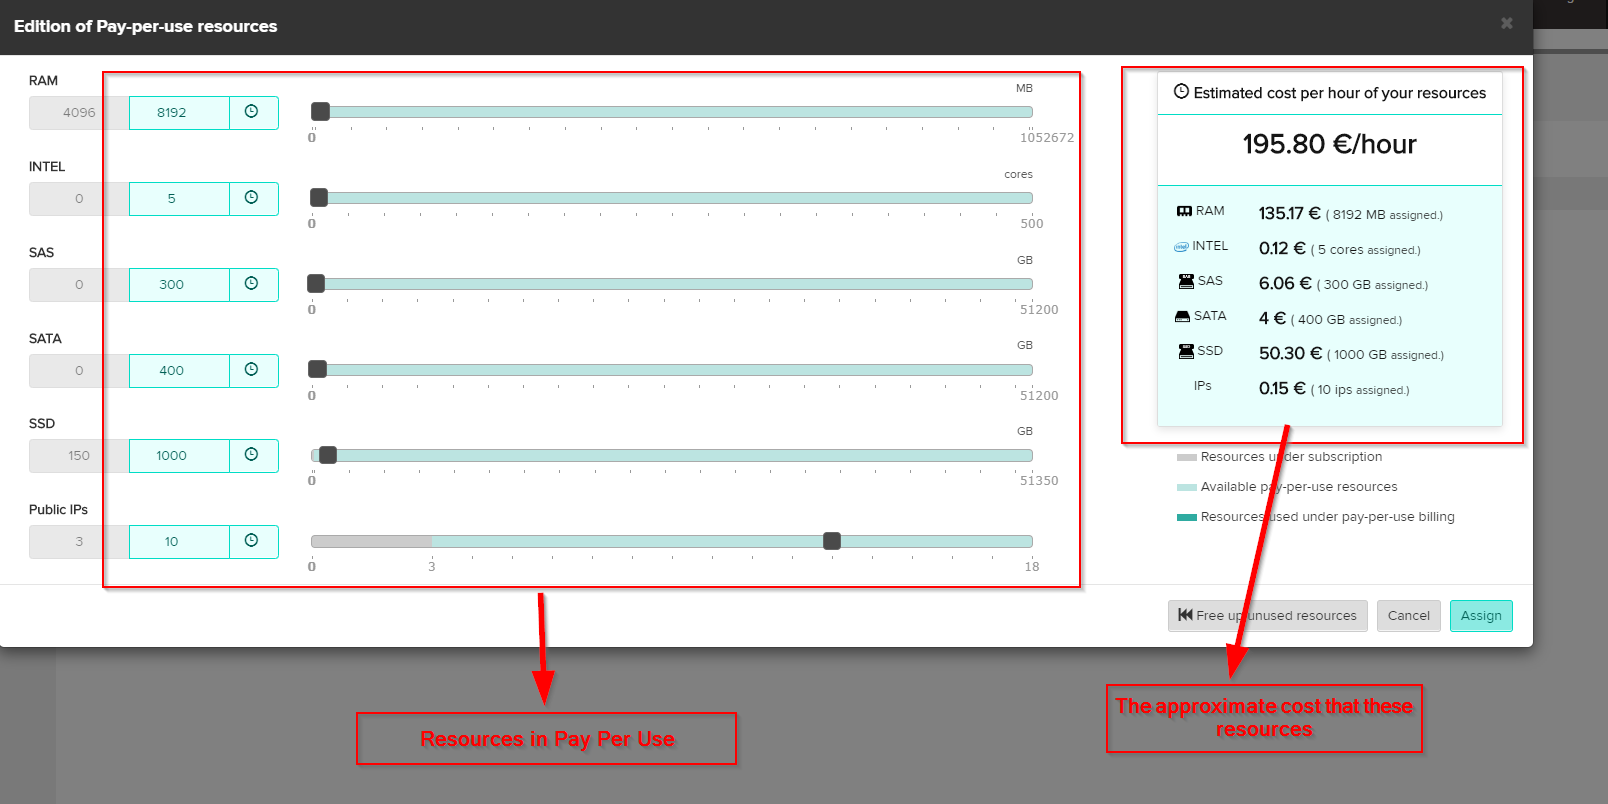
| + | To associate additional resources in "Pay per Use", just click on "Edit the resources in Pay Per Use". At that time we will see a window with a resource selector which will give us all the information about the resources that we are going to add in addition to those that we have in our subscription, and the approximate cost that these resources will have. | ||
| + | |||
| + | [[Archivo:PE2.png]] | ||
| + | |||
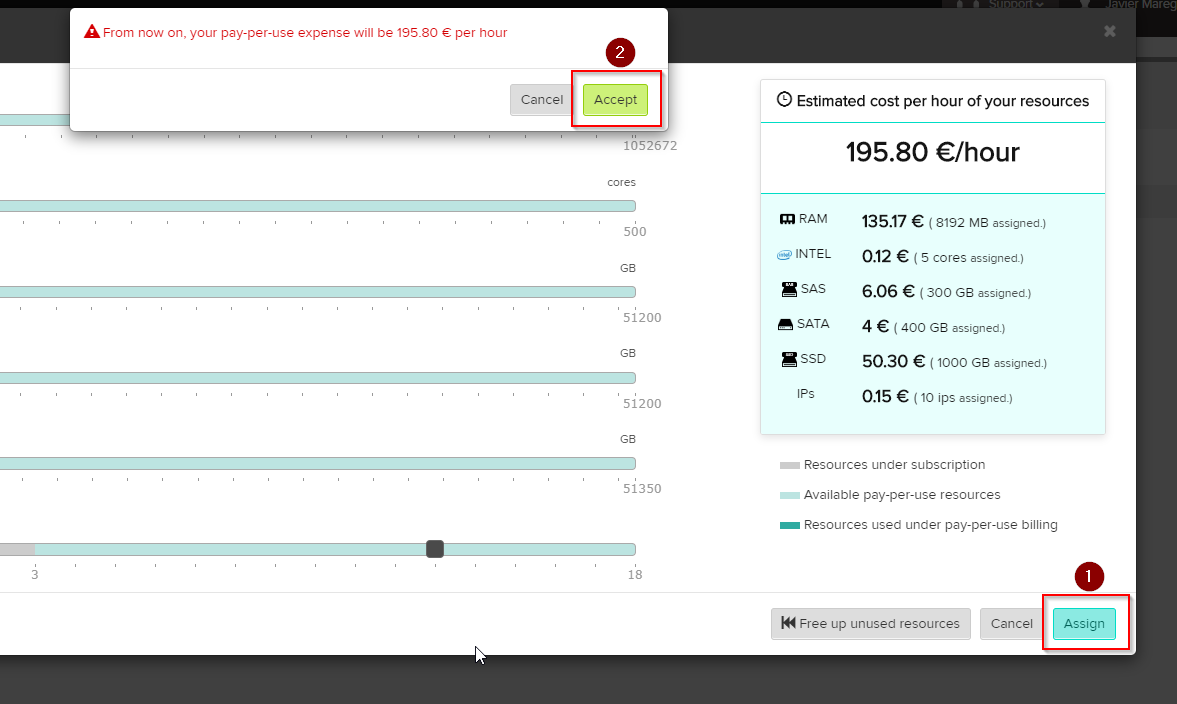
| + | Once the "Assign" button is pressed, the system will assign the new resources contracted in Pay Per Use mode to the resource pool of your Cloud Datacenter, and from this moment you can assign them to any server you want, or create new servers, being 100% available for use | ||
| + | |||
| + | [[Archivo:PE3.png]] | ||
| + | |||
| + | '''Remember that from this moment, the billing system begins to calculate the time in which the resources are available for use and therefore, it is important to carry out this step when the resources are necessary to use them.''' | ||
| + | |||
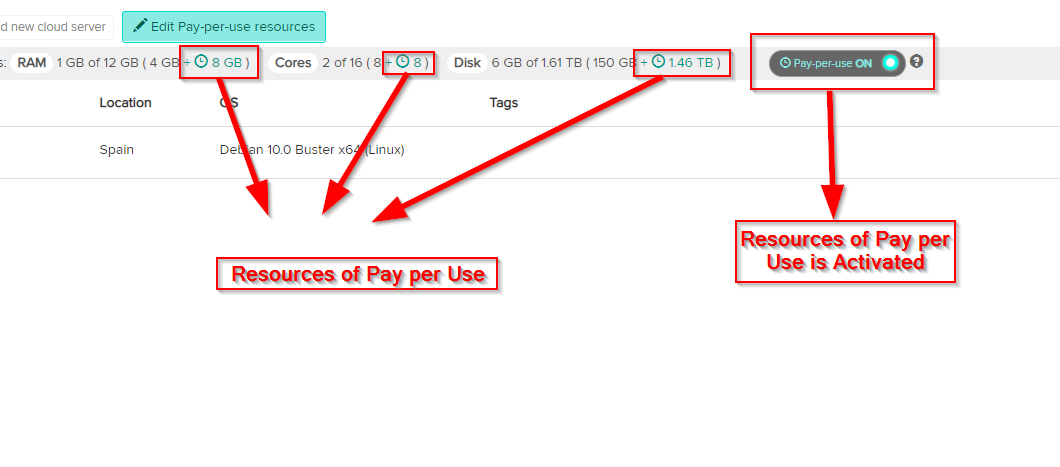
| + | From this moment we can already see that we have Pay Per Use resources activated and we have them available, meaning that we are billing for them. | ||
| + | |||
| + | [[Archivo:PE4.png]] | ||
| + | |||
| + | When creating a new server or increasing the resources of an already created server, we will see the resources that are in the subscription and those that are contracted in Pay Per Use mode, following this logic: | ||
| + | |||
| + | Subscription Resources = '''Green Color''' | ||
| + | |||
| + | Pay Per Use Resources = '''Blue Color''' | ||
| + | |||
| + | [[Archivo:PE5.png]] | ||
| + | |||
| + | If we have assigned Pay-As-You-Go resources to any server, we can see it in the server resource view: | ||
| + | |||
| + | [[Archivo:PE6.png]] | ||
| + | |||
| + | The server information is shown in this way, seeing both the cost of Pay Per Use and the resources assigned in this way: | ||
| + | |||
| + | [[Archivo:PE7.png]] | ||
| + | |||
| + | When creating a server, if we detect that we need more resources and do not have them in our subscription, we can add more resources in Pay Per Use mode, editing those resources from the "Edit resources in Pay Per Use" button | ||
| + | |||
| + | [[Archivo:PE8.png]] | ||
| + | |||
| + | |||
| + | == Deactivation of Pay Per Use == | ||
| + | |||
| + | At the moment when we no longer need the resources, and therefore we want to be billed, we must deactivate the subscription in Pay per Use. | ||
| + | |||
| + | In order not to be billed for the Pay Per Use, it can be done in 2 ways: | ||
| + | |||
| + | '''Remove resources assigned to Pay As You Go (Deallocate)''' | ||
| + | |||
| + | This method prevents billing from being generated due to having assigned Pay-As-You-Go resources, although at any time these resources can be assigned without having to Activate them again. | ||
| + | |||
| + | To do this, simply follow these steps: | ||
| + | |||
| + | 1. Deallocate Pay Per Use resources from the server or servers added, so that they are unassigned | ||
| + | |||
| + | '''This step is essential, because if there are resources contracted in Pay-As-You-Go mode assigned to a server, the system will not allow the deactivation of this service''' | ||
| + | |||
| + | 2. Edit the Pay Per Use resources, setting them all to 0, that is, not selecting additional resources for Pay Per Use | ||
| + | |||
| + | [[Archivo:PE9.png]] | ||
| + | |||
| + | After that we will see that the "Pay Per Use" mode is disabled | ||
| + | |||
| + | [[Archivo:PE10.png]] | ||
| + | |||
| + | From this moment, the system stops adding hours of use to the Pay Per Use and therefore, it will stop billing for this service, until Pay Per Use resources are added again. | ||
| + | |||
| + | '''Disabling the Pay Per Use system (Deactivate)''' | ||
| + | |||
| + | It is possible to deactivate the Pay Per Use option so that resources cannot be assigned. To do this, follow these steps: | ||
| + | |||
| + | 1- Release the Pay Per Use resources assigned to the servers | ||
| + | |||
| + | 2- Follow the steps to deallocate the Pay Per Use resources, as explained in section 4.1 of this document | ||
| + | |||
| + | 3- Access the “Billing Panel” section, select the Cloud Datacenter on which you want to deactivate the Pay Per Use and click on Disable Pay Per Use | ||
| + | |||
| + | [[Archivo:PE11.png]] | ||
| + | |||
| + | '''It is very important to point out that in order to stop billing the Pay Per Use resources, they have to be deallocated as explained in this point (4.1 or 4.2). The shutdown of the server does not generate the stoppage of the billing system for the Pay Per Use resources, if they have not been previously unassigned from the turned off or disabled servers.''' | ||
| + | |||
| + | == ¿How is the Pay Per Use invoiced? == | ||
| + | |||
| + | The system generates billing in Pay Per Use calculating the time of use for each resource contracted in this modality throughout the month, that is, each time it is activated and deactivated, it registers the time that the active resources have been, adds them and invoices them on a monthly basis. | ||
| + | |||
| + | Let's put an example in hiring 3 Gb of RAM: | ||
| + | |||
| + | - The following table represents the start and end date of the Pay Per Use activation for 3 Gb of RAM | ||
| + | |||
| + | [[Archivo:P18.PNG]] | ||
| + | |||
| + | - Based on these data, the billing will be as follows: | ||
| + | |||
| + | [[Archivo:P19.PNG]] | ||
| + | |||
| + | |||
| + | - As a summary, a total of 108 units of RAM will be billed, that is, 1 hour of 108Gb of RAM, so, for example, if each Gb of RAM had a cost of € 0.02 / hour, the amount of Pay per Use would be | ||
| + | 0.02x108 = '''2,16€''' for 36 hours of use. | ||
| + | |||
| + | == Explanation of an invoice == | ||
| + | |||
| + | In the invoices that are generated, the concepts of Pay per Use are included | ||
| + | |||
| + | [[Archivo:P14.png]] | ||
| + | |||
| + | If we want to see a more detailed invoice, we will only have to access the "Pay Per Use Details” section in the Control Panel | ||
| + | |||
| + | [[Archivo:PE12.png]] | ||
| + | |||
| + | And the Pay Per Use details will be shown for that invoice: | ||
| + | |||
| + | [[Archivo:P16.png]] | ||
| + | |||
| + | |||
| + | == Payment Management for Users == | ||
| + | |||
| + | Users of a client can also manage resources in Pay Per Use, but for that the main client himself must have enabled the relevant permissions for said user, being as simple as: | ||
| + | |||
| + | 1- Create a user if it is not created from the user panel | ||
| + | |||
| + | 2- Assign the "Pay Per Use" permission in the desired Cloud Datacenter | ||
| + | |||
| + | 3- Save changes | ||
| + | |||
| + | [[Archivo:PE13.png]] | ||
| + | |||
| + | From that moment, the user will have permissions to activate / deactivate Pay Per Use resources for the Cloud Datacenter or Clouds Datacenter assigned by the account owner. | ||
Revisión actual del 04:50 14 may 2020
Contenido
¿What is Pay Per Use?
Pay per Use is the functionality available to the client in the Gigas Control Panel, that enables the option to expand resources from Cloud servers hired in subscription mode, temporarily and managing their consumption, thus being able to control the cost of additional resources.
This functionality is designed for a punctual increase in resources without the need for time-consuming commercial procedures, providing all the possible autonomy to the client, both in the activation and deactivation of these additional resources.
The products in which this expansion can be carried out, within the Gigas product catalog, are the Cloud Datacenter, in any of its plans, and may increase the following resources:
- RAM
- CPU (Intel cores)
- Disk (SSD, SAS and SATA) --> The disk expansion generates the expansion of the Backup space automatically and without extra cost
- IPs
Resources can be added in blocks of minimum units, being able to contract as many units as we need, taking into account that the minimum unit that can be contracted is:
Minimum Unit Resource
RAM 1 Gb
CPU (Intel) 1 core
SSD Disk 100 Gb
SAS Disk 100 Gb
SATA Disk 100 Gb
IP 1 IP
¿How can I contract and activate Pay Per Use?
The functionality of Pay Per Use must be activated every time you want to have additional resources, although by default, it is activated.
In case we have disabled it and want to activate it, you just have to:
1- Select the Cloud Datacenter on which we need to expand resources in Pay Per Use mode
2- Click on “Activate resources in Pay Per Use”
3- A window will appear with the Terms and Conditions of use of the Pay Per Use, which must be read and accepted
4- After that, we will already have the functionality activated, although we will not yet have any Pay Per Use resource included and therefore we will not be billing anything additional, clearly indicating it since the Pay Per Use button is deactivated (OFF)
To associate additional resources in "Pay per Use", just click on "Edit the resources in Pay Per Use". At that time we will see a window with a resource selector which will give us all the information about the resources that we are going to add in addition to those that we have in our subscription, and the approximate cost that these resources will have.
Once the "Assign" button is pressed, the system will assign the new resources contracted in Pay Per Use mode to the resource pool of your Cloud Datacenter, and from this moment you can assign them to any server you want, or create new servers, being 100% available for use
Remember that from this moment, the billing system begins to calculate the time in which the resources are available for use and therefore, it is important to carry out this step when the resources are necessary to use them.
From this moment we can already see that we have Pay Per Use resources activated and we have them available, meaning that we are billing for them.
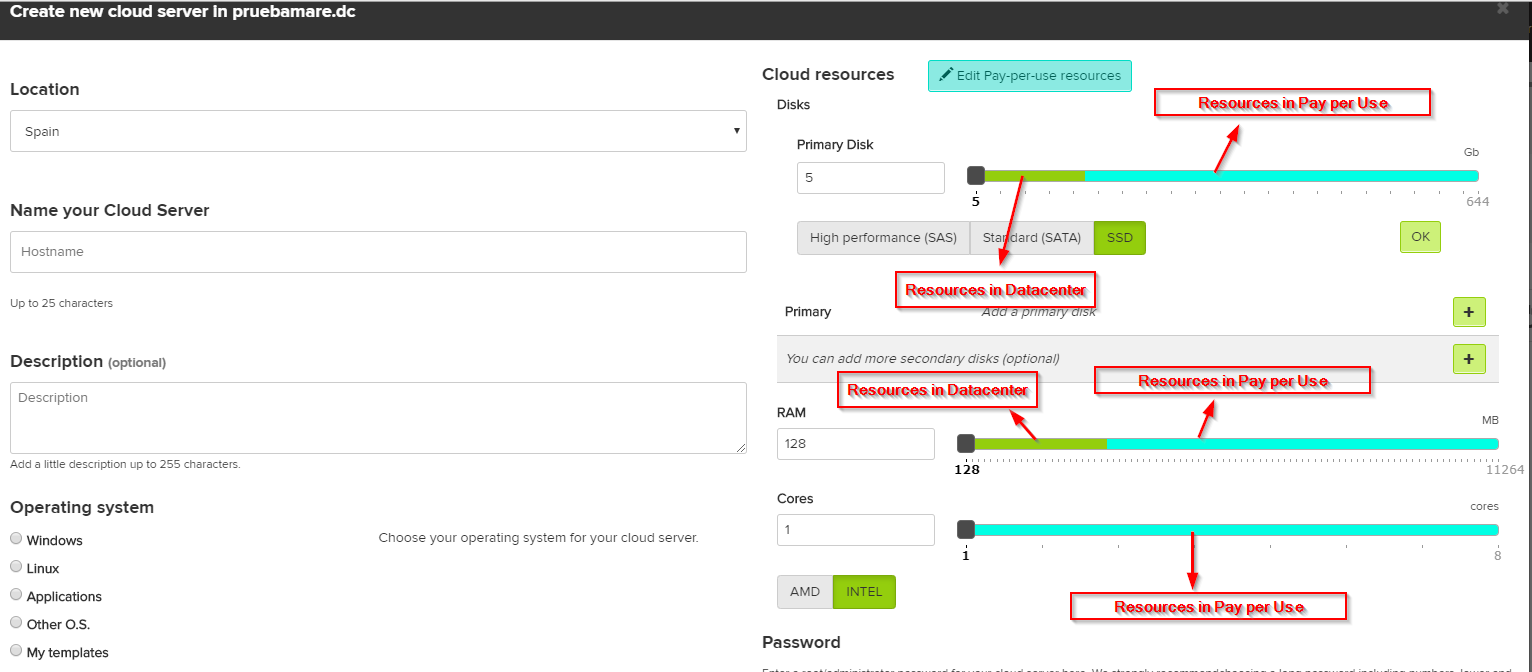
When creating a new server or increasing the resources of an already created server, we will see the resources that are in the subscription and those that are contracted in Pay Per Use mode, following this logic:
Subscription Resources = Green Color
Pay Per Use Resources = Blue Color
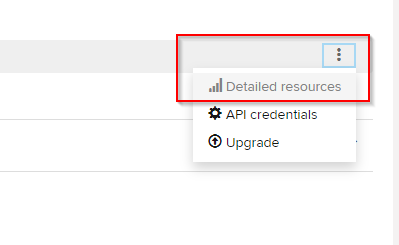
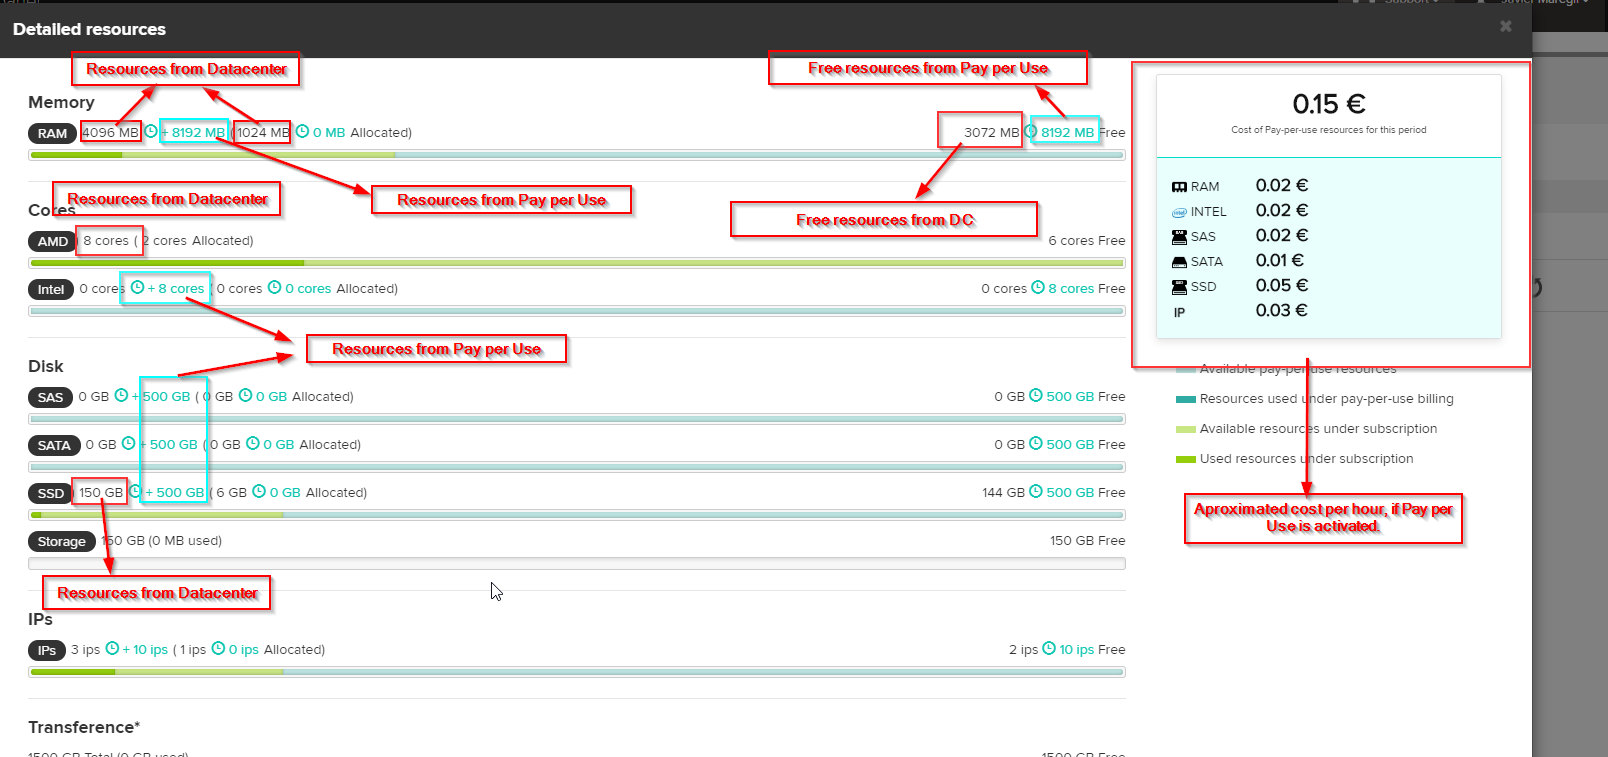
If we have assigned Pay-As-You-Go resources to any server, we can see it in the server resource view:
The server information is shown in this way, seeing both the cost of Pay Per Use and the resources assigned in this way:
When creating a server, if we detect that we need more resources and do not have them in our subscription, we can add more resources in Pay Per Use mode, editing those resources from the "Edit resources in Pay Per Use" button
Deactivation of Pay Per Use
At the moment when we no longer need the resources, and therefore we want to be billed, we must deactivate the subscription in Pay per Use.
In order not to be billed for the Pay Per Use, it can be done in 2 ways:
Remove resources assigned to Pay As You Go (Deallocate)
This method prevents billing from being generated due to having assigned Pay-As-You-Go resources, although at any time these resources can be assigned without having to Activate them again.
To do this, simply follow these steps:
1. Deallocate Pay Per Use resources from the server or servers added, so that they are unassigned
This step is essential, because if there are resources contracted in Pay-As-You-Go mode assigned to a server, the system will not allow the deactivation of this service
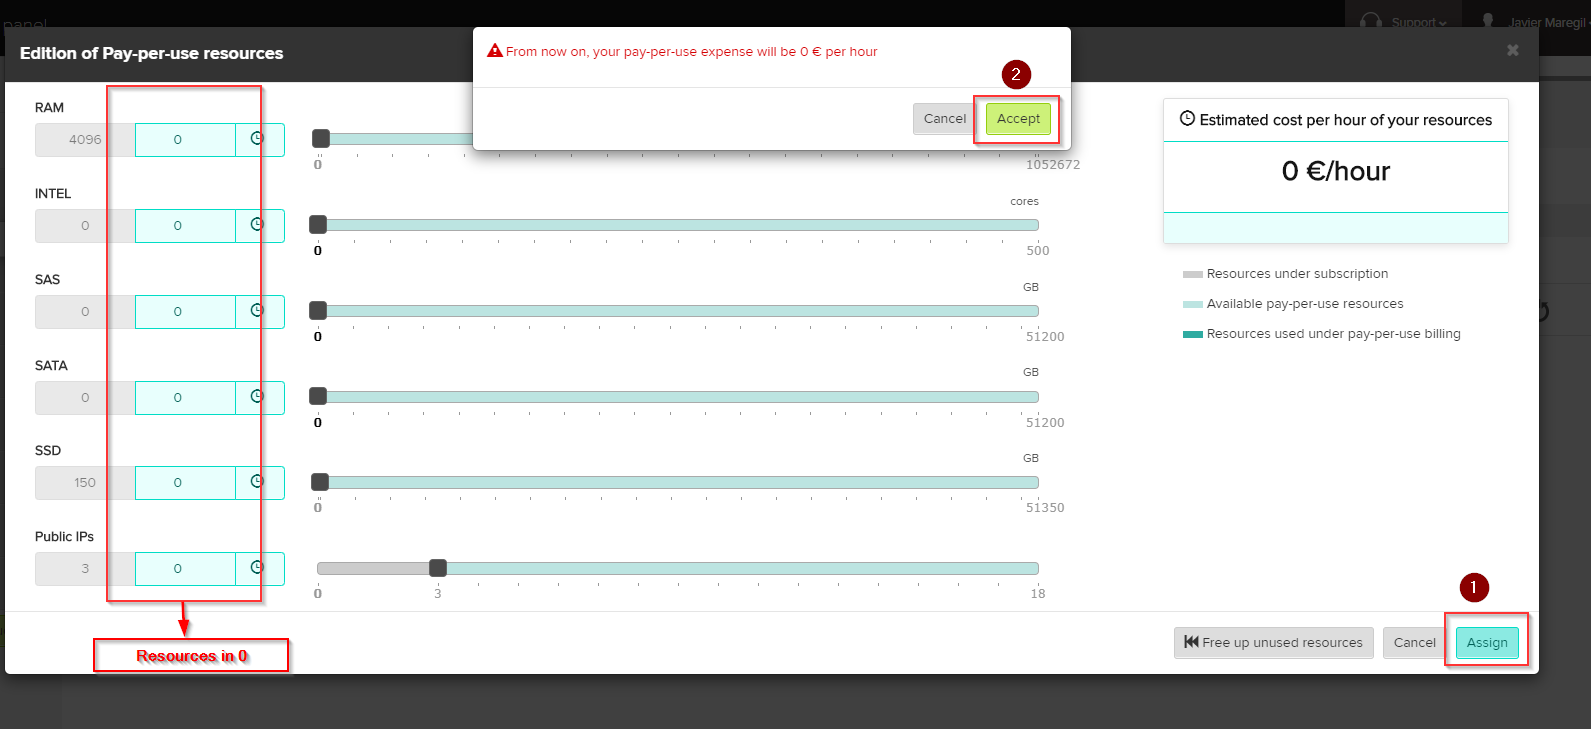
2. Edit the Pay Per Use resources, setting them all to 0, that is, not selecting additional resources for Pay Per Use
After that we will see that the "Pay Per Use" mode is disabled
From this moment, the system stops adding hours of use to the Pay Per Use and therefore, it will stop billing for this service, until Pay Per Use resources are added again.
Disabling the Pay Per Use system (Deactivate)
It is possible to deactivate the Pay Per Use option so that resources cannot be assigned. To do this, follow these steps:
1- Release the Pay Per Use resources assigned to the servers
2- Follow the steps to deallocate the Pay Per Use resources, as explained in section 4.1 of this document
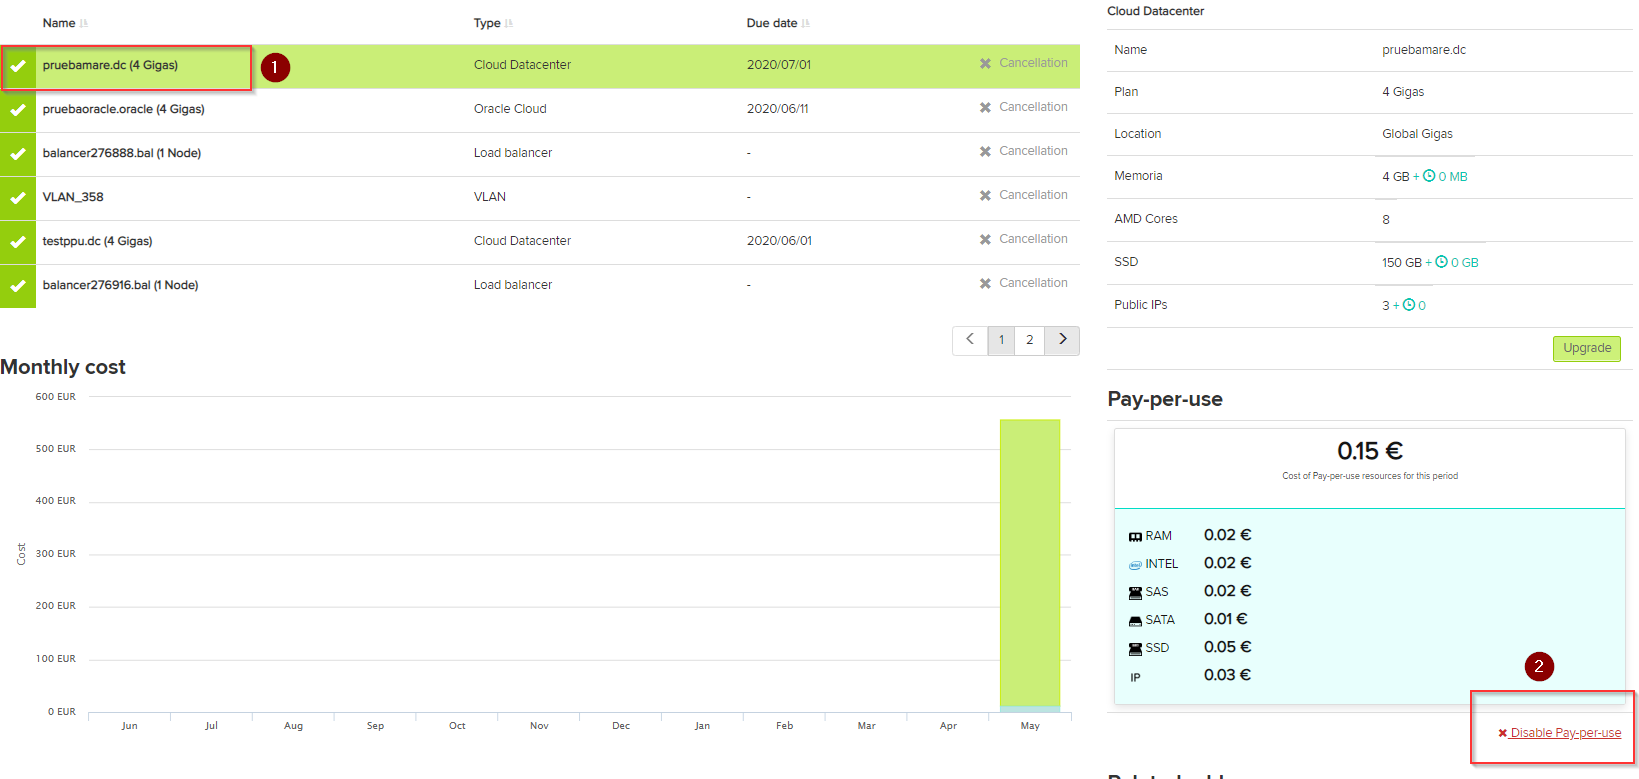
3- Access the “Billing Panel” section, select the Cloud Datacenter on which you want to deactivate the Pay Per Use and click on Disable Pay Per Use
It is very important to point out that in order to stop billing the Pay Per Use resources, they have to be deallocated as explained in this point (4.1 or 4.2). The shutdown of the server does not generate the stoppage of the billing system for the Pay Per Use resources, if they have not been previously unassigned from the turned off or disabled servers.
¿How is the Pay Per Use invoiced?
The system generates billing in Pay Per Use calculating the time of use for each resource contracted in this modality throughout the month, that is, each time it is activated and deactivated, it registers the time that the active resources have been, adds them and invoices them on a monthly basis.
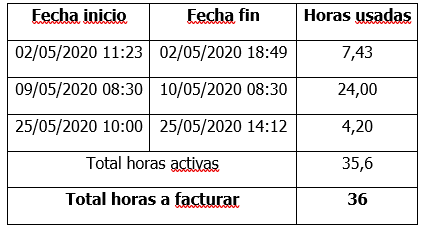
Let's put an example in hiring 3 Gb of RAM:
- The following table represents the start and end date of the Pay Per Use activation for 3 Gb of RAM
- Based on these data, the billing will be as follows:
- As a summary, a total of 108 units of RAM will be billed, that is, 1 hour of 108Gb of RAM, so, for example, if each Gb of RAM had a cost of € 0.02 / hour, the amount of Pay per Use would be
0.02x108 = 2,16€ for 36 hours of use.
Explanation of an invoice
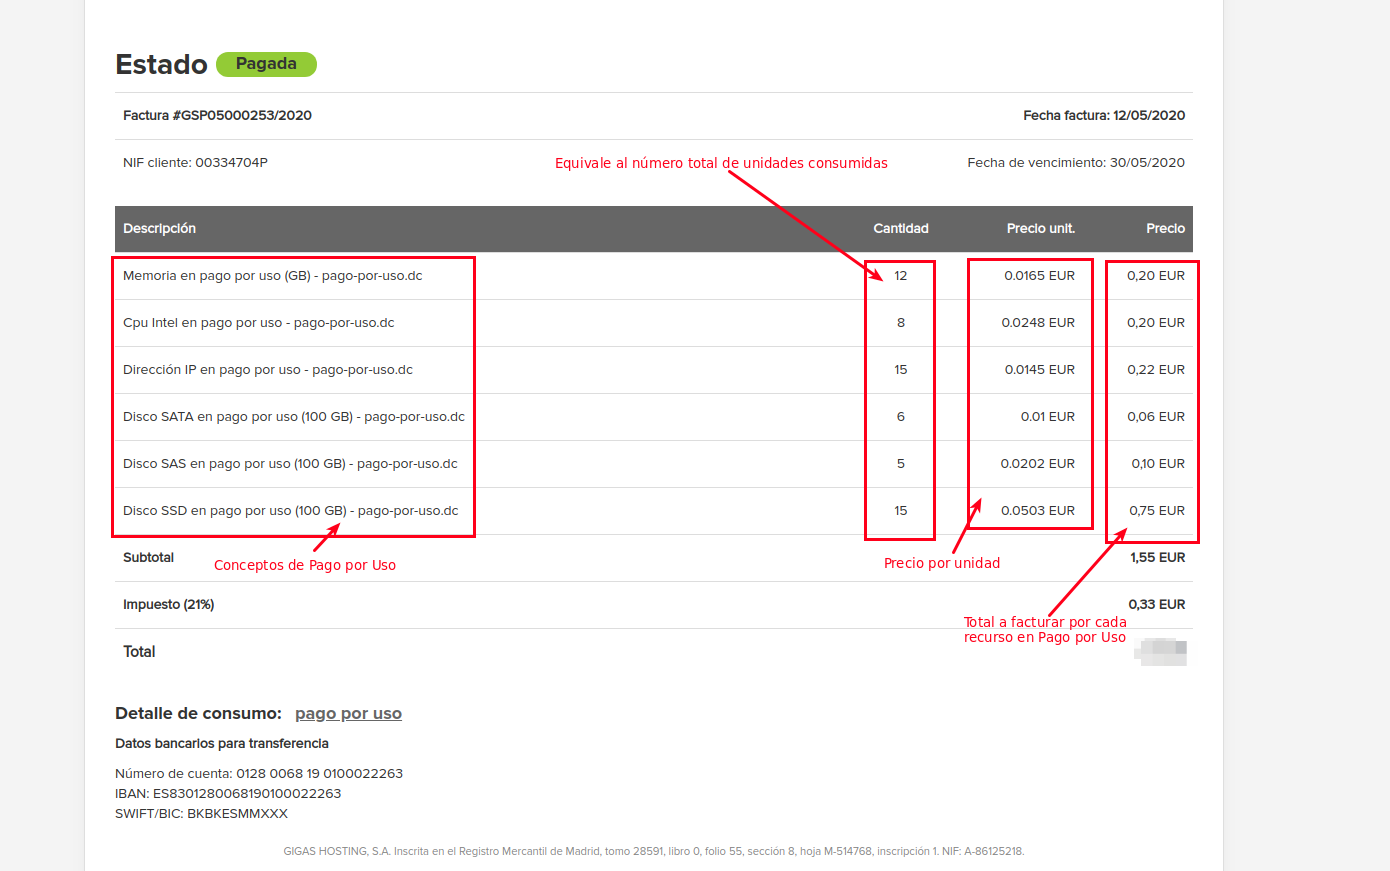
In the invoices that are generated, the concepts of Pay per Use are included
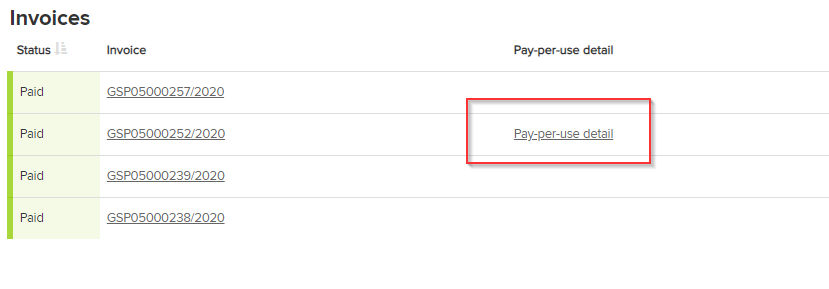
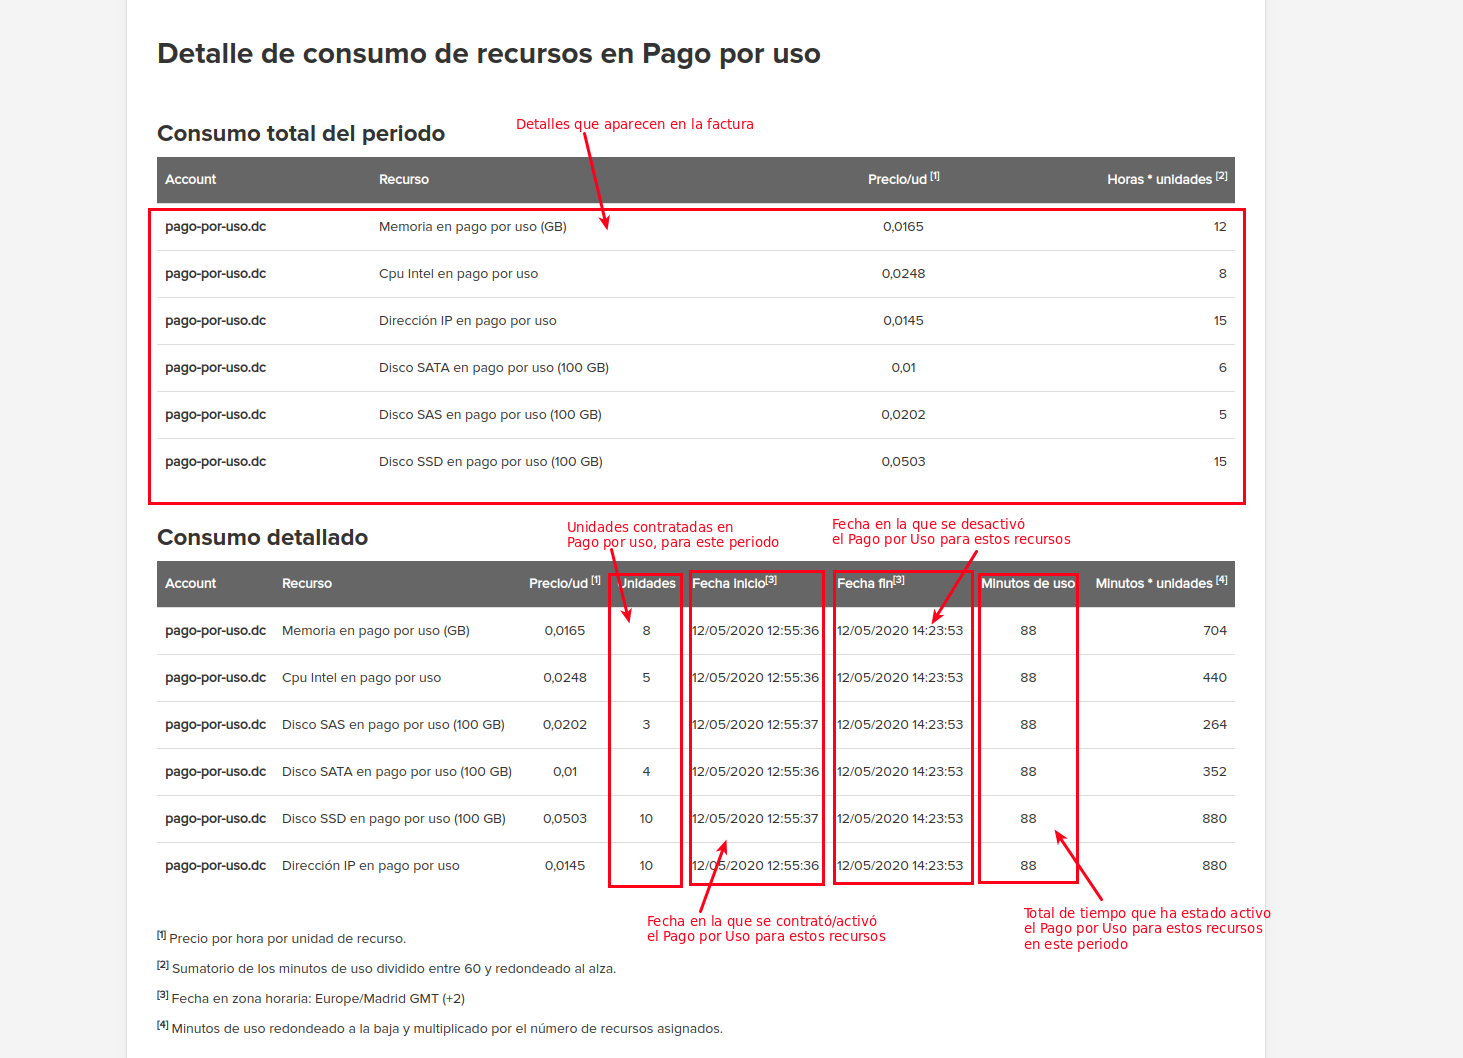
If we want to see a more detailed invoice, we will only have to access the "Pay Per Use Details” section in the Control Panel
And the Pay Per Use details will be shown for that invoice:
Payment Management for Users
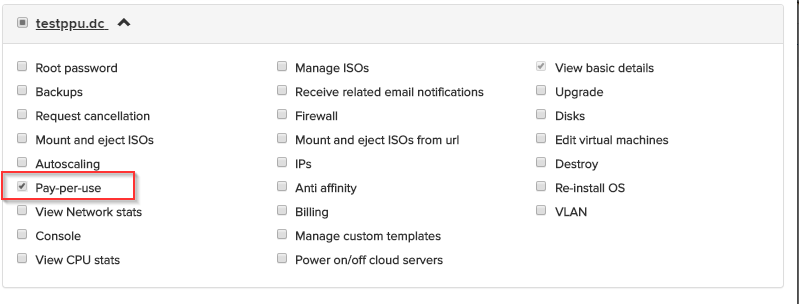
Users of a client can also manage resources in Pay Per Use, but for that the main client himself must have enabled the relevant permissions for said user, being as simple as:
1- Create a user if it is not created from the user panel
2- Assign the "Pay Per Use" permission in the desired Cloud Datacenter
3- Save changes
From that moment, the user will have permissions to activate / deactivate Pay Per Use resources for the Cloud Datacenter or Clouds Datacenter assigned by the account owner.


