Diferencia entre revisiones de «SMS MANUAL Gigas»
| (No se muestran 2 ediciones intermedias de otro usuario) | |||
| Línea 1: | Línea 1: | ||
| − | {{ | + | {{en español|Manual_SMS_Gigas}} |
== INTRODUCTION == | == INTRODUCTION == | ||
| Línea 479: | Línea 479: | ||
'''IMPORTANT:''' When granting a balance to a subaccount, the balance of the parent account decreases in the same proportion. | '''IMPORTANT:''' When granting a balance to a subaccount, the balance of the parent account decreases in the same proportion. | ||
Therefore, when granting a balance to a subaccount, the parent account MUST have the same or greater balance than the one you want to grant. | Therefore, when granting a balance to a subaccount, the parent account MUST have the same or greater balance than the one you want to grant. | ||
| + | |||
| + | [[Categoría:Telecomunicaciones y VoIP]] | ||
Revisión actual del 12:17 13 feb 2025
Contenido
INTRODUCTION
The following document is intended for the user to know, in a simple way, the operation of the SMS sending platform through the web. The manual has been arranged with the usual arrangement of the buttons that exist on the web platform. Although it is impossible to expose all the cases of use of the platform, an attempt will be made to give a global vision and the different possibilities that exist when planning shipments
CAMPAIGNS
Although it is possible to send campaigns using the simple method, practically all shipments are will be carried out through the "Campaign" functionality. Let's see how to send a campaign:
CREATE CAMPAIGN
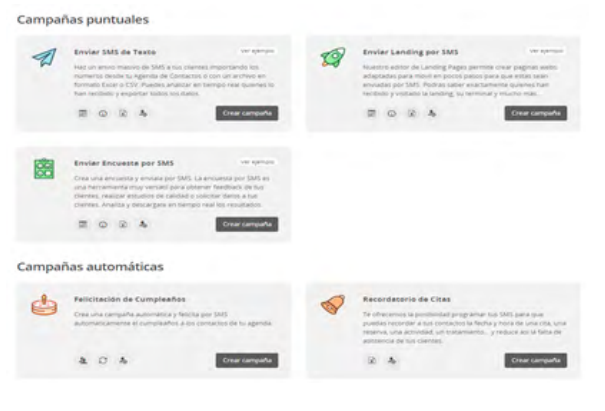
We will click on "Campaign" (in the upper left menu) and after that we will click on the "Create Bell". After that, the platform will show us 5 types of campaign and we will click on the "Create Campaign" button in depending on the type of campaign we want to create:
- One-off campaigns: They are sent only once, allowing you to program the delivery date and saving your parameters to resend it as many times as necessary. They may be:
- Send Text SMS
- Send Landing by SMS
- Send Survey by SMS
- Automatic campaigns: Allows the system to take the dates and times of sending a CSV or Excel file and thus automate such shipments.
- Birthday congratulation
- Appointment Reminder
A description of how it works is attached to each type of campaign. In all of them you can add, manually or import through a file, the list of destination numbers and different variables such as name and surname, which are used for the platform to automate personalization of messages. The methods of sending Surveys and Landing require previously configuring and saving a template, as we can see in the next section of this manual.
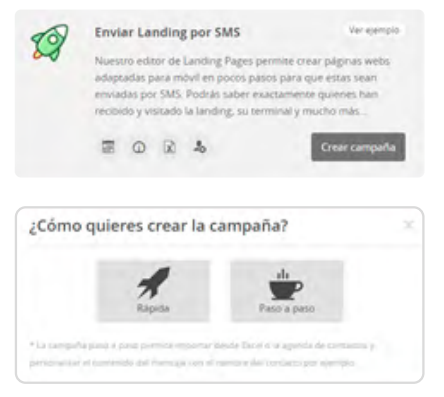
We show below how the type of Landing campaign being the one with the most complexity required, as the rest of the shipping types are performed in a similar or simpler way. Clicking on create campaign in any of the specific campaigns will offer us 2 options:
- Fast
- Step by Step.
The difference between fast and step campaign
by step is that in the step by step option
allows the system to customize
messages taking values from a file
uploaded; for this example we click on
step by step option.
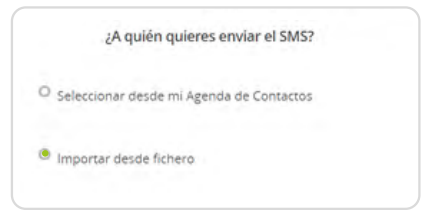
We can leave an agenda previously saved with groups of contacts, introducing them manually or by importing a file, these groups of contacts are managed from the menu option Top Contacts.
[[Archivo:campaña5.png|In the case that we explain we will not use the agenda contacts, we will import from file.]
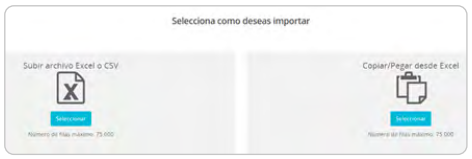
Next, we will have the following options:
- Upload Excel or CSV file
- Copy / Paste from Excel
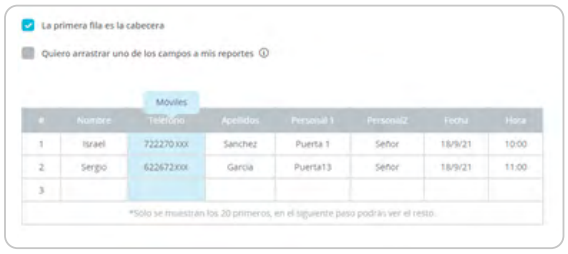
When the platform has imported the data, it will ask us to select which of the columns is the
corresponding to the telephones where the shipments will be made, these numbers must all be in the
same format and without spaces on the sides or between numbers.
We can also select another of the columns (of those existing in the original Excel) that is
will associate in the reports of the shipments to those numbers.
It is also important to note that if there is a header row (with the name of the columns) it must
be checked as shown in the following image (so that the platform does not take it into account).
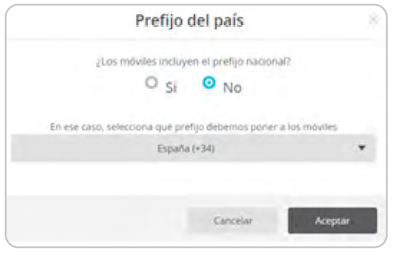
Do the numbers include a prefix? Select correct option:
MESSAGE
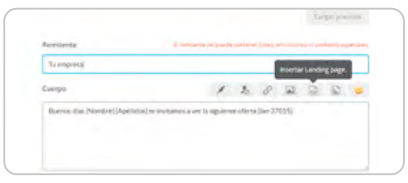
Once we have defined the numbers to that you have to send the messages, we go to the screen for writing the message itself, for this In the section "Write your message" we will write the message that will reach the recipients by filling in The sections:
- Sender
- Body.
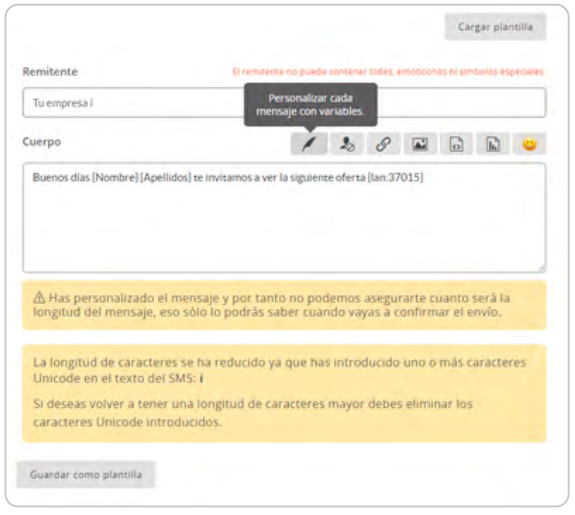
Sender: The sender will appear in the header of the SMS as its origin, a maximum length of 11 non-special characters such as accents or parentheses is allowed. Do not use senders that are not legitimate as they can be taken by the operators as an identity theft which would cause a blocking of said messages.
Message body. In this section we can add the text of the message and
include the variables of the imported file, in the example {Name} and {Surname}
are the columns that we have selected from the previously embedded file,
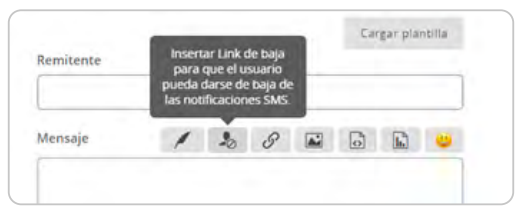
The action of adding variables can be done by clicking on the icon with a
drawn pen.
In addition to adding variables, which we can take from the Excel file that we have previously imported, we can add the following:
- Insert unsubscribe link.
- Insert a link. The link will be shortened using url shorten techniques, so that it occupies the minimum amount of characters necessary).
- Insert an image: in this case a new window will be displayed so that we can tell the platform which image we want to show. As in the previous case, the image will not go in the SMS but a short url will be attached to our message, and the user by clicking on said url, will show the image that we had previously uploaded in the mobile browser.
- Insert a Landing Page (see next chapters).
- Insert a Survey (see next chapters).
- Insert smileys.
The text computes 160 characters per SMS, referred to as UNICODE characters, each character incorporated outside of the Unicode type, such as accents and parentheses, can compute up to 10 normal characters, which is why the notice appears at the bottom.
Each icon offers a brief description of how it works when you move the mouse over it, in the image above we have added the landing page {lan: 37015} by clicking on the icon for it. In the case of adding Landing or Surveys it is necessary to have them previously created.
Insert unsubscribe link, also available when creating the landing or survey, allows the recipient to include their number in a blacklist by clicking on said link.
The numbers included in the black list will be excluded from the shipments automatically, this list can be edited from the "Reports" section that we will see later.
 In addition, we will have the option of
save this message with template and
reuse it later.
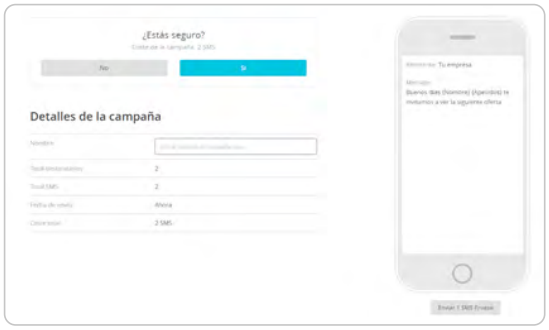
Once our message is finished, we can schedule its delivery or do it immediately.
In any of the cases we
will show a summary prior to shipment,
indicating the total cost of the
campaign to send
CAMPAIGN FOLLOW-UP
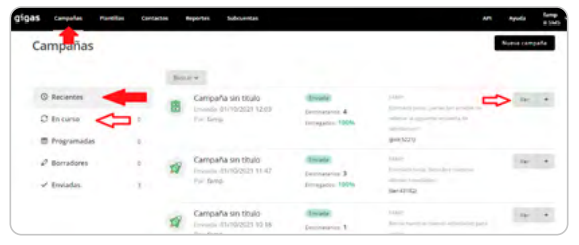
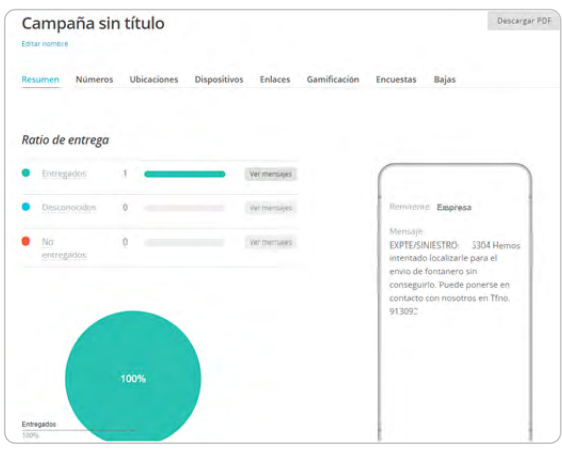
Once confirmed, it will be sent, the tracking of shipments can be done from the recent or ongoing campaigns section, depending on the size of the campaign it may appear in progress (which means that it is still sending), recent (where the latest campaigns we have are shown) or sent (which means that the shipment has already been made).
Important: Just because a campaign has been sent does not mean that it has been delivered. Delivery depends on external factors such as the saturation or not of the destination phone network, as well as the availability or not of the same phone (off, lack of coverage, does not exist, is not registered with any operator ...). that delivery is delayed or never made
Accessing the detail in the view option in the campaigns section, we will attend to a multitude of information about the shipment made. All information is downloadable.
TEMPLATES
CREATE TEMPLATE
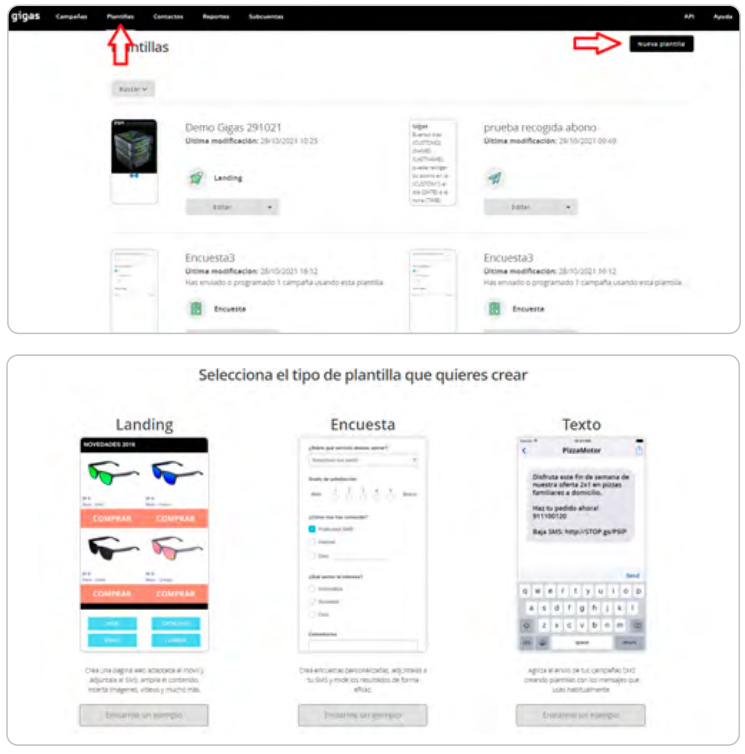
Accessing from the option of the upper menu "Templates", and clicking on the button "New Template" we have available several editable examples:
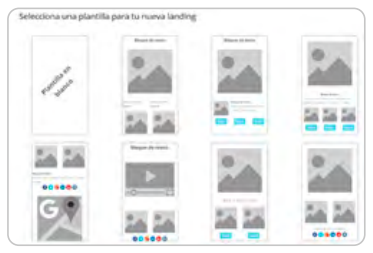
In this example we access a new template to show how it is done from scratch, for this we select the type of template marked as "Landing". In the next screen we will have different "type" options, although to understand the mechanics correctly, in this case the blank template will be used:
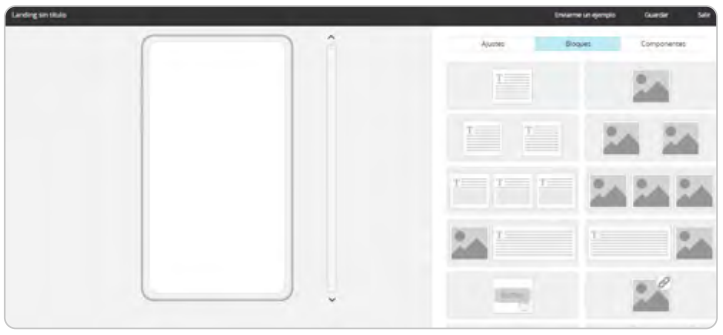
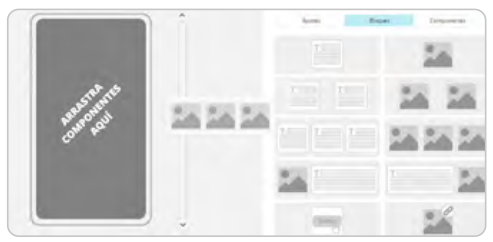
Even if we select a pre-configured template, we can add, delete and edit the blocks we need. Once the blank template has been selected, we will enter the Landing Page creation tool itself, having on the right side the components, blocks and settings that will allow us to compose our Landing, and on the left side the "canvas" or "Screen" of the mobile browser, where we can see how our Landing is looking.
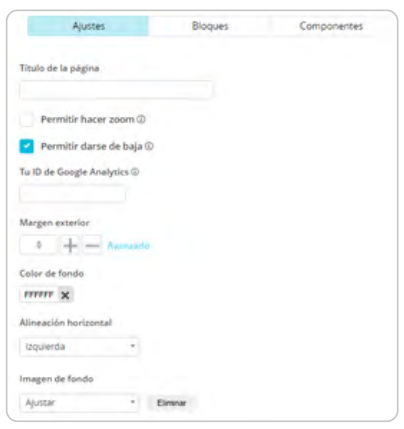
SETTINGS
We will have the general values of the Landing as well as the possibility or not of allowing the recipient to unsubscribe, and in the case of having a Google Analytics ID to be able to trace statistically with your own Google tool.
BLOCKS
In this section we have different already composed blocks, with different functionalities:
- Images
- Images with destination url
- Text
- Youtube videos
- Buttons
- Countdowns
- Etc.
COMPONENTS
They are special functions that can be displayed in the blocks, previously there must be a block on the left side of the tool. Its operation is similar to that of the blocks, it is dragged with the mouse to the desired area and the values that are shown on the right side are configured.
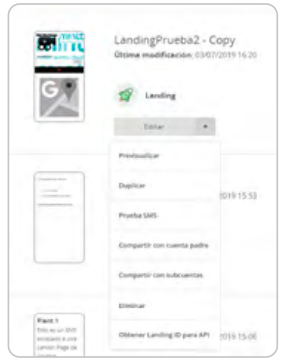
Once the Landing template is saved, we will have a drop-down menu from which we can perform the following actions (not all of them may be available):
- Edit (this allows us to re-edit the template).
- Preview the template. It will show us how the landing is in a mobile screen simulation.
- Duplicate. It allows us to duplicate the template to make edits without altering the original.
- Test SMS. It allows us to send the template to a real phone number, to verify on the spot how the template looks truthfully.
- Share with parent account. This enables the top level of this account to use the templates that have been generated in this subaccount.
- Share with subaccount. It enables the lower levels (if any) to use the templates that have been generated in the account.
- Remove. Allows deletion of the template.
- Get the LandingID. It allows to find out the ID of this template, for its later use through the API if this option is available.
The case of Survey templates works in a similar way to that explained in the case of Landing, dragging the questions (components) to the left side and configuring the options on the right side.
Both Landing and Surveys allow us to insert an unsubscribe link in the "settings" section, so it would not be necessary to insert it in the body of the message when sending the campaign.
CONTACTS
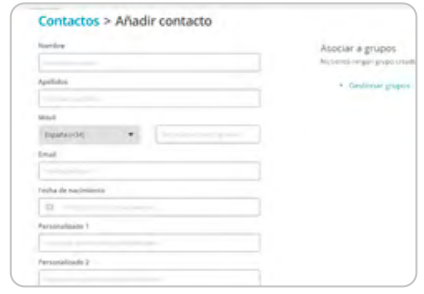
The contacts section allows you to create groups of contacts and leave them stored in the platform for future shipments, it can be created manually by filling in a form or importing them by file (CSV or Excel) as in the cases described above.
We can create as many different groups as needed, being able to carry out the following actions:
- View contact.
- Edit contact.
- Delete contact.
- Send an SMS to a contact.
- Download a complete group of contacts in an Excel file.
By filling in the date of birth in these forms, it will allow us, for example, to carry out birthday reminder campaigns or select recipients by age
REPORTS
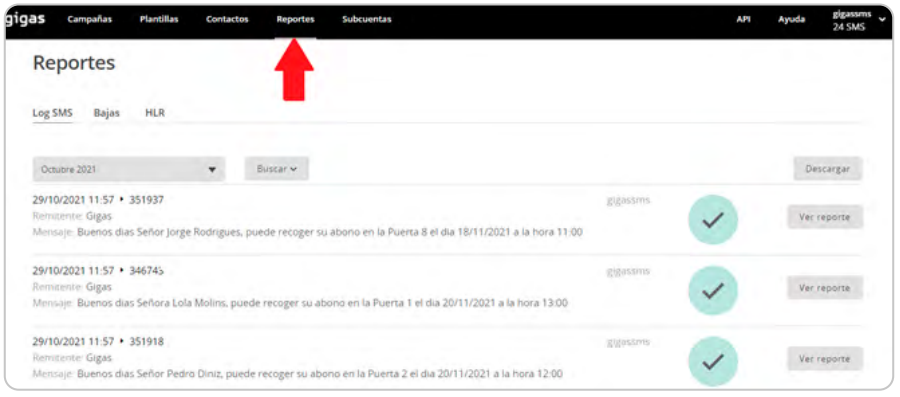
Within this section, which we will access from the top menu, we will find 2 options:
- SMS log
- Low
LOG SMS
It will offer us the details and status of each text SMS sent.
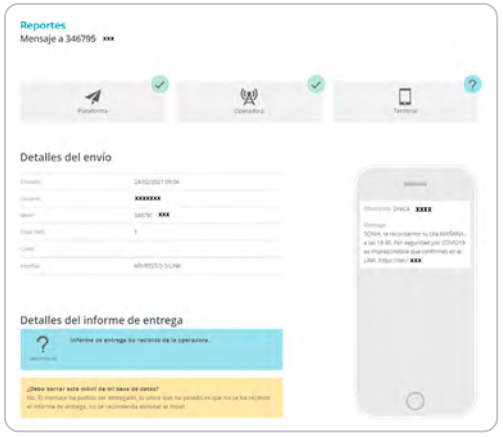
This section is especially useful to find the cause of messages that have not reached your terminal, in the event that an SMS has not arrived successfully, it will be shown instead of a blue check, a question mark, a yellow or red icon. being able to obtain even more detail by clicking on the option "see report" of each shipment. In this report we will see each of the 3 phases of the shipment:
- Platform (the shipment has left the platform or not).
- Operator (the shipment has been sent or not, by the final operator).
- Terminal (the shipment has arrived or has been delivered to the terminal).
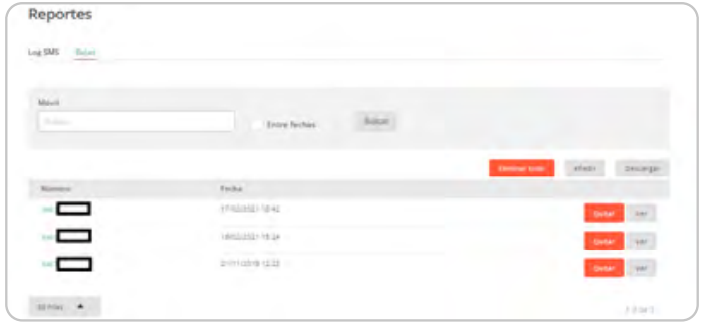
UNSUBSCRIBE
In unsubscribe or "black list" we can manage the numbers that have used the unsubscribe link, being able to:
- Watch
- Add
- Remove
- The numbers individually or by file.
When a user clicks on the unsubscribe link in an SMS received through the platform, their number is automatically added to a list in this section and the platform will omit shipments to that number while they are in said list, even if in a campaign we re-include the number manually or by file. This is because, before making any shipment, the associated blacklist will always be checked to verify that the number is not on it.
SUBACCOUNTS
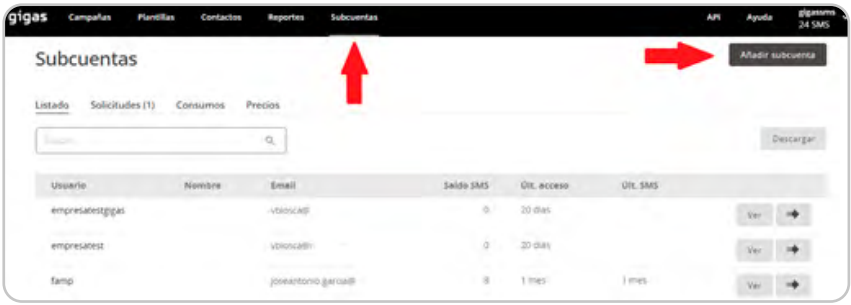
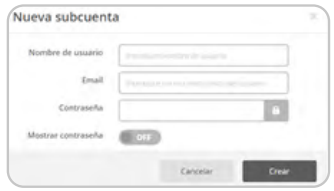
In this option we can create subaccounts under the main account by filling out a simple form that asks for the following data:
- Username.
- Email (this email is the one that will be used for notifications and balance requests).
- Password.
Once a subaccount has been created, it will appear listed (along with the rest that exist) when clicking on the option in the upper menu.
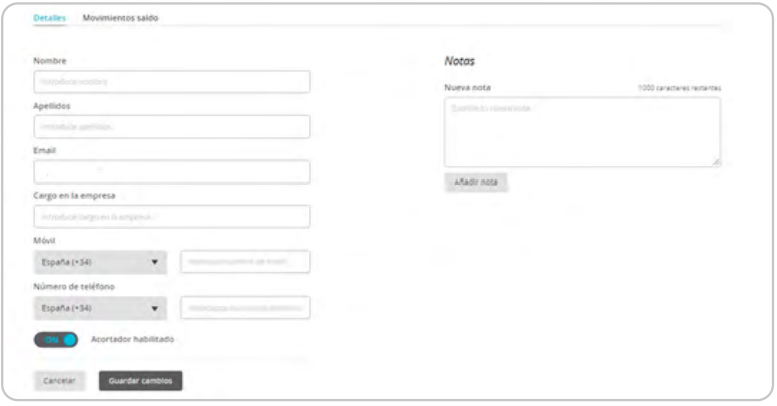
If we click on the view button, we will enter the details section of said account, where we can fill in any of its fields.
IMPORTANT: It is necessary to enable the "Shortener Enabled" control, to allow the newly created subaccounts to be able to use the Landing and Survey templates. In the case of not enabling this check, the user will not be able to use said templates (they will appear as disabled or prohibited)
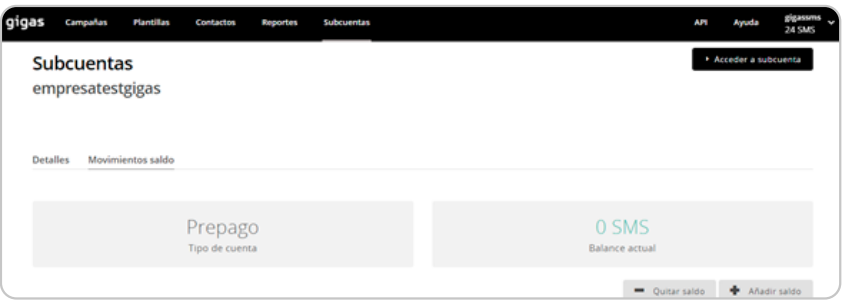
The availability of SMS sending is done through message balances, the main account has a maximum message balance, which is recharged periodically and for a subaccount to send messages it is necessary to allocate or recharge a part of the balance. Accounts and subaccounts cannot be limited by roles or permissions, since they have all the functionality of the account (it cannot be segregated by query type and administrator type users), as a security measure the balance system is used ( see OTHERS section), since a subaccount cannot make more shipments than those assigned in the available balance. When a subaccount exhausts its balance it is necessary to recharge it from the parent account.
API AND SETTINGS
API (APPLICATION PROGRAMMING INTERFACES)
In the API section we can carry out procedures on the API KEY (or API key) necessary to integrate the platform with an external service through API. Technical documentation on its operation is available in the section “read documentation”.
'IMPORTANT:' Each account and subaccount can generate their API Key and are linked to the password, they are generated only once, allowing it to be copied only at the time of its creation, if the password of the account, a new API key can be generated, but never the same one that had previously been generated.
This is important in that if the sending of sms has been integrated with an external service through the api and the password is modified or accidentally deleted, it will stop working until a new API key is generated and it is update in the external service that is making the shipments.
SETTINGS
We will have account data available, we can establish default sender, Modify the password, although we remember that it would affect the API if it were being used,
We can also establish time restrictions for shipments, and notification of activity and minimum balance that would be sent automatically to the account administrator's email.
OTHERS
BALANCE
The balance request system works as follows:
When a subaccount needs more balance than its remainder (either because it is at zero, or because it needs more for future campaigns) it must
request it to her parent account.
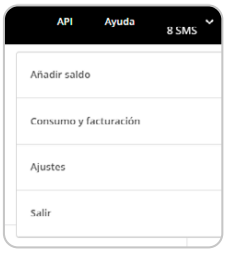
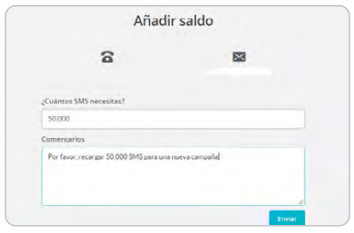
To do this, we will click on the account name (upper right menu) and choose the option to add balance.
This will take us to a new screen where we will be presented a form to request the recharge of more SMS. East form will send an email to the email address of the parent account of this subaccount:
In that case, the parent account will receive the recharge request email, but also when entering the platform you will have a new notification (or request) to recharge SMS from the subaccount.
By clicking on Requests we will see all those that we have in:
- Slopes. A subaccount has asked us for more balance. If you press accept, the balance requested in the balance request form is granted and goes to Accepted. If you click on Deny, it will go to rejected.
- Accepted. Those that have been accepted.
- Rejected. Those that have been denied.
IMPORTANT: When granting a balance to a subaccount, the balance of the parent account decreases in the same proportion. Therefore, when granting a balance to a subaccount, the parent account MUST have the same or greater balance than the one you want to grant.
