Diferencia entre revisiones de «Load balancing and Autoscaling»
(barra idioma2) |
|||
| (No se muestra una edición intermedia de otro usuario) | |||
| Línea 113: | Línea 113: | ||
[[File:Balanceador_Autoescalado9.jpg]] | [[File:Balanceador_Autoescalado9.jpg]] | ||
| + | |||
| + | {{Support}} | ||
| + | |||
| + | [[Categoría:Load_Balancer_and_Autoscaling]] | ||
| + | [[Categoría:Control_Panel]] | ||
Revisión actual del 17:41 23 mar 2017
Load balancing
1.1 Prerequisites
Before contracting and configuring a load-balancing service you must already have the following services/products contracted:
- Cloud Datacenter
- Private VLAN
1.2 Concept
A load balancer is, conceptually speaking, a separate machine that manages the connections of two or more servers, distributing connections and connection requests according to a set of pre-established rules. A load balancer can, in turn, be redundant, which means that if the primary one becomes unavailable, the secondary one will seamlessly take over the tasks for the end client.
1.3 Contracting
Clients can contract this service from their control panel without redundancy; if they wish to contract high availability, once they have contracted the load balancer they can do so in the “Failover” tab on its configuration page.
It is important to remember that you must have a VLAN to use the load-balancing service.
1.4 Initial Configuration
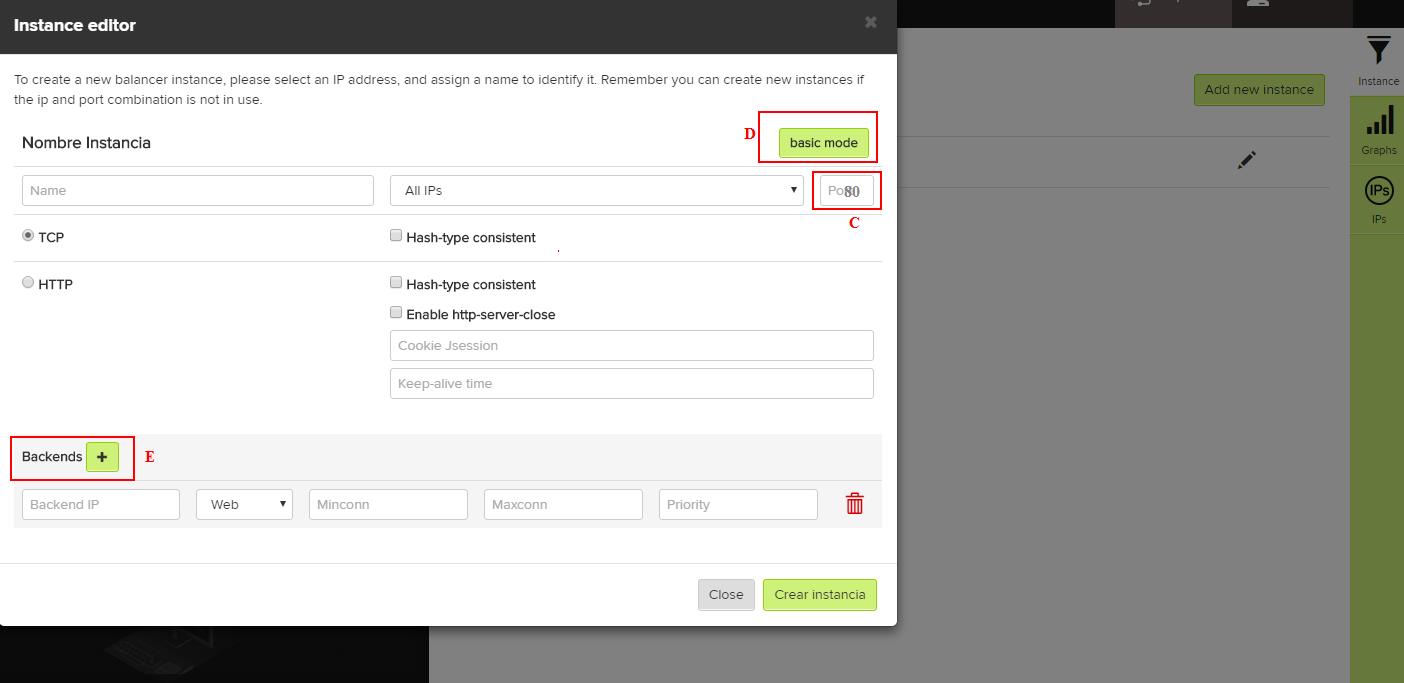
Once you have contracted a load-balancing service, you can configure it. Access the configuration page by selecting load balancer on your control panel. The first thing to do is to create a load balancer instance in which to configure the service you want to balance. For example, you can create an instance called WEB that balances connections arriving at port 80 of the IP instance and forwards it to the web port (80) of all the backends that you configure. You can thus create different instances for different load-balancing services, each with their own configuration backends and rules.
Below is an explanation of the various options you will find and what they mean.
- Failover (high availability) – A configuration for which resources not previously applied to a cloud server is used to create additional virtual machines based on the configuration of a load balancer to provide a high-availability load-balancing service
- (A) Instance – The set of rules and behavior parameters of a load balancer
- (B) Public IP address – An IP exposed to internet that is specifically assigned to a particular load balancer
- (B) Private IP address – An IP oriented to a client’s private VLAN, set up in their Cloud Datacenter
By clicking on instance and edit, you can access other information and configurations.
- (C) Port – This refers to the port of the public IP which responds to the load balancer configured for this specific instance
- (D) Type of Load Balancer – The load balancing method to be used by the load balancer when managing the incoming connections to be balanced, and configured for this specific instance
- (E) Backend IP address – The IP/s of the server/s between which incoming connections to the load balancer will be balanced. These servers must offer the same content and use the same system
To create a new instance (or a first one, if that is the case), it is first given a name (A). Then the IP that will respond to the load balancer (either a specific one or all those available; all these addresses will be displayed on the page) must be chosen (B), as must the load-balancing service which is usually specified by the port that is chosen (C). Additionally, for an instance that has already been created, you can choose the type of load balancing (D) and the IPs of the servers of the internal network (private VLAN), as well as the port for these that will serve the content to be load balanced (E).
1.5 Advanced
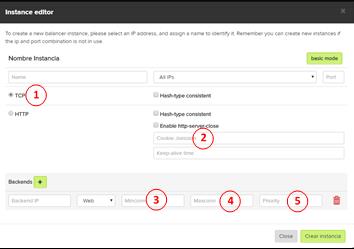
This tab allows you to apply a more detailed configuration of the load-balancing instance where, in addition to the above-mentioned parameters, others such as the protocol for visitor tracking can be applied, either TCP or HTTP (1), as well as the ID session code to be applied to the instance (2).
With regard to each backend you can set the Minconn (3) and Maxconn (4) and configure the minimum and maximum connections respectively that each one will manage, as well as the priority (5) to be given to this backend in order of preference.
1.6 Maintenance
The parameters for load-balancing instances set for a particular load balancer can be modified to suit changing needs. You can add (A) and remove (B) backends. It is also possible to disable an instance (C) or, if necessary, delete (D) it completely. To save the changes of an instance, the parameters must thus be changed and “save changes” (E) must be selected at the end.
1.7 IPs
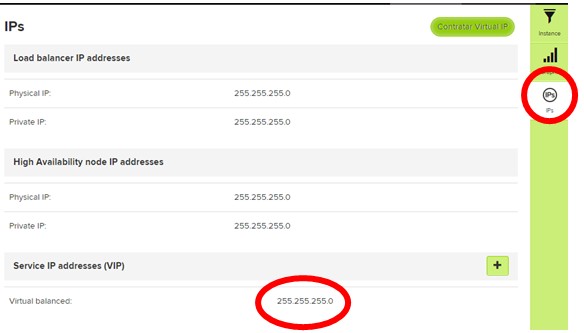
From this tab you can check the IP to be balanced by the load balancer in question – this IP must be configured on the client’s DNS in order for the load-balancing service to be provided. In cases where a high-availability service is required, the IP to be balanced must be a virtual IP which can be automatically reassigned to a new instance of the load balancer.
1.8 HIGH AVAILABILITY
From this tab you can contract a high-availability service which allows you to retrieve the load-balancing service in minimum time via a passive node of the balancer; this is only activated when a failure is detected in the service of the main one . In order for the service to be functional, the resources needed for the cloud backup server must be provided in advance; this is done when this added service is contracted.
1.9 Statistics
This shows the statistics of use and the performance of the load balancer during different time periods broken down by instance.
Autoscaling
When you have configured a load-balancer instance, you can then choose to configure an autoscaling system: this consists of a set of rules which, once they have been met, results in the creation of an additional cloud server (using unassigned resources within the Cloud Datacenter) based on a template previously designed by the client and which is dependent on a specific load-balancing instance which will use this template for its backend functions.
2.1 Prerequisites
Before you can configure and enable the autoscaling rules, a number of requisites must be met:
- This cloud must have its own customized cloud server template (see the Help section in the gigas.com Handbook)
- A configured and functional load-balancing instance with a configured backend
- Sufficient (unassigned) resources available in the cloud to cover the total number of all the configurations of the autoscaled cloud servers (cloned from the above-mentioned template) that you want to be in operation at the same time
When these requisites have been met, the autoscaling system can be configured. Go to the “Details” tab of the administration section to configure the cloud-server autoscaling settings.
The main autoscaling page contains several sections:
A) A list of the set autoscaling rules and their implementation status B) The general autoscaling configuration that is applicable to all the rules C) The specific configurations of the different rules which are currently active
By using the different buttons on this screen, you can access both the general and specific configurations of the rules
2.2 General Configuration
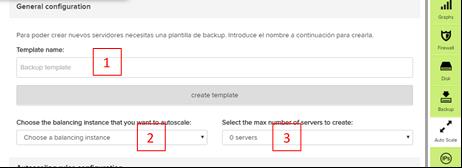
1) Select the previously-created customized template to be used to create the additional cloud servers that will be part of the autoscaling solution. 2) Select the load-balancing instance in which the subsequent cloud servers created with this autoscaling rule will be included. This instance will be reconfigured to make use of these autoscaled servers. 3) Select the maximum number of servers you want to create with the autoscaling rule in question.
2.3 Specific Configurations
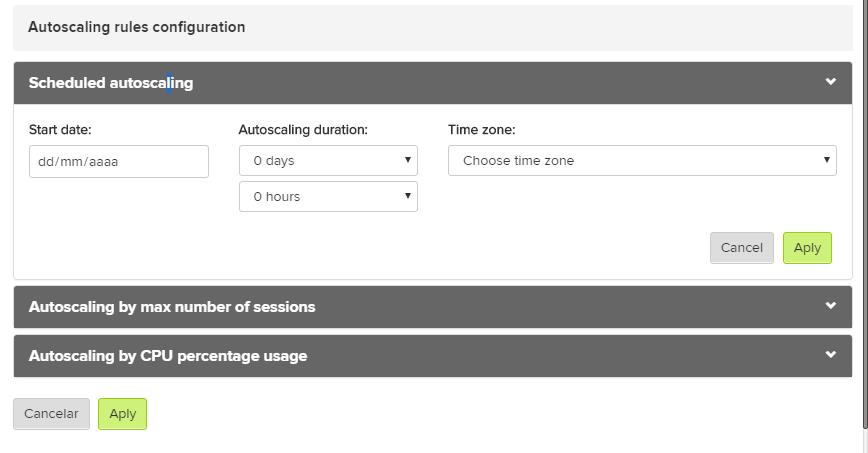
Start Date and Time – the configuration by which the autoscale rule is activated.
- Autoscaling by maximum number of sessions: This specifies the number of concurrent sessions that must be exceeded in a given period (in this case, 5 minutes) as well as the duration of the autoscaling effect from the time of activation.
- Autoscaling by percentage of CPU usage: This takes place when a percentage (in this case, 5%) of continuous use is exceeded for a specific period of time (in this case, 5 minutes), autoscaling will take place.

