Diferencia entre revisiones de «How to Administer my Cloud Server from within Gigas Control Panel»
(reorganización. falta copiar textos ya traducidos... y traducir) |
|||
| (No se muestran 8 ediciones intermedias de 2 usuarios) | |||
| Línea 7: | Línea 7: | ||
# ON/OFF – These buttons allow you to boot up or force-close the server. The OFF button performs a shutdown on an electrical level, not stopping the services in execution at that time. | # ON/OFF – These buttons allow you to boot up or force-close the server. The OFF button performs a shutdown on an electrical level, not stopping the services in execution at that time. | ||
# Cloud Server Name - Shows you the name assigned to the Cloud Server. | # Cloud Server Name - Shows you the name assigned to the Cloud Server. | ||
| + | # Ubication - Show you the ubication assigned to the Cloud Server. | ||
# Operating System - Lets you check the Operating System template installed in your Cloud Server. | # Operating System - Lets you check the Operating System template installed in your Cloud Server. | ||
# Tags/Add - Lets you see/add the tags assigned to your Cloud Server. | # Tags/Add - Lets you see/add the tags assigned to your Cloud Server. | ||
| Línea 12: | Línea 13: | ||
# Details - Lets you access a tab with additional information on sour Cloud Server. | # Details - Lets you access a tab with additional information on sour Cloud Server. | ||
| − | [[Archivo: | + | [[Archivo:Administrarcloud1.png]] |
=='''Details tab'''== | =='''Details tab'''== | ||
# Your cloud server´s Hardware Description – You will find the cloud server´s hardware setup in this window. This information reflects the total assigned hardware information (hard drive, memory, CPU and IP). | # Your cloud server´s Hardware Description – You will find the cloud server´s hardware setup in this window. This information reflects the total assigned hardware information (hard drive, memory, CPU and IP). | ||
| − | # | + | # OS - Lets you check the Operating System template installed in your Cloud Server. |
| − | # | + | # Root password (Show) - Lets you see superadmin password: root (Linux) or Administrator (Windows). |
[[Archivo:Cloud_admin2.jpg]] | [[Archivo:Cloud_admin2.jpg]] | ||
| − | ==''' | + | =='''Cloud Server section'''== |
| − | # ON/OFF – | + | # ON/OFF – These buttons allow you to boot up or force-close the server. The OFF button performs a shutdown on an electrical level, not stopping the services in execution at that time. |
| − | # | + | # Cloud Server Name - Shows you the name assigned to the Cloud Server. |
| − | # | + | # Reboot Cloud Server - Lets you do an ordered reboot of your server by stopping services before rebooting. |
| − | # | + | # Delete Cloud Server - By using this option you will delete your Cloud Server and erase the resources assigned to it, so they will be unallocated and will return to your Cloud resources pool. Keep in mind that this option will erase all data on the Cloud Server. |
| − | # | + | # Show root password - Lets you see superadmin password: root (Linux) or Administrator (Windows). |
| − | # | + | # Console access - Lets you access your machines prompt. The prompt displays your Cloud Server information in real time, so you will be able to use it, for instance, to view your server boot-up process. To access the prompt, you need Java installed in your browser. Although Gigas prompt gives your immediate access to your cloud server, we recommend you use more customizable and flexible accesses such as Secure Shell (SSH) or Terminal Server. |
| − | # | + | # Re-install OS - Allows you to re-install your Cloud Server with the Operating System you pick from the available image list. Keep in mind that this option will erase all data contained in the Cloud Server. |
| − | # | + | # Add a short description to your Cloud Server - Lets you add a short description to your Cloud Server. |
| − | # | + | # Add a tag - Lets you manage the tags assigned to your Cloud Server. |
[[Archivo:Cloud_admin3.jpg]] | [[Archivo:Cloud_admin3.jpg]] | ||
| − | === | + | ===Cloud Server details tab=== |
| − | # | + | # Resources – In this part you will find hardware configuration associated to your Cloud Server. The information shows the total assigned hardware data (Disk, Memory, CPU). |
| − | # | + | # Location - In this part you can check your Cloud Server location. |
| − | # | + | # Template - Lets you check the Operating System templated installed in your Cloud Server. |
| − | # IPs - | + | # IPs - Lets you see the IPs assigned to your Cloud Server. |
[[Archivo:Cloud_admin4.jpg]] | [[Archivo:Cloud_admin4.jpg]] | ||
| − | === | + | ===Modify cores and RAM tab=== |
| − | # RAM - | + | # RAM - Lets you increase or decrease the amount of RAM memory assigned to your Cloud Server. |
| − | # Cores - | + | # Cores - Lets you increase or decrease the number of cores assigned to your Cloud Server. |
[[Archivo:Cloud_admin5.jpg]] | [[Archivo:Cloud_admin5.jpg]] | ||
| − | ==''' | + | =='''Graphs section'''== |
| − | + | This section lets you see the CPU and Network usage graphs for your Cloud Server. Graphs are updated every hour and let you see a log of last 24 hours so you can check your Cloud Server usage and dimensioning. | |
[[Archivo:Cloud_admin6.jpg]] | [[Archivo:Cloud_admin6.jpg]] | ||
| − | === | + | ===CPU tab=== |
[[Archivo:Cloud_admin7.jpg]] | [[Archivo:Cloud_admin7.jpg]] | ||
| − | === | + | ===Network tab=== |
[[Archivo:Cloud_admin8.jpg]] | [[Archivo:Cloud_admin8.jpg]] | ||
| − | ==''' | + | =='''Firewall section'''== |
| − | + | In this section you can: | |
| − | # | + | #Add rules |
| − | # | + | #Configure the default behaviour |
[[Archivo:Cloud_admin9.jpg]] | [[Archivo:Cloud_admin9.jpg]] | ||
| − | ==''' | + | =='''Disks section'''== |
| − | + | ||
| − | # | + | Provides the following options: |
| − | # | + | #Add Disk - Lets you add an additional disk in case you have unassigned space. |
| − | # | + | #Add more space - Lets you contract additional space that you can assign later. |
| − | # | + | #Free space for backups and templates - Informs you on the space available for you to do backups and store templates. Keep in mind that those are stored in a different machine than your Cloud Server which has the same amount of total disk space that your Cloud Server. |
| − | # | + | #Type of disk - It can be SAS (high performance), SATA o Solid State (SSD). |
| − | # | + | #Disk - Lets you know the disk ID (useful to distinguish between same type and size disks). |
| − | # | + | #Size - Shows you the disk size. |
| − | #* | + | #Type - It can be Primary, Swap, Secondary. |
| − | #* | + | #*Primary disks cannot be removed as they contain your Cloud Server Operating System. |
| − | # | + | #*Swap disks cannot be modified nor removed. |
| − | #Autobackup - | + | #Created - Shows you the creation date and time. |
| − | # | + | #Autobackup - Lets you know/set the auto-backup flag. When activated, adds your server to the free backup policy offered by Gigas. It does a weekly full backup starting from the moment the "Backup" button is pressed. You can find a list of available backups in next tab "Backup". |
| − | #Backup - | + | #Edit - Lets you modify the disk size (resize). Keep in mind that this process takes some time to be completed and produces a reboot. Maximum size disk is limited by the disk amount you have ordered in your product. |
| − | # | + | #Backup - Creates a disk backup. This option lets you do an on-demand backup of your disk. Keep in mind that a backup has an execution window so it is not instant. Once done, the new backup will replace old copies you might have (automatic or manual ones). |
| + | #Delete - Lets you remove a disk. Available on Secondary disks. | ||
[[Archivo:Cloud_admin10.jpg]] | [[Archivo:Cloud_admin10.jpg]] | ||
| − | ==''' | + | =='''Backup section'''== |
| − | + | Keep in mind that a backup has an execution window and is not instant. Once successfully done, it will replace old copies your might have (automatic or manual ones). | |
| − | # | + | #Free space for backups and templates - Informs you on the space available for you to do backups and store templates. Keep in mind that those are stored in a different machine than your Cloud Server which has the same amount of total disk space that your Cloud Server. |
| − | # | + | #Advanced backup - Lets you order Advanced Backup. |
| − | #Backups - | + | #Backups - Lets you know the available backups and operate with them. |
| − | # | + | #Created - Show you the backup creation date. |
| − | # | + | #Disk - Show you the disk ID the backup has been done from. |
| − | # | + | #Size - Lets you know the size of the backup. |
| − | # | + | #Type - Show you whether the backup has been launched manually or automatically. |
| − | # | + | #Restore - Les you restore a backup in the original disk. |
| − | # | + | #Convert to template - Lets you convert the backup into a template that you can use to easily deploy new machines or go back to the moment the backup was done. Backups that are converted to templates no longer remain as backups. |
| − | # | + | #Delete - Deletes the backup. |
| − | # | + | #Templates - Shows existing templates for all the Cloud Servers within the product (Cloud VPS or Cloud Datacenter). |
| − | # | + | #Created - Shows the date and time of conversion to template. |
| − | # | + | #Description - Shows you the description assigned to the template. |
| − | # | + | #Size - Shows the amount of disk space of the template. |
| − | # | + | #Create Cloud Server from this template - Lets you create a new Cloud Server from the template. |
| − | # | + | #Delete - Deletes the template. |
[[Archivo:Cloud_admin11.jpg]] | [[Archivo:Cloud_admin11.jpg]] | ||
| − | ==''' | + | =='''IPs section'''== |
| − | + | Lets you add or remove IPs according to the available resources in your pool. | |
| − | + | Keep in mind that changes are not applied until you press "Apply changes" button (10). | |
| − | + | Keep also in mind that Cloud Servers must have at least a public IP so they are reachable from the Internet. | |
| − | + | #Add new IP - Lets you contract additional IPs than the included in your resources pool. | |
| − | # | + | #IP address - Lets you know already assigned IPs. |
| − | # | + | #Subnet mask - Lets you know the network mask from the assigned IP. |
| − | # | + | #Gateway - Lets you know the gateway assigned to the IP. These last three data are useful to know just in case you want to manually configure your Cloud Server network. In case of a VLAN, gateway does not apply (-). |
| − | # | + | #Type - Lets you know the type of IP. It can be either Public or private (in which case the "Type" will not appear (-)). |
| − | # | + | #Port speed - Lets you know the maximum port speed of the port. In the case of VLANs, it does not apply (-). |
| − | # | + | #Remove - Lets you remove an IP address. Removes the asignment and releases the IP address. |
| − | # | + | #Assign public IP - lets you assign a public IP from your resources pool. |
| − | # | + | #Assign private IP - Lets you assign a private IP for VLAN. |
| − | # | + | #Apply changes - Applies the changes. This operation means a reboot of the Cloud Server(s). |
| − | # | + | |
[[Archivo:Cloud_admin16.jpg]] | [[Archivo:Cloud_admin16.jpg]] | ||
| − | ==''' | + | =='''Autoscale section'''== |
| − | === | + | ===General configuration tab=== |
| − | + | To create the balancing autoscaling it is necessary that you already have a template from which the server(s) will be deployed. If you do not have one, you can create one from within this section. | |
| − | # | + | #Choose a template - Lets you choose a template from which the server(s) will be deployed. |
| − | # | + | #Template creation - Lets you create a template, essential condition for balancing autoscale. |
| − | # | + | #Create template - Creates a tremplate. |
| − | # | + | #Balancing instance that will be autoscaled - Lets you choose among your balancers. |
| − | # | + | #Max number of servers to create - Lets you choose the number of servers that will be deployed from the template. |
[[Archivo:Cloud_admin12.jpg]] | [[Archivo:Cloud_admin12.jpg]] | ||
| − | === | + | ===Scheduled autoscaling=== |
| − | + | ||
| − | + | ||
| − | + | ||
| − | + | ||
| − | + | ||
| − | + | ||
| − | + | ||
| − | + | ||
| − | + | ||
| + | Scheduled autoscaling lets you set up scheduled autoscaling in a date and a time in the future and during a specific amount of time, according to a specific time zone. | ||
| + | #Start date - Lets you specify a date in the future to start the autoscaling. | ||
| + | #Start time - Lets you specify a time in the future to start the autoscaling. | ||
| + | #Duration (days) - Duration of until 29 days of scheduled autoscaling. | ||
| + | #Duration (hours) - Duration of until 23 hours of scheduled autoscaling. | ||
| + | #Time zone - Time zone realted to autoscaling start date and time. | ||
| + | #Add - Lets you set up a scheduled autoscaling according to specified data. | ||
[[Archivo:Cloud_admin13.jpg]] | [[Archivo:Cloud_admin13.jpg]] | ||
| − | === | + | ===By max number of sessions tab=== |
| − | + | Lets you set up autoscaling according to the number of sessions of a minimum duration and during a specific amount of time. | |
| − | # | + | #Number of sessions - Minimum number of sessions that will trigger the autoscaling. |
| − | # | + | #For more than - Minimum duration of session that will trigger the autoscaling. |
| − | # | + | #Duration - Duration of autoscaling fromm its start. |
| − | # | + | #Add - Adds the selected schedule. |
[[Archivo:Cloud_admin14.jpg]] | [[Archivo:Cloud_admin14.jpg]] | ||
| − | === | + | ===By CPU usage percentage tab=== |
| − | + | Lets you set up a scheduled autoscaling depending on a certain amount of CPU usage. | |
| − | # | + | #Usage percentage - Lets you specify the threshold that will trigger the balancing autoscaling. |
| − | # | + | #For more than - Lets you specify the amount of time the CPU has to be at least on the percentage aforeset percentage so the balancing autoscaling will take place. |
| − | # | + | #Duration - Lets you specify the time the balancing autoscaling will last. |
| − | # | + | #Add - Adds the balancing autoscaling schedule according to the specified data. |
[[Archivo:Cloud_admin15.jpg]] | [[Archivo:Cloud_admin15.jpg]] | ||
| + | |||
| + | {{Support}} | ||
| + | |||
| + | [[Categoría:Gigas_Cloud_VPS]] | ||
| + | [[Categoría:Control_Panel]] | ||
Revisión actual del 14:40 21 nov 2017
You will be able to perform basic administration operations on your cloud servers from Gigas Control Panel.
Contenido
General
- ON/OFF – These buttons allow you to boot up or force-close the server. The OFF button performs a shutdown on an electrical level, not stopping the services in execution at that time.
- Cloud Server Name - Shows you the name assigned to the Cloud Server.
- Ubication - Show you the ubication assigned to the Cloud Server.
- Operating System - Lets you check the Operating System template installed in your Cloud Server.
- Tags/Add - Lets you see/add the tags assigned to your Cloud Server.
- Reboot Cloud Server - Lets you do an ordered reboot of your server by stopping services before rebooting.
- Details - Lets you access a tab with additional information on sour Cloud Server.
Details tab
- Your cloud server´s Hardware Description – You will find the cloud server´s hardware setup in this window. This information reflects the total assigned hardware information (hard drive, memory, CPU and IP).
- OS - Lets you check the Operating System template installed in your Cloud Server.
- Root password (Show) - Lets you see superadmin password: root (Linux) or Administrator (Windows).
Cloud Server section
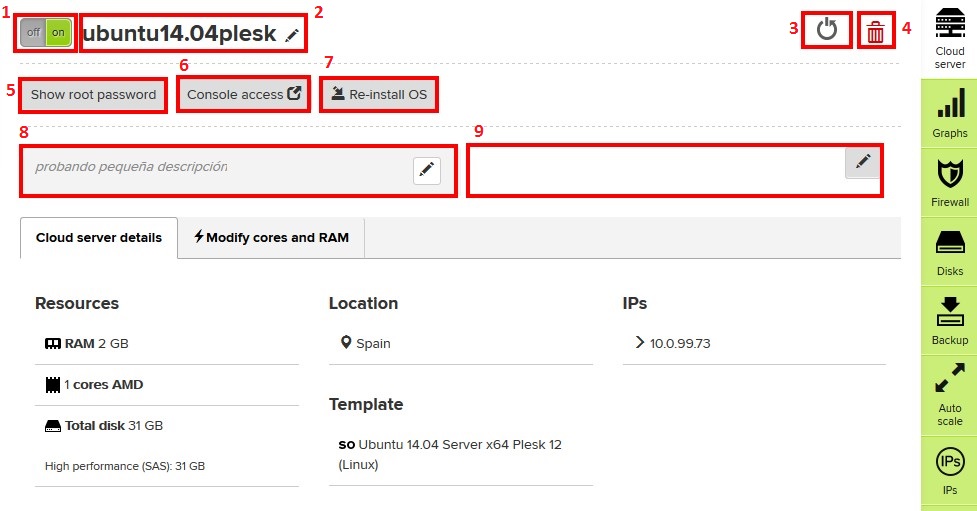
- ON/OFF – These buttons allow you to boot up or force-close the server. The OFF button performs a shutdown on an electrical level, not stopping the services in execution at that time.
- Cloud Server Name - Shows you the name assigned to the Cloud Server.
- Reboot Cloud Server - Lets you do an ordered reboot of your server by stopping services before rebooting.
- Delete Cloud Server - By using this option you will delete your Cloud Server and erase the resources assigned to it, so they will be unallocated and will return to your Cloud resources pool. Keep in mind that this option will erase all data on the Cloud Server.
- Show root password - Lets you see superadmin password: root (Linux) or Administrator (Windows).
- Console access - Lets you access your machines prompt. The prompt displays your Cloud Server information in real time, so you will be able to use it, for instance, to view your server boot-up process. To access the prompt, you need Java installed in your browser. Although Gigas prompt gives your immediate access to your cloud server, we recommend you use more customizable and flexible accesses such as Secure Shell (SSH) or Terminal Server.
- Re-install OS - Allows you to re-install your Cloud Server with the Operating System you pick from the available image list. Keep in mind that this option will erase all data contained in the Cloud Server.
- Add a short description to your Cloud Server - Lets you add a short description to your Cloud Server.
- Add a tag - Lets you manage the tags assigned to your Cloud Server.
Cloud Server details tab
- Resources – In this part you will find hardware configuration associated to your Cloud Server. The information shows the total assigned hardware data (Disk, Memory, CPU).
- Location - In this part you can check your Cloud Server location.
- Template - Lets you check the Operating System templated installed in your Cloud Server.
- IPs - Lets you see the IPs assigned to your Cloud Server.
Modify cores and RAM tab
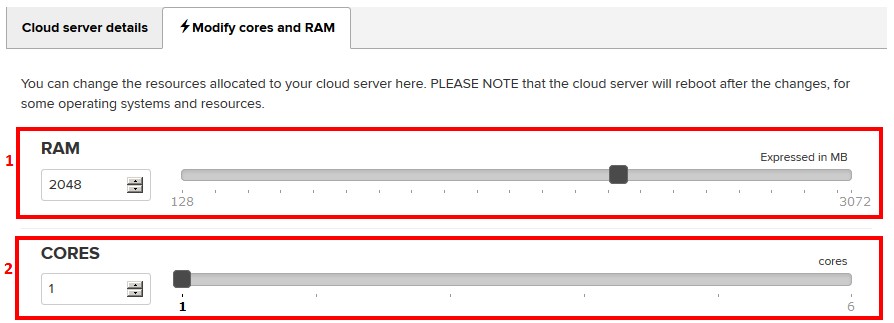
- RAM - Lets you increase or decrease the amount of RAM memory assigned to your Cloud Server.
- Cores - Lets you increase or decrease the number of cores assigned to your Cloud Server.
Graphs section
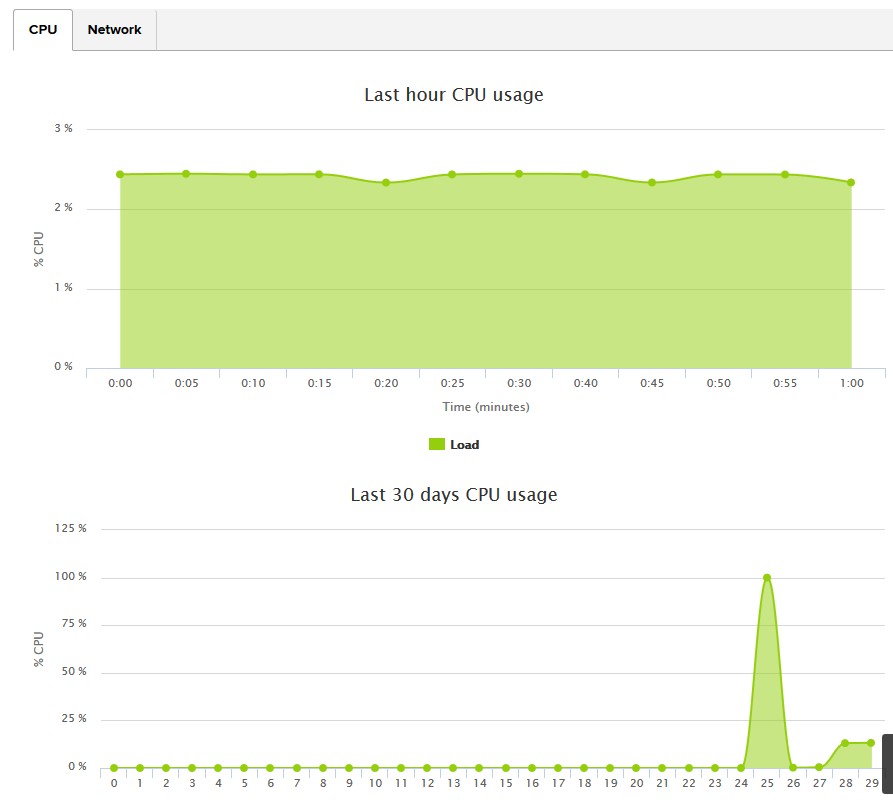
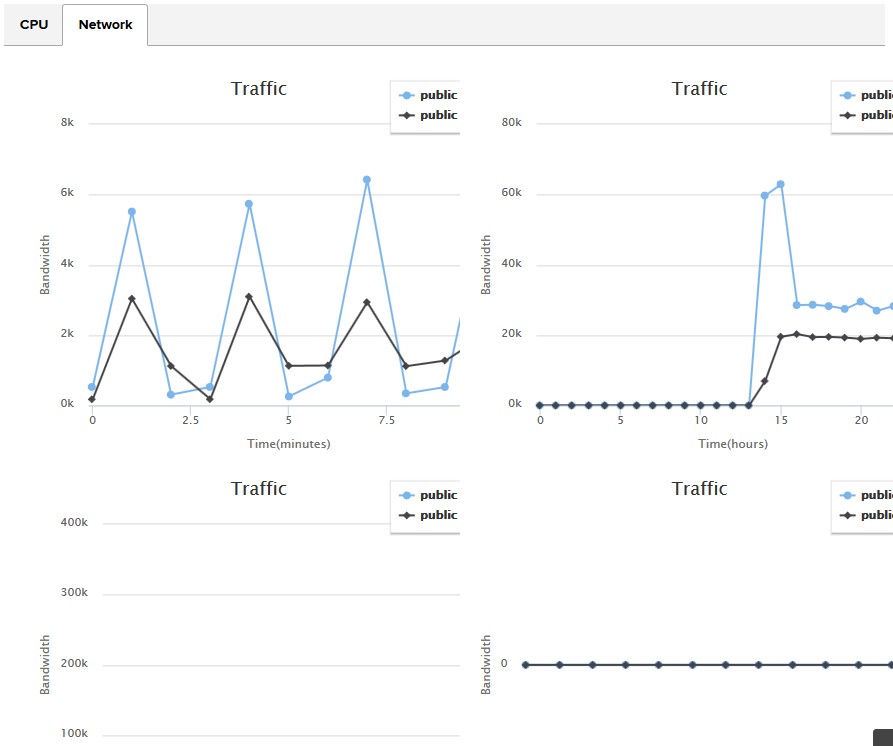
This section lets you see the CPU and Network usage graphs for your Cloud Server. Graphs are updated every hour and let you see a log of last 24 hours so you can check your Cloud Server usage and dimensioning.
CPU tab
Network tab
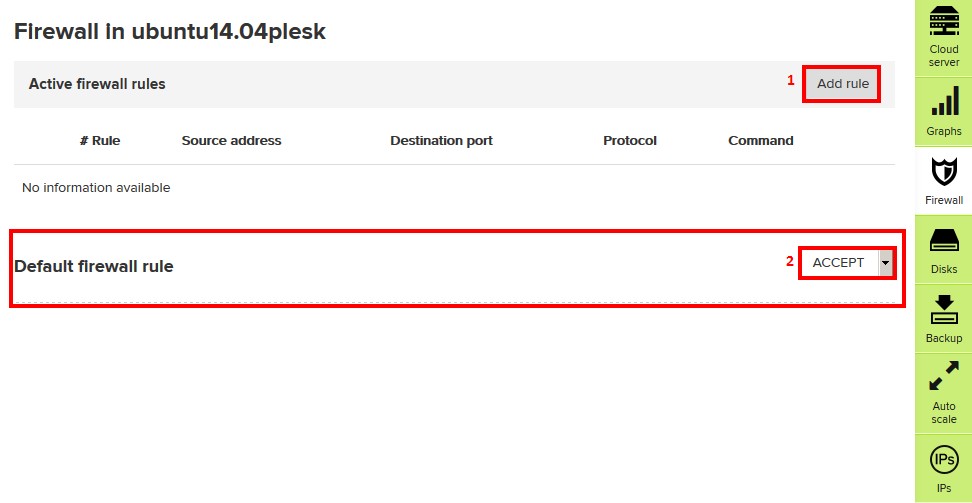
Firewall section
In this section you can:
- Add rules
- Configure the default behaviour
Disks section
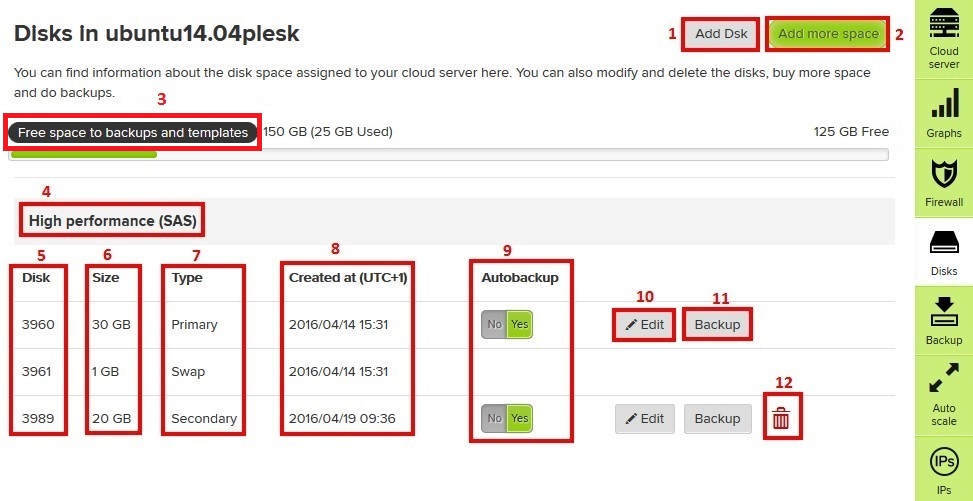
Provides the following options:
- Add Disk - Lets you add an additional disk in case you have unassigned space.
- Add more space - Lets you contract additional space that you can assign later.
- Free space for backups and templates - Informs you on the space available for you to do backups and store templates. Keep in mind that those are stored in a different machine than your Cloud Server which has the same amount of total disk space that your Cloud Server.
- Type of disk - It can be SAS (high performance), SATA o Solid State (SSD).
- Disk - Lets you know the disk ID (useful to distinguish between same type and size disks).
- Size - Shows you the disk size.
- Type - It can be Primary, Swap, Secondary.
- Primary disks cannot be removed as they contain your Cloud Server Operating System.
- Swap disks cannot be modified nor removed.
- Created - Shows you the creation date and time.
- Autobackup - Lets you know/set the auto-backup flag. When activated, adds your server to the free backup policy offered by Gigas. It does a weekly full backup starting from the moment the "Backup" button is pressed. You can find a list of available backups in next tab "Backup".
- Edit - Lets you modify the disk size (resize). Keep in mind that this process takes some time to be completed and produces a reboot. Maximum size disk is limited by the disk amount you have ordered in your product.
- Backup - Creates a disk backup. This option lets you do an on-demand backup of your disk. Keep in mind that a backup has an execution window so it is not instant. Once done, the new backup will replace old copies you might have (automatic or manual ones).
- Delete - Lets you remove a disk. Available on Secondary disks.
Backup section
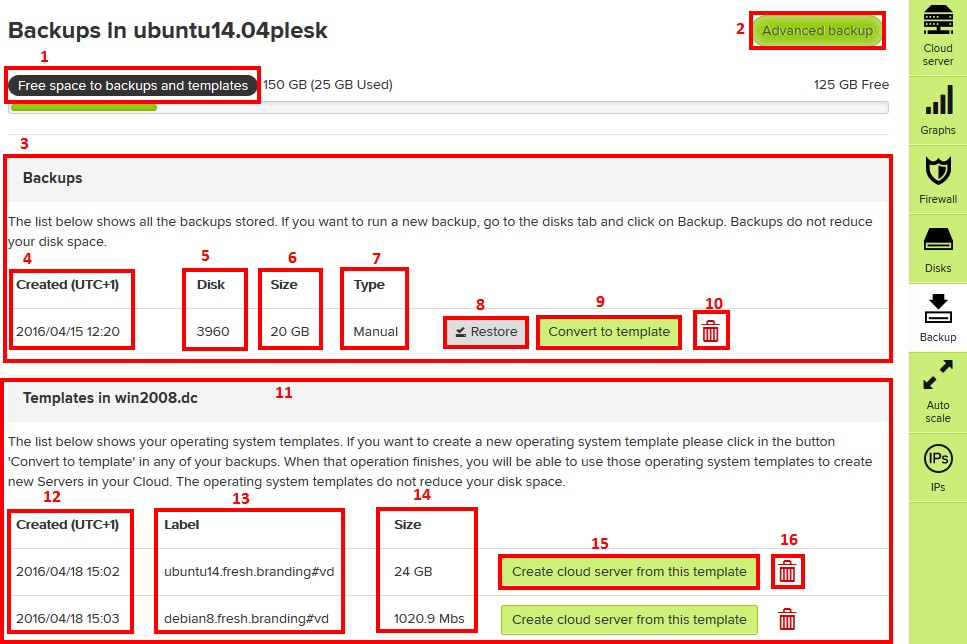
Keep in mind that a backup has an execution window and is not instant. Once successfully done, it will replace old copies your might have (automatic or manual ones).
- Free space for backups and templates - Informs you on the space available for you to do backups and store templates. Keep in mind that those are stored in a different machine than your Cloud Server which has the same amount of total disk space that your Cloud Server.
- Advanced backup - Lets you order Advanced Backup.
- Backups - Lets you know the available backups and operate with them.
- Created - Show you the backup creation date.
- Disk - Show you the disk ID the backup has been done from.
- Size - Lets you know the size of the backup.
- Type - Show you whether the backup has been launched manually or automatically.
- Restore - Les you restore a backup in the original disk.
- Convert to template - Lets you convert the backup into a template that you can use to easily deploy new machines or go back to the moment the backup was done. Backups that are converted to templates no longer remain as backups.
- Delete - Deletes the backup.
- Templates - Shows existing templates for all the Cloud Servers within the product (Cloud VPS or Cloud Datacenter).
- Created - Shows the date and time of conversion to template.
- Description - Shows you the description assigned to the template.
- Size - Shows the amount of disk space of the template.
- Create Cloud Server from this template - Lets you create a new Cloud Server from the template.
- Delete - Deletes the template.
IPs section
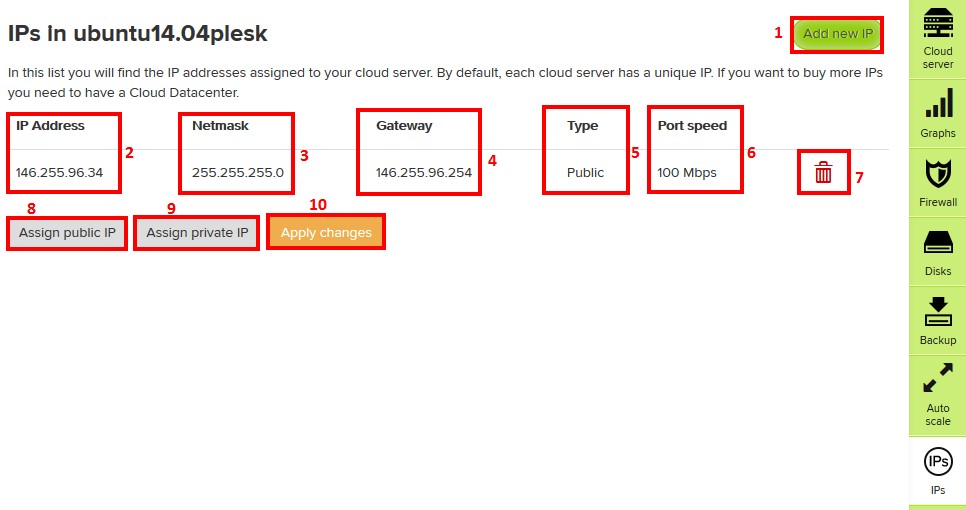
Lets you add or remove IPs according to the available resources in your pool. Keep in mind that changes are not applied until you press "Apply changes" button (10). Keep also in mind that Cloud Servers must have at least a public IP so they are reachable from the Internet.
- Add new IP - Lets you contract additional IPs than the included in your resources pool.
- IP address - Lets you know already assigned IPs.
- Subnet mask - Lets you know the network mask from the assigned IP.
- Gateway - Lets you know the gateway assigned to the IP. These last three data are useful to know just in case you want to manually configure your Cloud Server network. In case of a VLAN, gateway does not apply (-).
- Type - Lets you know the type of IP. It can be either Public or private (in which case the "Type" will not appear (-)).
- Port speed - Lets you know the maximum port speed of the port. In the case of VLANs, it does not apply (-).
- Remove - Lets you remove an IP address. Removes the asignment and releases the IP address.
- Assign public IP - lets you assign a public IP from your resources pool.
- Assign private IP - Lets you assign a private IP for VLAN.
- Apply changes - Applies the changes. This operation means a reboot of the Cloud Server(s).
Autoscale section
General configuration tab
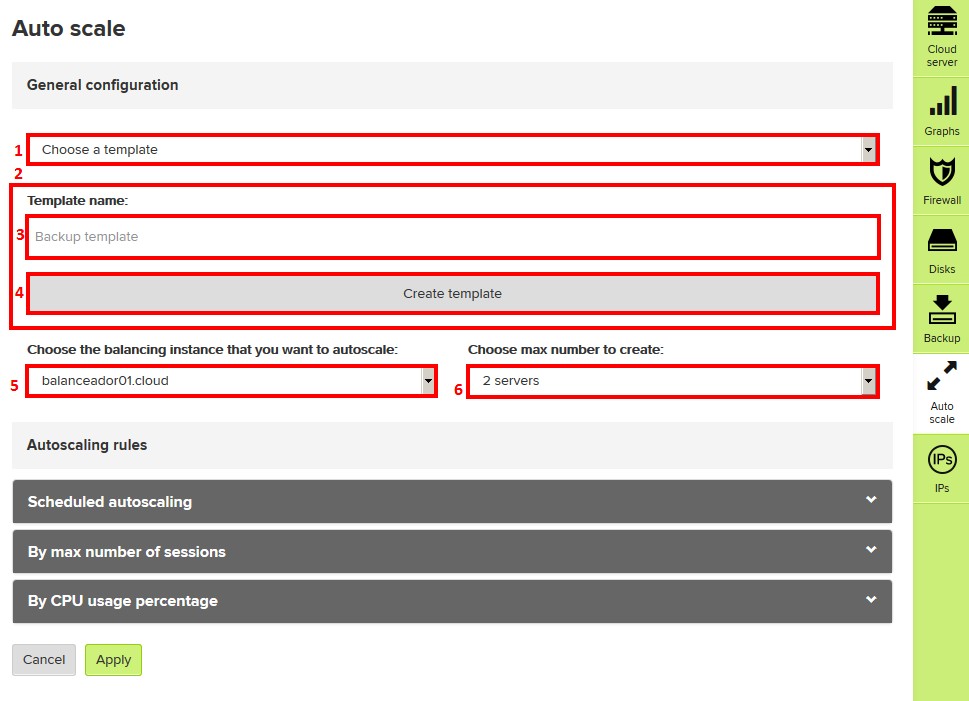
To create the balancing autoscaling it is necessary that you already have a template from which the server(s) will be deployed. If you do not have one, you can create one from within this section.
- Choose a template - Lets you choose a template from which the server(s) will be deployed.
- Template creation - Lets you create a template, essential condition for balancing autoscale.
- Create template - Creates a tremplate.
- Balancing instance that will be autoscaled - Lets you choose among your balancers.
- Max number of servers to create - Lets you choose the number of servers that will be deployed from the template.
Scheduled autoscaling
Scheduled autoscaling lets you set up scheduled autoscaling in a date and a time in the future and during a specific amount of time, according to a specific time zone.
- Start date - Lets you specify a date in the future to start the autoscaling.
- Start time - Lets you specify a time in the future to start the autoscaling.
- Duration (days) - Duration of until 29 days of scheduled autoscaling.
- Duration (hours) - Duration of until 23 hours of scheduled autoscaling.
- Time zone - Time zone realted to autoscaling start date and time.
- Add - Lets you set up a scheduled autoscaling according to specified data.
By max number of sessions tab
Lets you set up autoscaling according to the number of sessions of a minimum duration and during a specific amount of time.
- Number of sessions - Minimum number of sessions that will trigger the autoscaling.
- For more than - Minimum duration of session that will trigger the autoscaling.
- Duration - Duration of autoscaling fromm its start.
- Add - Adds the selected schedule.
By CPU usage percentage tab
Lets you set up a scheduled autoscaling depending on a certain amount of CPU usage.
- Usage percentage - Lets you specify the threshold that will trigger the balancing autoscaling.
- For more than - Lets you specify the amount of time the CPU has to be at least on the percentage aforeset percentage so the balancing autoscaling will take place.
- Duration - Lets you specify the time the balancing autoscaling will last.
- Add - Adds the balancing autoscaling schedule according to the specified data.

