Diferencia entre revisiones de «Import Templates»
| Línea 33: | Línea 33: | ||
<p>'''- vhd'''</p> | <p>'''- vhd'''</p> | ||
| − | <p> | + | <p>To import templates to Gigas, just “drag” the template from your PC or laptop to the form in the |
| − | + | Control Panel; the template will begin to download automatically. | |
| + | </p> | ||
| − | <p> | + | <p>If your internet connection is interrupted, don’t worry; you can use the upload form again and |
| − | + | resume uploading the template from the moment the connection was interrupted.</p> | |
<p>'''Gigas takes no responsibility of the origin nor the usage of the custom operative systems of the clients, so we won't be able to offer support beyond recommending the re-installing of the OS with the ISO that was created with, keeping in mind that the client can always use any OS template that Gigas has available for their clients.'''</p> | <p>'''Gigas takes no responsibility of the origin nor the usage of the custom operative systems of the clients, so we won't be able to offer support beyond recommending the re-installing of the OS with the ISO that was created with, keeping in mind that the client can always use any OS template that Gigas has available for their clients.'''</p> | ||
| Línea 43: | Línea 44: | ||
| − | ''' 2. | + | ''' 2. A new section of the Panel – Templates and ISOs''' |
| − | <p> | + | <p>Gigas’ Control Panel has a new option for managing templates as well as ISO CD templates |
| − | + | from virtual machines.</p> | |
| − | <p> | + | <p>This option is on the left-hand menu of the Panel.</p> |
[[Archivo:Importacion_templates1.png]] | [[Archivo:Importacion_templates1.png]] | ||
| − | <p> | + | <p>Via this new section you can remove, add, and modify operating system templates or CD |
| − | + | templates.</p> | |
| − | <p> | + | <p>You can also download these templates and ISOs to have them on your PC or laptop again. |
| − | + | Remember that you can only download templates that have been previously uploaded to the | |
| − | + | system.</p> | |
| − | ''' 3. | + | ''' 3. Uploading templates ''' |
| − | <p> | + | <p>To upload a new template to Gigas, just click on the “Upload a new Template” button in the |
| − | + | Templates and ISO Panel.</p> | |
| − | <p> | + | <p>The following window will open</p> |
[[Archivo:Importacion_templates2.png]] | [[Archivo:Importacion_templates2.png]] | ||
| − | <p> | + | <p>Look in your PC or laptop for the file with the template of the Virtual Server or hard disk that |
| − | + | you want to upload, then use the left mouse button to drag the template to the “Drag and drop | |
| − | + | a file” box. </p> | |
| − | <p> | + | <p>You can also look for the file on your local hard drive by clicking on the “Select from your |
| − | + | computer” button; this will link the template with one of your Cloud Datacenters at Gigas as it | |
| − | + | may be in different geographical locations within our Cloud.</p> | |
| − | <p> | + | <p>If your connection was interrupted while uploading the template and the action was not |
| − | + | completed, the upload progress of that template will appear in the upload form as it detects | |
| − | + | that the upload of the file had already begun. The template will start to upload from the moment | |
| − | + | it was interrupted.</p> | |
| − | <p> | + | <p>After clicking on the “Upload” button, the upload process will begin immediately.</p> |
[[Archivo:Importacion_templates3.png]] | [[Archivo:Importacion_templates3.png]] | ||
| − | <p> | + | <p>When it has finished, the new template will appear on the Templates list on the Panel; you |
| − | + | can now select it and connect to a virtual server just as if it was a CD.</p> | |
| − | <p> | + | <p>The space taken up by this template is added to the backup space of your Cloud Datacenter |
| − | Datacenter.</p> | + | product.</p> |
| − | <p> | + | <p>It will take a few minutes before the template is available. This is due to the conversions and |
| − | + | checks that are made to your template to convert it to RAW format.</p> | |
[[Archivo:Importacion_templates4.png]] | [[Archivo:Importacion_templates4.png]] | ||
| − | ''' 4. | + | ''' 4. Importing templates via HTTP |
| + | ''' | ||
| − | <p> | + | <p>You can also notify us as to where your URL template is located and we will take care of |
| − | + | downloading, checking, converting, and making it available to you on the Panel.</p> | |
| − | <p> | + | <p>To do this we use a specific form to upload a template from a URL. We accept the</p> |
| − | <p> | + | <p>following URLs: HTTP, HTTPS and FTP. Ports 80, 443 and 20-21.1</p> |
| − | <p> | + | <p>If you use HTTPS, we recommend that you verify the certificates beforehand as if there is an |
| − | + | error the template will not download.</p> | |
[[Archivo:Importacion_templates5.png]] | [[Archivo:Importacion_templates5.png]] | ||
| − | ''' 5. | + | ''' 5. Restoring a template to a disk''' |
| − | <p> | + | <p>In addition to creating new full Cloud Servers, we now offer the option of restoring a template |
| − | + | to a secondary hard disk on your server.</p> | |
| − | <p> | + | <p>This is done using the restoration form, found in the Templates and ISO section.</p> |
[[Archivo:Importacion_templates6.png]] | [[Archivo:Importacion_templates6.png]] | ||
| − | <p> | + | <p>It is also possible to restore a backup directly to a server’s hard disk.</p> |
| − | ''' 6. | + | ''' 6. Creating a Cloud Server from a template''' |
| − | <p> | + | <p>To create a new Virtual Server from one of your Templates, just click on the “Create New Server” |
| − | + | button and a drop-down menu will appear with the templates you have imported to Gigas in the | |
| − | + | “My Templates” section.</p> | |
[[Archivo:Importacion_templates7.png]] | [[Archivo:Importacion_templates7.png]] | ||
| − | <p> | + | <p>'''IMPORTANT: When installing your template server that is different from those officially offered |
| − | + | by GIGAS, some of the control panel options may not work, or may be directly disabled.'''</p> | |
| − | + | ||
| − | ''' 7. | + | ''' 7. Creating a template from a Cloud Server''' |
| − | <p> | + | <p>To create a template from an existing Cloud Server, follow these steps:</p> |
| − | * | + | * Create a backup of the hard disk of the server that you want to convert to a template |
| − | * | + | * In the Backups section of that Cloud Server, click on the “Convert to Template” option. |
| − | <p> | + | <p>This new template will be available for installing Cloud Servers from that moment onwards.</p> |
| − | + | ||
| − | 8. | + | 8. How to export templates from VMware Servers to Gigas’ |
| − | + | new template upload system | |
| − | |||
| − | |||
| − | |||
| − | <p> | + | <p>Keep in mind that with GIGAS each server can have several hard disks so each template uploaded |
| − | + | to Gigas must contain a single hard disk which can then be used to build servers.</p> | |
| − | <p> | + | <p>Here is a quick guide to exporting hard disks from a Windows 2003/2008 or Linux server to a |
| − | + | valid Gigas template.</p> | |
| − | + | ||
| − | + | <p>(Remember: Although Microsoft is no longer supported by Windows 2003 servers, we have | |
| + | included it in this quick guide for reasons of compatibility as many users still have applications | ||
| + | that use this version of the operating system.)</p> | ||
| − | <p>1. | + | ''' GUIDE FOR EXPORTING TEMPLATES ''' |
| − | <p>2. | + | |
| + | <p>1. Uninstall VMWare Tools /both for Windows as well as Linux).</p> | ||
| + | <p>2. In the case of Windows 2003, apply this patch | ||
http://download.qnap.com/Storage/Others/Virtualization_Station/MergeIDE.zip</p> | http://download.qnap.com/Storage/Others/Virtualization_Station/MergeIDE.zip</p> | ||
| − | <p>3. | + | <p>3. Enable SSH access on the VMware ESX where the VM you want to export resides</p> |
| − | + | <p>4. Clone the disks that you want to export to Gigas.</p> | |
| − | <p>4. | + | <p>5. Execute:</p> |
| − | <p>5. | + | |
<p>vmkfstools –clonevirtualdisk SERVERNAME.vmdk –diskformat SERVERNAMEgigas.vmdk</p> | <p>vmkfstools –clonevirtualdisk SERVERNAME.vmdk –diskformat SERVERNAMEgigas.vmdk</p> | ||
| − | <p>6. | + | <p>6. Repeat the same step for each of the server’s hard disks.</p> |
| − | <p> | + | <p>The hard disks are now ready to be uploaded to Gigas’ template import form.</p> |
| − | + | ||
Revisión actual del 19:58 16 mar 2017
TEMPLATES FROM VIRTUAL MACHINES
1. Introduction
This handbook shows you how to manage operating system templates in the Gigas Cloud Datacenter:
- Import Servers to your Cloud Datacenter.
- Create templates from existing servers or backups.
With Gigas, you can create your server from a varied selection of available Operating Systems that have been checked by the Gigas Technical Team so that they are compatible with your Cloud Datacenter. It is also possible to install a CD reader on your Cloud Server and install an operating system from scratch starting from an ISO template.
This new feature allows all our users to upload entire templates from hard disks or virtual servers to Gigas and create new Gigas Cloud Servers starting from scratch from these templates.
IMPORTANT:
When installing your template server that is different from those officially offered by GIGAS, some of the control panel options may not work, or may be directly disabled.
On the other hand, Mac and Solaris are NOT SUPPORTED. The images must have format:
- raw
- qcow
- qcow2
- ova
- vmdk
- vhd
To import templates to Gigas, just “drag” the template from your PC or laptop to the form in the Control Panel; the template will begin to download automatically.
If your internet connection is interrupted, don’t worry; you can use the upload form again and resume uploading the template from the moment the connection was interrupted.
Gigas takes no responsibility of the origin nor the usage of the custom operative systems of the clients, so we won't be able to offer support beyond recommending the re-installing of the OS with the ISO that was created with, keeping in mind that the client can always use any OS template that Gigas has available for their clients.
2. A new section of the Panel – Templates and ISOs
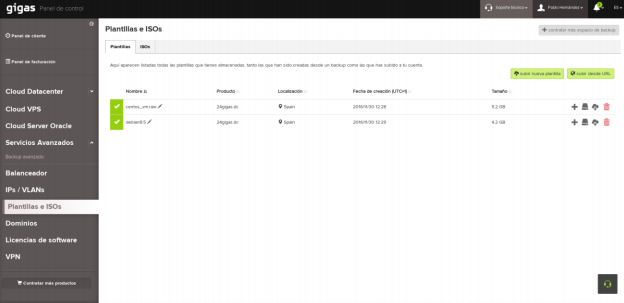
Gigas’ Control Panel has a new option for managing templates as well as ISO CD templates from virtual machines.
This option is on the left-hand menu of the Panel.
Via this new section you can remove, add, and modify operating system templates or CD templates.
You can also download these templates and ISOs to have them on your PC or laptop again. Remember that you can only download templates that have been previously uploaded to the system.
3. Uploading templates
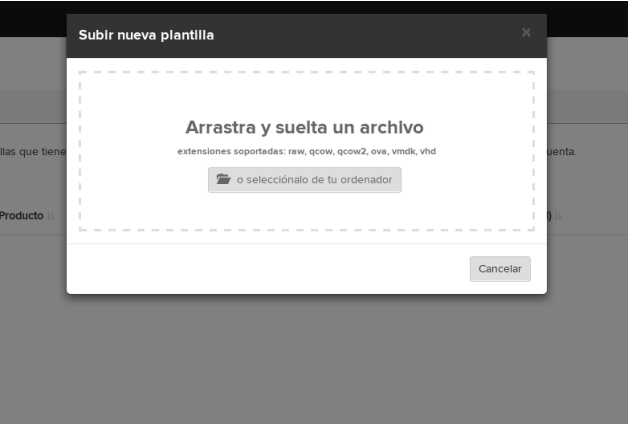
To upload a new template to Gigas, just click on the “Upload a new Template” button in the Templates and ISO Panel.
The following window will open
Look in your PC or laptop for the file with the template of the Virtual Server or hard disk that you want to upload, then use the left mouse button to drag the template to the “Drag and drop a file” box.
You can also look for the file on your local hard drive by clicking on the “Select from your computer” button; this will link the template with one of your Cloud Datacenters at Gigas as it may be in different geographical locations within our Cloud.
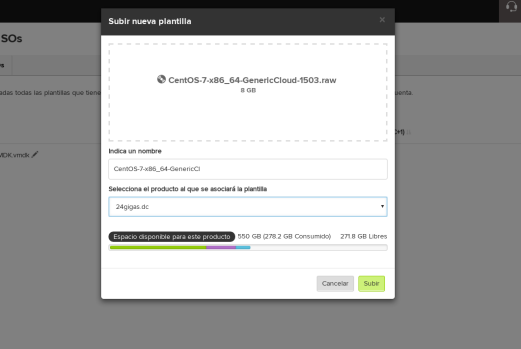
If your connection was interrupted while uploading the template and the action was not completed, the upload progress of that template will appear in the upload form as it detects that the upload of the file had already begun. The template will start to upload from the moment it was interrupted.
After clicking on the “Upload” button, the upload process will begin immediately.
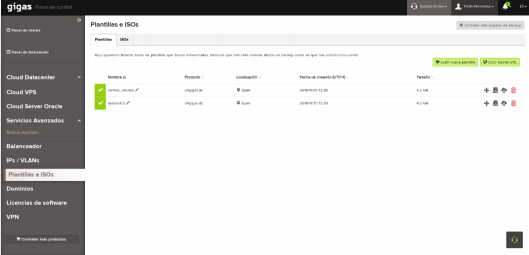
When it has finished, the new template will appear on the Templates list on the Panel; you can now select it and connect to a virtual server just as if it was a CD.
The space taken up by this template is added to the backup space of your Cloud Datacenter product.
It will take a few minutes before the template is available. This is due to the conversions and checks that are made to your template to convert it to RAW format.
4. Importing templates via HTTP
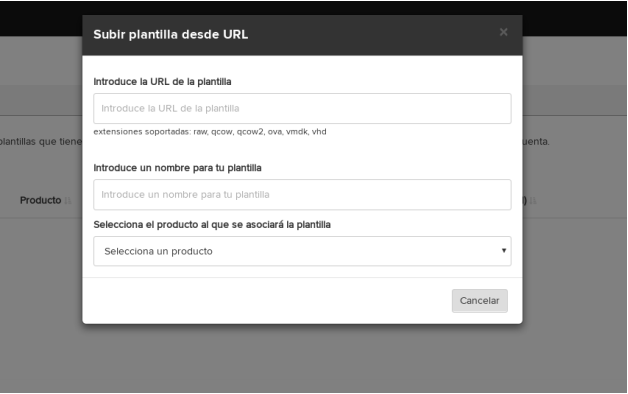
You can also notify us as to where your URL template is located and we will take care of downloading, checking, converting, and making it available to you on the Panel.
To do this we use a specific form to upload a template from a URL. We accept the
following URLs: HTTP, HTTPS and FTP. Ports 80, 443 and 20-21.1
If you use HTTPS, we recommend that you verify the certificates beforehand as if there is an error the template will not download.
5. Restoring a template to a disk
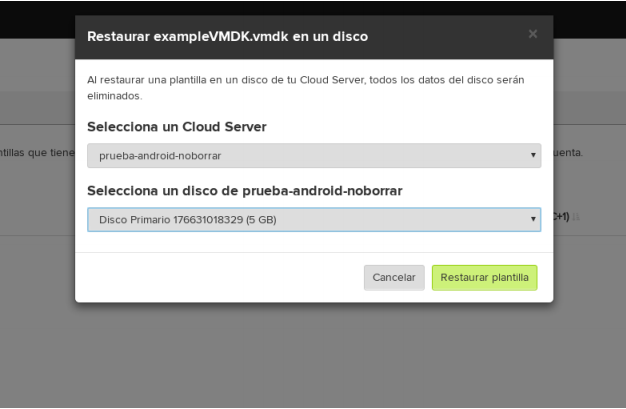
In addition to creating new full Cloud Servers, we now offer the option of restoring a template to a secondary hard disk on your server.
This is done using the restoration form, found in the Templates and ISO section.
It is also possible to restore a backup directly to a server’s hard disk.
6. Creating a Cloud Server from a template
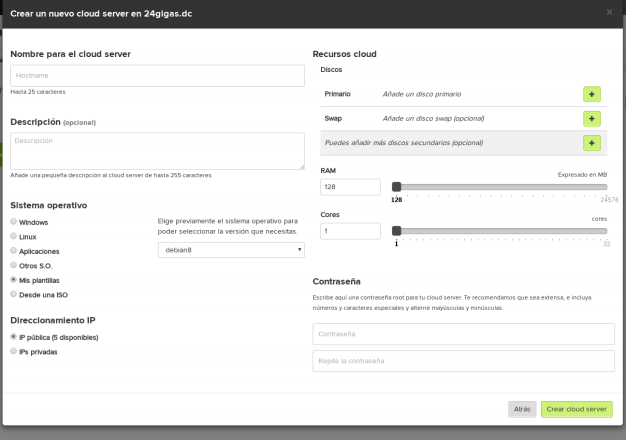
To create a new Virtual Server from one of your Templates, just click on the “Create New Server” button and a drop-down menu will appear with the templates you have imported to Gigas in the “My Templates” section.
IMPORTANT: When installing your template server that is different from those officially offered by GIGAS, some of the control panel options may not work, or may be directly disabled.
7. Creating a template from a Cloud Server
To create a template from an existing Cloud Server, follow these steps:
- Create a backup of the hard disk of the server that you want to convert to a template
- In the Backups section of that Cloud Server, click on the “Convert to Template” option.
This new template will be available for installing Cloud Servers from that moment onwards.
8. How to export templates from VMware Servers to Gigas’ new template upload system
Keep in mind that with GIGAS each server can have several hard disks so each template uploaded to Gigas must contain a single hard disk which can then be used to build servers.
Here is a quick guide to exporting hard disks from a Windows 2003/2008 or Linux server to a valid Gigas template.
(Remember: Although Microsoft is no longer supported by Windows 2003 servers, we have included it in this quick guide for reasons of compatibility as many users still have applications that use this version of the operating system.)
GUIDE FOR EXPORTING TEMPLATES
1. Uninstall VMWare Tools /both for Windows as well as Linux).
2. In the case of Windows 2003, apply this patch http://download.qnap.com/Storage/Others/Virtualization_Station/MergeIDE.zip
3. Enable SSH access on the VMware ESX where the VM you want to export resides
4. Clone the disks that you want to export to Gigas.
5. Execute:
vmkfstools –clonevirtualdisk SERVERNAME.vmdk –diskformat SERVERNAMEgigas.vmdk
6. Repeat the same step for each of the server’s hard disks.
The hard disks are now ready to be uploaded to Gigas’ template import form.
